Pages

Friday, December 18, 2020

ESP32 Starterkit

For an index to all my stories click this text

ESP32 Starterkit met alle onderdelen verkrijgbaar !!! Scroll omlaag voor de uitleg.

Christmass is coming up and that is the time for presents.
If you are looking for a present for a loved one, friend, or family member that wants to start with Home automation, electronics or the ESP chips in general consider my book on the ESP32 which has all ingredients to get someone starting. 

For a full list of chapters look here:
http://lucstechblog.blogspot.com/2020/06/esp32-simplified-my-book-in-english-now.html

For an international list of resellers look here:
http://lucstechblog.blogspot.com/2020/10/esp32-simplified-world-wide-available.html

Next week is Christmass and the week after is New Year so this was the last posting of this year.

Have a Merry Christmass and a Happy New Year.
Lets hope it will be a lot better then this one.
Stay Safe !!!

Luc Volders


ESP32 Starterkit

Het is bijna Kerstmis en tijd voor cadeautjes.

Als je iemand in de familie of vriendenkring hebt die geinterresseerd is in electronica, huisautomatisering of de ESP32 chip in zijn algemeenheid dan is er nu het ideale Kerstcadeau.

De firma Otronic https://www.otronic.nl/ heeft een complete starterskit beschikbaar voor de ESP32.

Naast De ESP32 zelf worden alle onderdelen bijgeleverd zoals breadboard, jumper kabels, weerstanden, leds en sensors zoals ze in mijn boek staan beschreven. En uiteraard is mijn boek in het Nederlands ook bijgeleverd. De kit heet niet voor niets: ESP32 Starterkit Luc Volders editie !

Hier is de lijst met alle bijgeleverde onderdelen:

1x    Boek ESP32 Uitgelegd 365 pagina's van Luc Volders
1x    ESP32 Development Board
2x    Breadboard 400 gaats
100x    Weerstanden diverse waardes
50x    Transparante LEDs in 10 kleuren
10x    Dupont Jumper kabel 20cm M/M
10x    Duppnt Jumper kabel 20cm M/F
1x    Dallas DS18B20 thermometer
2x    LDR
1x    SG90 Servo motor
1x    TIP120 Power Transistor
1x    UBS Breadboard power supply
1x    Relais 5v
2x    DC Motor 5v
2x    470µF Condensator
1x    8 Leds RGB WS2812 strip
1x    L293D motor driver chip
1x    PIR sensor 5v
1x    RCWL-0516 magnetron radar sensor
1x    SW-18010P trilsensor
1x    SW-520D tilt sensor
1x    Display TM1637 4-digits rood
1x    Mini OLED dispay 0,96 inch I2C 128x64
1x    Schuifweerstand
1x    Micro USB kabeltje
1x    5V - 3A adapter

Kortom compleet om direct met mijn boek aan de slag te gaan en de projecten en voorbeelden die er in staan te realiseren en natuurlijk zelf te gaan experimenteren.

Een fantastisch initiatief waar ik natuurlijk erg trots op ben.

De kit is te koop bij Otronic die overigens nog veel meer sensors en onderdelen beschikbaar heeft: https://www.otronic.nl/

Natuurlijk is het boek ook los te koop bij Otronic, Boekenbestellen, Kiwi Electronics, je favoriete lokale boekhandel of Bol.

Volgende week is Kerst, en de week erna Nieuwjaar dus dit is de laatste post van dit jaar.

Fijne Kerst en Gelukkig Nieuwjaar.
En laten we ervoor zorgen dat het nieuwe jaar beter wordt dan dit jaar.
Blijf Gezond !!!

Luc Volders

Friday, December 11, 2020

ESP32 Wifi-Analogread problem

 For an index to all my stories click this text

I was experiencing a strange error. And I could not find what I was doing wrong.

Short situation sketch.

I had an LDR attached with a 10K pull-down resistor to a pin of my ESP32 and I was going to send the sensors data over Wifi.

However the analog reading just gave 4095 all the time. So I presumed a faulty LDR. I exchanged it to a new one but no avail. I checked the connections over and over and still no result. The output of the ESP kept telling me the measured value was 4095.

Well then there could be only one conclusion. The analog input pin of the ESP32 should be defective. So I attached the LDR to another pin and presto: immediate result.

But something was nagging me. I had used that pin all the time when I was writing my book. So why would it suddenly be faulty. Therefore I started testeing other analog input pins and guess what:  some where working OK others were dead.

Wifi and Analog read do not mix on all pins !!!

Then I started digging in the technical literature and on the internet and then I found it. The ESP32 has two ADC converters ADC1 with 8 channels that are connected to GPIO 32 till 39 and ADC2 which has 10 channels. The problem is that ADC2 is used to manage wifi functions. So if you use Wifi you can not use ADC2 !!!

So the bottom line is: if you are using Wifi you can only use GPIO32 till GPIO39.

My Doit Dev Kit has not all of these pins exposed so I can only use GPIO32, GPIO33, GPIO34, GPIO35, GPIO36 and GPIO38. And testing revealed that these indeed worked as they should.


Above is a pin layout of the ESP32 Doit Devkit board with the Analog input pins exposed. You can use all these pins when you are not using wifi.

If you need Analog pins and Wifi only use the next pins:

pin D33 ADC5  GPIO33 OK
pin D32 ADC4  GPIO32 OK
pin D35 ADC7  GPIO35 OK
Pin D34 ADC6  GPIO34 OK
pin D39 ADC3  GPIO39 OK
pin D36 ADC0  GPIO36 OK

It is annoying but in the end I was just pleased that my ESP32 was not broken.

Till next time
Have fun

Luc Volders

Friday, December 4, 2020

SVG to STL

For an index to all my stories click this text.

Sometimes you need/want to print something easy. A 2D design which you want to use as a keychain or an anchor you want to transfer to a coat hanger.

There are two examples on this weblog. I made a location sign which you can find here:
http://lucstechblog.blogspot.com/2019/04/always-knowing-where-you-are.html

And I took a 2D design and altered into a coat hanger. You can find that story here.

To make a 3D print from a 2D design you need to do 2 important steps. Most pictures are in JPG format so you need to trasform that to an STL file.

The way I was normally doing that was by first transferring the JPG to an SVG file with convertio: https://convertio.co/nl/jpg-svg/

The next step was to convert the SVG file to an STL file using Tinkercad.
This works just fine and in Tinkercad you can adjust the size of the object before you convert it to STL.
The drawback is that you need an account for Tinkercad and that the process is slow (logging in, opening a new projact, loading the SVG).

So I did a quick search in Google and found an online SVG to STL converter. You can find it here: http://svg2stl.com/

SVG to STL

The website is simple and does what it needs to do.


Start with uploading an SVG file.


I tried uploading a JPG file. It was accepted however there were many artifacts shown. So that does not work.


An SVG file came out very well. So I converted it to an STL file.


It looked ok on the screen.


You can turn it in any direction you like for inspection just like the most STL viewers let you. After inspection just download it.


And here is the downloaded file in my slicer. And yes: for quick and dirty work I am using the creality slicer which is an old version of Cura but works just fine for most of my prints.

The slicer allows me to adjust the X, Y and Z dimension of anly loaded model so what I previous did in Tinkercad I can do now quicker.

JPG to STL direct ??

There are some websites that allow direct conversion from JPG to STL. I tried several of these and never got a good result. There is however another option to achieve this. That is for another upcoming story.

Till next time
have fun,


Luc Volders


Saturday, November 28, 2020

Creating a file with no extension in Windows

 For an index to all my stories click this text

This is just a short tip for those of you who are installing the Raspberry operating system on a PC.

I am using several Raspberry Pi's in my home for different purposes. Here is my list of Raspberries that are used in my home at this moment:
- Pi 3 as a Media player
- Pi 2 as a Printer server
- Pi 3B with Octoprint for controlling my 3D printer
- Domoticz for my home automation
- Pi Zero as Internet Radio

So all in all a bunch and I am adding more. My next one is going to be a NAS as I still have some old drives lying around.

To install a new Rapsberry I download the latest Raspbian from the Raspberry website and put it on an SD card with Etcher. Nothing special until now.

SSH

The Raspberry has the capability to work headless. This means that you do not need a monitor, keyboard and mouse. You can run the Raspberry over SSH with a terminal program on your PC. I use Putty for that.


Above you can see how such a session works.

In raspi-config you can activate SSH but how are you going to start raspi-config if your Raspberry-Pi starts headless. Well you can activate SSH by putting an empty file with the name ssh in the boot folder of the SSD card.

So after writing the SD card with Etcher on my PC I open the SD card and write a file with the name SSH on it.

But there is a small problem. You need to make that empty file yourself. The file may not have an extension. And that is a bit of a problem in Windows. I struggled some time with how to do that, so here is the trick.

Open the SD directory and right-click the mouse.


Now you can make a new file. But wait, each of the options will make a file with an extension. If you make a new text file for instance the name will be ssh.txt and that is not what we want. We want NO extension.

If you make the file ssh.txt you can ask the info for it but can not remove the extension. And when there is an extension it will not activate SSH in the Raspberry.

How to make an empty file without an extension.

This is the way to do it.


Open notepad on your PC
Now you have an empty document.

Chose Save As.


Put the name of the file in as follows:

"ssh"

So put quotes around the filename. As type choose ALL and not text. And then save it into the SD's 


Now the empty file will be saved and without an extension, just like we needed.

It took me a while to find this trick. So I hope it is usefull for you to.

Till next time

Luc Volders

Friday, November 13, 2020

Sending data from ESP8266 to Domoticz part III

For a complete index to all my stories click this text

This is the third installment about using the ESP8266 as a means for sending data to Domoticz.
The first story showed how to switch a light on and off by sending commands from the ESP8266 to Domoticz. Re-read that story here: http://lucstechblog.blogspot.com/2020/01/sending-data-from-esp-to-domoticz.html
The second story showed you how to connect a Dallas DS18B20 thermometer to an ESP8266 and send the data to Domoticz. Re-read that story here: http://lucstechblog.blogspot.com/2020/01/sending-data-from-esp-to-domoticz-part.html

This last story (for now) shows you how to build a web-page in the ESP8266 that incorporates two buttons to send commands to Domoticz setting a light ON or OFF and displays the temperature of the Dallas DS18B20 on the webpage and automatically sends the temperature to Domoticz every 5 minutes. So this story combines both previous stories and presents the data on a nice web-page.

Setup

For combining the functions of the previous stories I presume that you have read those stories and setup the hardware on the breadboard and setup a thermometer in Domoticz like shown in those stories. If not please read them first.
Part 1: http://lucstechblog.blogspot.com/2020/01/sending-data-from-esp-to-domoticz.html
Part 2: http://lucstechblog.blogspot.com/2020/01/sending-data-from-esp-to-domoticz-part.html

The Software

Likewise in the previous stories the software is written in the Arduino IDE.  

The Libraries used for the Dallas DS18B20 are:
OneWire.h
DallasTemperature.h


I used a special library for building the webpage and that is:
ESP8266WebServer.h

You can find this webserver Library here:
https://github.com/esp8266/ESPWebServer

Or install it with the Arduino library manager.

The program


// Adapted by Luc Volders
// Webserver with 2 buttons
// to send command to Domoticz to
// to put a lamp on and off
// the we3bpage is refreshed every 15 seconds
// to display the up to date temperature
// and write Dallas temp on screen
// page will send temp to Domoticz every 5 Minutes

#include <ESP8266WiFi.h>
#include <ESP8266WebServer.h>
#include <ESP8266HTTPClient.h>

ESP8266WebServer Webserver(80);

#include <OneWire.h>
#include <DallasTemperature.h>

// Data wire is connected to GPIO 2 (D4) on the Wemos D1 mini
#define dallasiopin 2

// Setup a oneWire instance
OneWire oneWire(dallasiopin);

// Pass our oneWire reference to Dallas Temperature. 
DallasTemperature sensors(&oneWire);

// Replace with your network credentials
const char* ssid = "XXXXXXXXXXXXXXXX";
//const char* password = "password";
const char* password = "PASSWORD";

// HTTP Domoticz settings
const char* host = "192.168.1.66";
const int   port = 8080;
HTTPClient http;

String HTMLpage = "";

unsigned long previousMillis = 0;
// Change interval for your own purposes
// 1000 (MS) * 60 (seconds) * 5 (minutes)
const long interval = 1000 * 60 * 5; 

void setup(void)
{

  sensors.begin();

  buildpage();

  Serial.begin(115200);
  WiFi.begin(ssid, password);
  Serial.println("");

  // Wait for connection
  while (WiFi.status() != WL_CONNECTED) 
  {
    delay(500);
    Serial.print(".");
  }
  Serial.println("");
  Serial.print("Connected to ");
  Serial.println(ssid);
  Serial.print("IP address: ");
  Serial.println(WiFi.localIP());
  
  Webserver.on("/", [](){
    buildpage();
    Webserver.send(200, "text/html", HTMLpage);
  });
  Webserver.on("/lampON", []()
  {
    buildpage();
    Webserver.send(200, "text/html", HTMLpage+"<center><p style = 'color:green;'>LED is ON</p></center>");
    //digitalWrite(LED, HIGH);
        String url = "/json.htm?type=command&param=switchlight&idx=";
        url += String(3);
        url += "&switchcmd=On";
          http.begin(host,port,url);
          int httpCode = http.GET();
          if (httpCode) 
          {
            if (httpCode == 200) 
            {
               String payload = http.getString();
               Serial.println("Domoticz response "); 
               Serial.println(payload);
            }
           }     
    delay(1000);
  }
  );

  
  Webserver.on("/lampOFF", []()
  {
    buildpage();
    Webserver.send(200, "text/html", HTMLpage+"<center><p style = 'color:red;'>LED is OFF</p></center>");
    //digitalWrite(LED, LOW);
    String url = "/json.htm?type=command&param=switchlight&idx=";
    url += String(3);
    url += "&switchcmd=Off";
             http.begin(host,port,url);
          int httpCode = http.GET();
          if (httpCode) 
          {
            if (httpCode == 200) 
            {
               String payload = http.getString();
               Serial.println("Domoticz response "); 
               Serial.println(payload);
            }
           } 
              Serial.println("closing connection");
  http.end();
    delay(1000); 
  }
  );
  
  Webserver.begin();
  Serial.println("HTTP Webserver started");
}
 
void loop(void)
{
  Webserver.handleClient();
  unsigned long currentMillis = millis();
  if(currentMillis - previousMillis >= interval) 
    {
    // save the last time you blinked the LED 
    previousMillis = currentMillis;   
    senddomo();
    } 
}

void buildpage()
{
   // sensors.begin();
  Serial.println("Requesting temperatures for webpage...");
  sensors.requestTemperatures();
  
  HTMLpage = "";
  HTMLpage += "<body bgcolor=PowderBlue>";
  HTMLpage += "<META HTTP-EQUIV='refresh' CONTENT='15'>";
  HTMLpage += "<center><h1 style = 'color:red;'>Luc's Domoticz Control</h1>" ;
  HTMLpage += "<br>" ;
  HTMLpage += "<center><h1 style = 'color:black;'>Temperature : ";
  HTMLpage += (sensors.getTempCByIndex(0));
  HTMLpage += "</h1><br>" ;
  HTMLpage += "<p><h1>Lamp : </h1>";
  HTMLpage += "<a href=\'lampON\'><button style = 'background-color:green; font-size: 1.2em;'>ON</button></a>";
  HTMLpage += "&nbsp;&nbsp;&nbsp;" ;

  HTMLpage += "<a href=\' lampOFF\'><button  style = 'background-color:red; font-size: 1.2em;'>OFF</button>";
  HTMLpage += "</a></p></center>" ;
}

void senddomo()
{
  Serial.print("temperature is ");
  Serial.println((sensors.getTempCByIndex(0)));

  Serial.println("Requesting temperatures for domoticz ...");
  sensors.requestTemperatures();
  Serial.println("DONE");
  // After retrieving the temperature, we can print it.
  Serial.print("Temperature is: ");
  int TEMP = (sensors.getTempCByIndex(0));
  Serial.println(TEMP);
  // Here is the Json format that Domoticz expects
  // /json.htm?type=command&param=udevice&idx=IDX&nvalue=0&svalue=TEMP
  String url = "/json.htm?type=command&param=udevice&idx=";
         url += String(5297);
         url += "&nvalue=0&svalue="; 
         url += String(TEMP);

  Serial.print("Connecting to ");
  Serial.println(host);
  Serial.print("Requesting URL: ");
  Serial.println(url);
  http.begin(host,port,url);
  int httpCode = http.GET();
    if (httpCode) 
    {
      if (httpCode == 200) 
      {
        String payload = http.getString();
        Serial.println("Domoticz response "); 
        Serial.println(payload);
      }
    }
   
  Serial.println("closing connection");
  http.end();
}


Most of the program is self explanatory. Nevertheless I will highlight some parts for those of you who want to modify it.

ESP8266WebServer Webserver(80);

This line makes sure that the webserver is started on port 80. This is the standard port for web servers in your router.

// Replace with your network credentials
const char* ssid = "XXXXXXXXXXXXXXXX";
//const char* password = "password";
const char* password = "PASSWORD";

Like always replace these values with the name of your router and the password.

// HTTP Domoticz settings
const char* host = "192.168.1.66";
const int   port = 8080;

Same as above. Replace these values with the IP number from your Domoticz system. The port 8080 is the standard port on which Domoticz broadcasts its webpage.

const long interval = 1000 * 60 * 5;

The variable interval defines how often the temperature value is send to Domoticz. In this case 1000 * 60 = 1 minute * 5 makes every 5 minutes. adapt that to your own needs. Replace for example the 5 with 30 if you want the ESP to send the temperature every 30 minutes to Domoticz.

  Webserver.on("/", [](){
    buildpage();
    Webserver.send(200, "text/html", HTMLpage);
  });

This piece of code refreshes the webpage when you use the refresh button in tour browser or just access the webpage for the first time.

Webserver.on("/lampON", []()

The code that follows after this statement is the code that is executed when you push the ON button on the webpage. It also displays the text LED is ON in the color green on the screen. This is also the part where the button ON part is send to Domoticz

Webserver.on("/lampOFF", []()

Same as above but now the part that is executed when you press the OFF button. It puts the text LED is OFF in red on the screen and sends the OFF information to Domoticz.

void loop(void)
{
  Webserver.handleClient();
  unsigned long currentMillis = millis();
  if(currentMillis - previousMillis >= interval)
    {
    // save the last time you blinked the LED
    previousMillis = currentMillis;  
    senddomo();
    }
}

In the loop the webserver looks if any button is pressed and if that is the case it starts the ON or OFF rourine as described above. Next there is a test wether the time passed in miliseonds is larger as the defined interval variable. If that is the case the senddomo() routine is called which sends the actual temperature to Domoticz.

void buildpage()

This is the routine where the actual webpage is build.

HTMLpage += "<META HTTP-EQUIV='refresh' CONTENT='15'>";

This particular line makes sure that the webpages auto refreshes every 15 seconds to give you  the current temperature. Adjust it to your own liking.
The rest of the lines just build the webpage with the temperature and the buttons.

void senddomo()

This routine retrieves the current temperature from the Dallas DS18B20 and sends it to Domoticz. This routine is called evry X seconds where X is defined by the variable interval as discussed above.

Now open the serial monitor of your Arduino IDE and look at which IP adress the ESP8266 is located.


Put the IP adress in your browser and you will see the above webpage.


And here is ann example of the Domoticz log.

This completes this series. You now have all the tools to control Domoticz switches and send data to Domoticz using an ESP8266. Adapt this to your own needs.

Till next time
Have fun

Luc Volders

Friday, November 6, 2020

Sending data from ESP to Domoticz part II

For an index to all my stories click this text

In the first part of this series I showed you how to switch your lights on and off by having an ESP 8266 sending commands to Domoticz. You can re-read that story here: http://lucstechblog.blogspot.com/2020/01/sending-data-from-esp-to-domoticz.html

In this part I am going to show you how to build a thermometer with an ESP8266 and have it send it's data to Domoticz. Naturally the thermometer can be used as an example to send any information you like to Domoticz and display it on the Dashboard.

Domoticz part

First step is to build a Virtual sensor in Domoticz. This is a sensor that is not physically connected to Domoticz. So start with opening your web-browser and open your Domoticz dashboard.


Go to the settings tab in Domoticz and choose hardware.


Fill in the name, I choose Virtual 2 as I already have another ESP running as a thermometer. Feel free to use a meaningfull name for yourself.
As type select Dummy, and choose add.


As you can see in the list Virtual 2 has been added. This device has been given an IDX which is not important for us now.


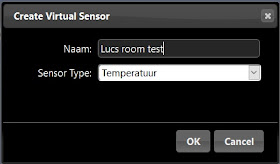
Now on the line with Virtual 2 click on the blue button that mentions: Create virtual sensors. A small screen opens in which you can give your sensor a name and you can select a type from the drop-down list. Choose a meaningfull name and as type choose temperature.

Briefly a popup screen appears mentioning that a new sensor has been created which is visible in the devices menu.


In the devices menu you will find your new designed thermometer. In my particular case it has IDX 5223. This is important as you will need this jnumber in the ESP8266 program later on.


Now move over to the Temperature tab and there your new thermometer is visible. The temperature is set at 0 degrees Celsius as no data has been received yet.

ESP8266 part

Building a thermometer with an ESP8266 is actually quite easy. You will only need an ESP8266,  a Dallas DS18B20 thermometer chip and a 4k7 pull up resistor.
You can find a detailed description on how to build one here: http://lucstechblog.blogspot.com/2017/11/oh-no-not-another-wifi-thermometer.html

This time we are going to do things differently. I am going to use an ESP8266 and the software will be in Arduino IDE (C++) and NOT in ESPBasic.


As you can see the breadboard setup is very straightforward. As mentioned just an ESP8266 (Wemos Mini D1 clone), a DS18B20 and a 4k7 pull-up resistor attached to D4 (GPIO 2).

Testing The DS18B20

Before we will send data to Domoticz we have to make sure that the Dallas DS18B20 works like it should.

This is one of the most usefull things I learned during all my years as tinkerer. Do everything step by step. This makes searching for errors much easier. If we directly started with software that send data to Domoticz, and it did not work we could not be sure wether the hardware of the software was the faulty part. So lets do this step by step.


// Test program for Dallas DS18B20
// Adapted by Luc Volders

// Include the libraries we need
#include <OneWire.h>
#include <DallasTemperature.h>

// Data wire is connected to GPIO 2 (D4) on the Wemos D1 mini
#define dallasiopin 2

// Setup a oneWire instance
OneWire oneWire(dallasiopin);

// Pass our oneWire reference to Dallas Temperature. 
DallasTemperature sensors(&oneWire);


void setup()
{
  // start serial port
  Serial.begin(9600);
  Serial.println("Dallas Temperature Demo");

  // Start the library
  sensors.begin();
}


void loop()
{ 
  Serial.print("Requesting temperatures...");
  sensors.requestTemperatures();
  Serial.println("DONE");
  // When we got the temperatures, we can print it here.
  // Use the temperature from the first sensor only.
  Serial.print("Temperature for the device 1 (index 0) is: ");
  Serial.println(sensors.getTempCByIndex(0));  
  delay (2000);
}


A quick look at the program.

First two libraries are loaded: OneWire and DallasTemperature. The first one takes care of the communication between the ESP and the DS18B20 over the one wire. The second library reads  and interprets the received data.

We define that the OneWire library is connected to dallasiopin which is IO pin 2 (D4)

In the setup we open the Serialport so we can see what happens, and start the DallasTemperature library with the attached command sensors.begin()

In the loop the actual reading from the sensor is done.

sensors.requestTemperatures();

This is the line that gets the temperature from one (or more attached) sensor(s).

Serial.println(sensors.getTempCByIndex(0));

And this line prints the temperature fetched from sensor (0) in Celsius.

You can alter this line in:

Serial.println(sensors.getTempFByIndex(0));

to get the temperature in Fahrenheit.

Compile and upload the code with the Arduino IDE and open the Serial Monitor.


This is what you will see as the temperature in your case will undoubtedly be different. As you can see it is rather cold in my mancave.

As the test is successfull we can now be sure that the hardware is working ok.

Domoticz API

To send data to Domoticz we have to use the API. So let's visit the Domoticz documentation again. In the previous story I showed you where to find it. Here is the link again:
https://www.domoticz.com/wiki/Domoticz_API/JSON_URL's

Scroll a bit down the list and in the index you can see that Chapter 7 part 7.1 gives you details about using a temperature sensor. So move to that part:
https://www.domoticz.com/wiki/Domoticz_API/JSON_URL's#Temperature

Here we can see that the API for uploading temperature to Domoticz is as follows:

/json.htm?type=command&param=udevice&idx=IDX&nvalue=0&svalue=TEMP

IDX is the number of your device in Domoticz
TEMP is the temperature.

We have to incorporate this in our program.

We will use the same program as in the previous story but make alterations for the Dallas DS18B20 and the different API call.


// Program to send Temperature data from a
// Dallas DS18B20 with an ESP8266 to Domoticz
// adapted by Luc Volders

#include <ESP8266WiFi.h>
#include <ESP8266HTTPClient.h>
#include <OneWire.h>
#include <DallasTemperature.h>

// Data wire is plugged into GPIO 2 (D4) on the Wemos D1 mini
#define dallasiopin 2

// Setup a oneWire instance
OneWire oneWire(dallasiopin);

// Pass our oneWire reference to Dallas Temperature. 
DallasTemperature sensors(&oneWire);

// WiFi settings
#define wifi_ssid "XXXXXXXXXXXXX"
#define wifi_password "YYYYYYYYYYY"

// HTTP Domoticz settings
const char* host = "192.168.1.66";
const int   port = 8080;

HTTPClient http;

void setup() 
{
  Serial.begin(115200);
  setup_wifi();   

  // Start up the library
  sensors.begin();
}

void settemp()
{
  Serial.print("Requesting temperatures...");
  sensors.requestTemperatures();
  Serial.println("DONE");
  // After we got the temperatures, we can print them here.
  // Get the temperature from the first sensor only.
  Serial.print("Temperature for the device 1 (index 0) is: ");
  int TEMP = (sensors.getTempCByIndex(0));
  Serial.println(TEMP);
  // Here is the Json format that Domoticz expects
  // /json.htm?type=command&param=udevice&idx=IDX&nvalue=0&svalue=TEMP
  String url = "/json.htm?type=command&param=udevice&idx=";
  url += String(5223);
  url += "&nvalue=0&svalue="; 
  url += String(TEMP);

  sendToDomoticz(url);
}  

void loop() 
{
  settemp();
  delay (300000);
}

//Connect to wifi
void setup_wifi() 
{
  delay(10);
  Serial.println();
  Serial.print("Connecting to ");
  Serial.println(wifi_ssid);

  WiFi.begin(wifi_ssid, wifi_password);

  while (WiFi.status() != WL_CONNECTED) 
  {
    delay(500);
    Serial.print(".");
  }

  Serial.println("");
  Serial.println("WiFi connection Established");
  Serial.print("IP Adress : ");
  Serial.print(WiFi.localIP());
}


void sendToDomoticz(String url)
{
  Serial.print("Connecting to ");
  Serial.println(host);
  Serial.print("Requesting URL: ");
  Serial.println(url);
  http.begin(host,port,url);
  int httpCode = http.GET();
    if (httpCode) 
    {
      if (httpCode == 200) 
      {
        String payload = http.getString();
        Serial.println("Domoticz response "); 
        Serial.println(payload);
      }
    }
  Serial.println("closing connection");
  http.end();
}


As you can see this software is adapted from the software we used in the previous story. A close examination of the most important parts will help you adapt it for your own purposes.

#include <ESP8266WiFi.h>
#include <ESP8266HTTPClient.h>
#include <OneWire.h>
#include <DallasTemperature.h>

The program starts with importing the necessary libraries. After that the DallasTemperature and OneWire setup is done as described above in our test program.

// WiFi settings
#define wifi_ssid "XXXXXXXXXXXXX"
#define wifi_password "YYYYYYYYYYY"

// HTTP Domoticz settings
const char* host = "192.168.1.66";
const int   port = 8080;

Here you have to fill in your own credentials and IP number of your Domoticz system.

Move over to the setup part.

sensors.begin();

This command starts the reading of the DS18B20 sensor

setup_wifi();

This calls our Wifi setup routine. In that routine a connection is established with your router and the program displays the IP number of the ESP in the serial monitor. Then automatically the void loop() is called.
In the loop the settemp() routine is called every 5 minutes. This is achieved by the delay(300000). Five minutes is 5 x 60 (seconds) x 1000 (milis) = 300000. This value is ok for testing purposes. Sending temperature every 5 minutes is a totall overkill for Domoticz. So adapt this to your own needs. Every half hour would be more appropriate. Therefore change the delay value to 30 * 60 *1000 = 18000000

In the settemp() routine all the elements of the API call are assembled in the variable url. In the documentation we saw that the API call was as follows:

/json.htm?type=command&param=udevice&idx=IDX&nvalue=0&svalue=TEMP

So this is build step by step into the variable url.

String url = "/json.htm?type=command&param=udevice&idx=";

Here the first part of the call is put into the variable.

url += String(5223);

This line adds the IDX. Replace this with your own IDX.

url += "&nvalue=0&svalue=";
url += String(TEMP);

These lines add the last part of the API call. TEMP is a figure and converted to a string with STRING(TEMP) The value TEMP is the temperature collected by this statement:

int TEMP = (sensors.getTempCByIndex(0));

That's all.

Again compile and upload the code with the Arduino IDE and open the Serial Monitor. In the serial monitor you can see, just as with our teswt program,

Back to Domoticz

First wrap your fingers around the DS18B20 and make sure this makes the temperature go up.

Now open Domoticz in your webbrowser and go to the temperature tab. There you will see something similar to this:


As you can see the ESP8266 indeed send the temperature from the DS18B20 straight to Domoticz. The icecube has been replaced with the actual value.

This story and the previous one showed you how to control light switches through Domoticz with an ESP8266 and send a sensor value to Domoticz.

Next time we are going to expand the program to build a webpage that contains buttons for switching the light switches and displays the temperature that is send to Domoticz.

For now you will have enough documentation to control switches and send all kinds of data from various sensors to Domoticz. Just adapt the program to using the right API call which can be found in the Domoticz documentation.

Till next time
have fun

Luc Volders

Friday, October 30, 2020

3D printed Anchor Hook

For an index to all my stories click this text

As you might know: I have a new 3D printer. And since I got it I have printed more as with my previous printers. I now own a Creality CR20 pro and it is a no hassle workhorse. Power it up and start printing. No calibration (except occasional bed levelling) and excellent print quality.

Then I saw an Anchor shaped clothes-hook on the internet. I thought it would be a nice surprise for a friend of mine who is a boat owner. However the pricetag just for downloading the STL file is a downer for me.

I just can not see why people make a very simple design and not offer it for free. The 3D printing world and Reprap world was once an open-source community and that is why I restarted my old hobby. Now loads of guys buy a cheap 3D printer and try making money with it. The hobby spirit is gone.

Well I am a tinkerer so I decided to make it myself.

First thing to do was to have a good look at the shape and start a search on the internet.
A quick search with Google immediately gave me a good image which was free downloadable from Pngimg.com


So I went to the website and there it was: http://pngimg.com/download/37294


I opened Gimp (a free open-source Photoshop clone) and editted the picture so it was pure black and white. You can do that by the "select by color" option. Select the black part, invert the selection and fill the rest with white.


Next I turned the picture at what I thought was the right angle.


Then I removed the right part of the picture and part of the crossection on the left side.


Last step was to add the bar which is going to be used to put it against the wall


Then I exported the picture as a JPG to my harddrive.

I was going to make the STL file in Tinkercad. Tinkercad however does not support JPG files so I had to convert the JPG to an SVG file that Tinkercad understands. You can do that with a public domain vector editing program like Inkscape. But I took the easy rad and used an web-oriented converter called: Convertio. You can find it on the web with this link: https://convertio.co/nl/

Converting just took a few seconds and then I could download the SVG file.

Next step: import the SVG into Tinkercad and scale it. I scaled it to a height of 15cm and a width of 10 cm


And the last step was to extrude the height to 2cm so you could put a screw in the bar.


And now I could export the STL file to my computer.
I sliced in the Creality slicer.


And here is a 50% reduced result. This printed in about 25 minutes. I amde several small ones and 2 large ones.


Actually this is technically not 3D but 2.5D. But whatever you want to call it, it worked out fine. Fun to do and my friend appreciated it. And that is the most important part.

So start designing and have fun. Till next time.


Luc Volders

Friday, October 9, 2020

Magic Wand

 For an index to all my stories click this text

Halloween is coming up and I wanted to build something to amaze friends and kids. So I decided to build a magic wand. But what should it do. I decided to make a magic wand that would set a lamp on or off.

Lots of lamps in my house are connected to my home automation system. This system is called Domoticz and is Open Source. You can install it on a Raspberry Pi like I did and that keeps the overall cost down. Check it out !!! You can find it here: https://www.domoticz.com/

The previous story showed how an ESP8266 could send a command to Domoticz to put a lamp on or off. I am going to use that to build my magic wand. Please re-read that story because some parts of this story lean on it. You can re-read that story here:
http://lucstechblog.blogspot.com/2020/01/sending-data-from-esp-to-domoticz.html

In that story I used a Wemos Mini D1 to send commands to Domotcz. However a Wemos Mini D1 is to large to build into a magic wand. So I am going to use an ESP-01 this time. And as usually it will be programmed in Arduino language.

The ESP01 has just a few IO ports. One of the ports has to be unconnected when starting up otherwise the ESP-01 will start in programming mode in stead of normal mode. So we have to find a clever way to use the scarce IO ports.

The next challenge was how to operate the magic wand.

The way I build it is this.
There is an on-off switch on the magic wand that is used to save battery life. The ESP-01 needs some time to connect to my router. And to be able to know wether the connection has succeeded I put a led on top of the magic wand. The led will light up when the connection is established.

The next step is to operate the magic wand. I used a tilt switch for that. It is called the SW520D. The way it operates is that there is a small ball inside the sensor. When the sensor is in upright position the ball shortens two contacts in the bottom. When the sensor is tilted the connection is broken. There are a few future projects coming up with this sensor.


The overal design is as follows.

The on-off switch puts the power on.
The magic wand is held upright. The tilt switch is reverse mounted so the contacts are broken as long as the magic wand is kept upright.  The ESP01 starts making a connection to the router. When the connection is established the led will go ON. Then we can lower the magic wand to a less then horzontal position and the SW520D sensor will make contact. This triggers the ESP-01 to send the command to Domoticz to set the lamp on. When the magic wand rizes again the connection in the SW520D is broken agian and then the ESP-01 will send a command to Domoticz to put the lamp off again.

I used GPIO-0 and GPIO-2 on the ESP for the sensor and the led. The problem is that it is best to have both IO pins not connected at booting, otherwise the ESP-01 will boot in programming mode. Therefore the SW520D is reverse mounted so there will be no contacts made at boot time. The led is also reversed connected. This means that the VCC pin is connected to VCC and the GND is connected to the GPIO-2.

Breadboard setup.


The GND and VCC pins are connected to the batteries. Do not forget to connect VCC to the CH-EN (enable pin) otherwise the ESP-01 will not start up.

GPIO-2 is connected with an 220Ohm delimiting resistor to the GND pin of the led. The VCC pin from the led is connected to VCC.
GPIO-0 is connected to the SW520D and the remaining connection on the sensor is connected to GND.

The power supply.

Well a magic wand can not be connected to a mains outlet. That certainly would look stupid. So it has to be battery operated. Testeing learned that I needed 3 AAA batteries to get good results. So I drew a custom battery pack in Tinkercad. It had to be small to keep the overall width of the magic wand narrow.


I started with a casing for 1 battery. Mulitplied it and made one long casing from this.

You can download my design from Tinkercad if you like. The STL file has to be sliced. I sliced it at 0.3mm which is accurate enough. It does not have to be pretty as it is going to be mounted inside the magic wand. here is the link.
https://www.tinkercad.com/things/7lT5xm1sNRq-3-aaa-bat

The contacts were made from paperclips. I did not print the holes for the contacts but just drilled them.

There are a few steps to go. First is the program.

Magic Wand program

#include <ESP8266WiFi.h>
#include <ESP8266HTTPClient.h>

// WiFi settings
#define wifi_ssid "YOUR-ROUTERS-NAME"
#define wifi_password "ROUTERS PASSWORD"

// HTTP Domoticz settings
const char* host = "DOMOTICZ IP ADRESS";
const int   port = 8080;

int led = 2;  //GPIO1 TX
int sensor = 0; //GPIO2

HTTPClient http;

void setup() 
{
  pinMode(led, OUTPUT); 
  pinMode(sensor, INPUT_PULLUP);
  digitalWrite(led, HIGH);  // Led HIGH so starts off
  setup_wifi(); 
}


void switchonoff(){
      // Here is the Json format that Domoticz expects
      // /json.htm?type=command&param=switchlight&idx=99&switchcmd=On
      String url = "/json.htm?type=command&param=switchlight&idx=";
        url += String(3);
       if (digitalRead(sensor) == HIGH)
        {
        url += "&switchcmd=Off"; 
        }
        else   
        {
          url += "&switchcmd=On";
        }
      sendToDomoticz(url);
  }  


void loop() 
{
  switchonoff();
}

//Connect to wifi
void setup_wifi() {
  delay(10);
  WiFi.begin(wifi_ssid, wifi_password);

  while (WiFi.status() != WL_CONNECTED) {
    delay(500);
  }
  digitalWrite(led, LOW);
}

void sendToDomoticz(String url){
  http.begin(host,port,url);
  int httpCode = http.GET();
    if (httpCode) {
      if (httpCode == 200) {
        String payload = http.getString();
      }
    }
  http.end();
}


The code has a few pitfalls which I wil highlight.

// WiFi settings
#define wifi_ssid "YOUR-ROUTERS-NAME"
#define wifi_password "ROUTERS PASSWORD"

// HTTP Domoticz settings
const char* host = "DOMOTICZ IP ADRESS";
const int   port = 8080;


Fist thing is not to forget to put your own credentials here.

  pinMode(led, OUTPUT);
  pinMode(sensor, INPUT_PULLUP);
  digitalWrite(led, HIGH);  // Led HIGH so starts off


The pin for the LED is set as OUTPUT which is obvious but the pin is initially set HIGH. As the led is connected reverse the led will be off at the beginning.

void switchonoff(){
      // Here is the Json format that Domoticz expects
      // /json.htm?type=command&param=switchlight&idx=99&switchcmd=On
      String url = "/json.htm?type=command&param=switchlight&idx=";
        url += String(3);
       if (digitalRead(sensor) == HIGH)
        {
        url += "&switchcmd=Off";
        }
        else   
        {
          url += "&switchcmd=On";
        }
      sendToDomoticz(url);
  }


Here the string is created that will be send to Domoticz. The IDX which is the ID of the switch is dependend on your own system. In my case it is 3. The program tests wether the SW520 sensor is open or closed and puts the lamp accordingly on or off.

Detailed information on how to find the IP adress and the ID's of your switches can be found in the first part on sending commands to Domoticz which can be found here:
http://lucstechblog.blogspot.com/2020/01/sending-data-from-esp-to-domoticz.html

Stripboard

Well a breadboard is no good to hide your electronics in a magic wand. So I put it all on a small piece of stripboard.


I put headers on the stripboard to plug the ESP01 in. Do not forget to cut the connections between the headers so you do not short circuit the ESP's pins. As you can see I also cut some connections on the top of the breadboard otherwise the pins of the resistor would short circuit.

When I put the setup into the magic wand I did that upside down. The batteries are on the bottom the electronics on the top. That way the SW520D is upside down and does not make contact when the magic wand is held upright, just like we want.

Make sure you make the wires between the batterie holder and the electronics long enough to take the electronics out of your magic wand to replace the batteries.

The Magic wand

Luckily I found a carton tube at my job which was narrow but wide enough to put the electronics in. 


I printed a rounded top in which I put the led and used a push button as a power switch. As soon as I put the magic wand in my hand the pressure of my hand pushes the button and that powers the electronics. If I lay it down the pushbutton is released and the power is cut off.

Have fun !!!
Till Next time

Luc Volders