Pages

Friday, October 18, 2024

Pico Audio Part 3

For an index to all my stories click this text.

In this story I show how to install the necessary MicroPython drivers to play some real audio on the Raspberry Pico. And trust me it is worth while. The Pico is able to produce some excellent audio quality with the aid of just some resistors and capacitors !!

This is the third story on how to play audio files on the Raspberry Pi Pico.
The first story showed how to work with Audacity to record your own voice or convert existing audio to the wav format which can be played by the Pico. You can read that story here: http://lucstechblog.blogspot.com/2024/10/audacity-pico-audio-part-1.html

The second story told how to build the hardware setup. You just need 4 resistors and 2 capacitors. The total cost of this project is about 1 Euro/USD. That is without the Raspberry Pi Pico itself. You can use the Pico or the Pico W for this. They work equally well. You can read how to build the hardware here:
http://lucstechblog.blogspot.com/2024/10/audio-on-pico-part-2-hardware.html

Now the preparations are done we can install the software.

MicroPython drivers.

To play audio (wav) files on the Pico with MicroPython we need some drivers.

From MicroPython we need two drivers called chunk.py and wave.py. You can get them here:
https://github.com/joeky888/awesome-micropython-lib/tree/master/Audio
Just read the text and halfway the page you will find the links.

Next to these you will need some extra drivers which you can find here:
https://github.com/danjperron/PicoAudioPWM
From this link you will need to copy: myDMA.py, myPWM.py and wavePlayer.py. These drivers are provided courtesy of Daniel Per.ron

Just download and copy these five drivers to your Pico's lib directory.

For your convenience I have made a collection of all necessary drivers in my Github repositry. Here is the link:

https://github.com/Lucvolders/MicroPython/tree/main/Libraries/PicoAudio

Every file is just a textfile and can be copied and then pasted in Thonny. You can then save the file in Thonny's lib directory. Make sure to give the file exact the same name as they have in the repositry.

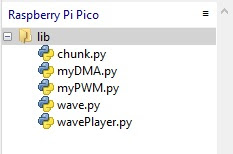
Your Pico's lib directory should now look like this:


Undoubtedly you will have more libraries loaded but these should be present to play audio.

Back to Audacity

In a previous story on this weblog I showed how you can record your own voice with Audacity. You can read that story here:
http://lucstechblog.blogspot.com/2024/10/audacity-pico-audio-part-1.html

In that story I gave you some "homework". I asked you to record the sentence "Hello world, this is the Raspberry Pi Pico talking" and save it on your computer using the name hello.wav

If you haven't done that please do it now because we are going to use that as a test for our audio player.

Make a new directory on your Pico and call it testsounds. Copy hello.wav to that directory.

If you do not know how to copy data files to a directory on your Pico you can follow this tutorial: http://lucstechblog.blogspot.com/2023/07/a-few-small-thonny-tips.html
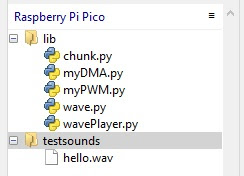


This is how your Pico's directory should look now in Thonny. Well that is if you are using a freshly installed Pico like I did.

Let's play some sound.

To play a sound we need just a small MicroPython program. Here it is:

from wavePlayer import wavePlayer
import time

player = wavePlayer()

while True:
    player.play('/testsounds/hello.wav')
    time.sleep(3)

I think this is self-explanatory nevertheless I will give some brief explanation.

from wavePlayer import wavePlayer
import time


The wavePlayer driver is imported in the Pico and so is the time library.
As stated in the beginning of this story we need 5 libraries to get the audio working. The wavePlayer library uses the other 4 libraries and loads them automatically.

player = wavePlayer()

The wavePlayer library is activated and we call it player.

while True:
    player.play('/testsounds/hello.wav')
    time.sleep(3)


An endless loop is created and in that loop player.play('/testsounds/hello.wav') plays the sound. Then there is a 3 second pause and the sound is repeated.

Space limitations.

Wave files take a lot of memory. My simple sentence "Hello world, this is the Raspberry Pi Pico talking" is converted in a 128k file. AS MicroPython itself also occupies a lot of flash memory there is in this example just 616K memory left for programs and libraries.

In the first story (the one about Audacity) I asked you to record several audio files. These take about 447k memory. So there is not much room for many or large audio files. But there is a solution for that which I will show in an upcoming story.

Ideas ???

Well this can be used in a lot of ways. In upcoming stories I'll show how to build a talking thermometer and a talking clock. Besides these how about:

- a talking doorbell
- audio feedback when a button was pressed
- an audio alarm when someone opens the cookie jar
- a piano that plays real recorded tones
- a musical greeting card
- an audio alarm for sensors

And last but not least. I will show you how to build a real audio player that plays music, podcasts etc as long as they are converted to 8k wav files !!!

Till next time
have fun

Luc Volders


Friday, October 11, 2024

Audio on the Pico part 2 the hardware

For an index to all my stories click here.

This is the second part in series about playing audio with The Raspberry Pi Pico.

The Raspberry Pi Pico can produce wonderfull audio. But it has to be in a certain format. The format is 8K wav. With the free software Audacity you can convert any audio (like MP3) to any other format. Even better: you can edit the audio like cutting parts out of it etc. This makes Audacity perfect for our purpose. The previous story discused the elements of Audacity that we need. You can read that story here 
http://lucstechblog.blogspot.com/2024/10/audacity-pico-audio-part-1.html


Please note that this will work both on the Raspberry Pi Pico and the Pico W.

To produce audio on the humble Raspberry Pi Pico we need just a few (very cheap) parts:
- 2  1K resistors
- 4  2K2 resistors
- 2  47nF capacitors.
- An active speaker set and/or
- earbuds

The active speaker set is just a set of speakers with a build in amplifier. Computer speakers are an example of these. Earbuds will also do the job if you want to listen in privacy. Just note that there is no volume adjustment in the hardware or software.

With these parts we build a simple low-pass filter which is enough to produce fantastic sounding audio.


This is how you can build the hardware on a breadboard. In this setup The audio output is connected to an active speaker with Alligator clips.

There are cheap audio amplifiers around which you can use on a breadboard. An example is the PAM8403 which I used in the series about Talkie on this weblog. You can use one of these with a separate speaker but don't forget to add a seperate power supply in that case as the PAM8403 needs more power as the Pico can deliver.


For your convenience I provide a wire-schematic which simplifies the breadboard setup a bit.


And as extra an electronic schematic which may be easier to understand.

Power supplies and long wires tend to produce noise that the audio circuit might pick up. So keep all wires as short as possible. Best is build this on a stripboard. If you want to do that, wait till this series ends. I am going to show you how to build a talking thermometer but I am also going to expand the setup with an SD card and some buttons to build a full audio player.

Connecting to a speaker

Most active speakers have a 3.5mm plug, just like earbuds have.


The picture shows how the connections on the plug are organised. Connect the alligator clips to the plug according to the left-right-gnd connections.

In the next part in this series we are going to play some sounds. The software is written in MicroPython. No less then 5 libraries are needed. So stay tuned.

Till next time
have fun

Luc Volders


Friday, October 4, 2024

Audacity (Pico audio part 1)

For an index to all my stories click this text.

I was fascinated by the talking clock and thermometer I build with the ESP32, but the audio quality was crap. It was like I heard an old Commodore 64 or Apple do speech synthesises in the eighties. At that time this was amazing but nowadays we want a better quality.

Raspberry pi pico audio is superior.

Then I stumbled on something amazing. The humble Raspberry Pi Pico can produce outstanding audio quality. The only thing we need for that is a Pico or a Pico W, 6 resistors and 2 capacitors. These are used as a simple low-pass filter. I am going to build some projects with this. We'll start with a talking thermometer and next a talking clock. In the end I will add some buttons and an SD card-reader and presto: A cheap MP3 player.

For those who want to build these projects you will need the following items:
- a Raspberry Pi Pico or Pico W
- 2 1K resistors
- 6 2.2K resistors
- 2 47nF capacitors

For the talking thermometer you will need as extra:
- Dallas DS18B20 digital thermometer
- 4k7 pull up resistor

And for the MP3 player you will need:
- SD card adapter for ESP8266 or ESP32 or
- an SD card adapter for micro SD cards (often included).

These will set you back between 6 Euro and 9 Euro depending on using the Pico or the Pico W. I present this list now so you can order them from your favorite electronics supplier so you have them in time when we start building the hardware next week.

How to get the audio files

For the talking clock and the talking thermometer you will need several audio files. The best parts is that you can use your own voice for this. And if your voice sounds like sandpaper (like mine) find someone in your family or friends that have a pleasant voice to help you.

As the Pico and Pico W have limited memory we need the audio files to be as small as possible. Therefore we will record them at 8K resolution and not the ussual 44k resolution. Next to that the MicroPython libraries can only play WAV files. So we need to record or audio files in 8K .wav format.

To record these audio files we will use audacity.

Audacity

Audacity is free open source audio software that is available for Windows, Mac and Linux.

Audacity can import and export WAV, AIFF, MP#, AU, FLAC and Ogg Vorbis files. You can import multiple files and combine them into one and then export them in any of the mentioned formats. This feature makes it ideal for (for example) converting MP3 files to WAV files or any other format you might need.

Next to Audacity you will need a Microphone. The better the Microphone the better the audio quality will be. However a simple stand alone version does the trick also. And if you do not want to spend money on a dedicated microphone the microphone in your webcam will also do the job.

Start by downloading and installing Audacity. You can find it here:
https://www.audacityteam.org/

Recording the audio files.


This is the opening screen. I changed the settings into a dark theme which I personally find easier to work with. Besides that the high contrast makes it easier to edit your audio recordings.


In the edit tab on the top of the screen choose preferences. In the preferences pop-up screen choose Interface and there choose the Theme of your choice. Like said: I prefer high contrast.


While in the preferences menu go to the Devices settings and choose which microphone you are going to use. I have two microphones on my PC. A stand alone Realtec Audio and the microphone in my WC150 web-cam. I choose the stand-alone microphone for my recordings.


Before starting your audio recordings change the project rate at the bottom of the screen to 8000. This will sample your audio recordings at 8K which is required for our project. Dont forget to set this value back to 44100 for the highest quality when you use Audacity for other purposes.

Now you can start your audio recordings by pressing the red record button at the top of the screen.


The recording stops by pressing the grey stop button. And you can listen to what you have recorded by pressing the play button.

In the main screen appear the waves that your recording made. In the above example you can see that I started a bit to late with talking and waited too long before I pressed the stop button. You can check that yourself by pressing the play button. While playing there is a line on the screen that shows where in the timeline the audio that you hear is.

For our Pico project we do not want any silences in the audio. If we need a pause in the audio we will let the program make that pause. So here the sound needs to get as short as possible.


Use your mouse to select the exact audio part you need without the silences. After selecting you can test if you made the right selection by pressing the play button.


In the edit menu select Remove Special and then Trim Audio and the parts that are not selected will be removed.


Now you can save your recording. Choose Export from the file menu and save it5 as a WAV file.

That's it. We have made our first recording.

Before going on to the next step, play around with Audacity. There is a lot to discover and you might use it for other projects then just the Pico Audio Project.

The Pico Audio project.

As stated in the beginning of this story we are going to build a talking thermometer and a talking clock. Our thermometer will be able to speak the temperatures from 1 to 59 degrees. The clock can say the hours from 1 to 24 and the minutes from one to 59.

So we need the following numbers and text:

1, 2, 3, 4, 5, 6, 7, 8, 9, 10, 11, 12, 13, 14, 15, 16, 17, 18, 19, 20, 30, 40, 50,
it is now, hour, minutes, degrees.

We do not need numbers like 21 to 29, 31 to 39 etc as we can make them by for example using 20 and then 5.

In the upcoming stories we are first going to do a test to see if the hardware on the Pico is working as expected. For this also record a sentence like: 

"Hello world, this is the Raspberry Pi Pico talking"

Save this using the filename: hello.wav 

So your "homework" for now is to record the above mentioned numbers and texts and save them in files in a directory on your computer.

Naming the audio files for the numbers needs some special attention. To make the files easily accessible for our program save the audio files with their number as their name. For example save 1 as "1.wav", 15 as "15.wav" etc. Save the recording of "it is now" as "itsnow.wav". For the other words use the word as the filename.

Next week I am going to discuss how to build the low pass filter with the above mentioned resistors and capacitors.

Till then.
Have fun

Luc Volders