Pages

Friday, April 26, 2019

Unlimited output ports for your Micro:bit

For an index of all my stories click this text

WS2811 as output for micro controllers part III

In the first part I showed you how to use WS2811 chips to create an almost unlimited number of PWM controlled outputs for an ESP8266.

The WS2811's are the chips that are build into the so called Neopixels. More detailed basic information about Neopixels can be found here: http://lucstechblog.blogspot.nl/2015/10/neopixels-ws2812-intro.html

So a Neopixel is basically a WS2811 and 3 leds build as a single chip. I am using just the WS2811's. As these can control 3 leds we should be able to use them as 3 outputs for a microcontroller. By daisy chaining them (just like we do with Neopixels) we can create an infinite number of outputs for any microcontroller. I did this succesfully with an ESP using LUA and Basic in Part 1 of this series. Read that story here http://lucstechblog.blogspot.com/2019/04/unlimited-outputs-for-your_12.html

Part II described how to use this technique with an Arduino and an Attiny85. Read that story here: http://lucstechblog.blogspot.com/2019/04/unlimited-outputs-for-your.html

And in this part I am going to show you how it is done with a Micro:bit.
For this I presume you have basic electronics knowledge because we are going to use the same hardware setup as we did with the Attiny85.

Hardware

As said above use the same hardware setup as used with the Attiny85.


In this setup replace the Attiny85 with the Micro:bit.


Power the Micro:bit independently from the WS2811's. The WS2811's work best at 5 volts and the Micro:bit works at 3 volts. So attach the GND from the Micro:bit to the Ground rail on the breadboard and attach the data line to P0. Forget about the 5Volt power line and supply the Micro:bit with it's own power supply.


Fortunately the WS2811's (just like the Neopixels) accept data at 3 volt level.


Here is the real-world setup.

Software.

The software is written in blocks.
I presume you are familiar with the Micro:bit programming environment; You can find the editor here: https://makecode.microbit.org/

Here is the full code:


The first block is always run when the Micro:bit is started. It displays a welcome message and attaches the neo driver to P0 and tells it that we are going to use 2 leds (WS-2811's)

The second block is just a counter that counts from 1 to 6 everytime the A button is pressed.

The third block is where the magic happens.
If you press the B button the block checks what number the counter was set at with button A in the previous block.
If the counter is set from 0 to 2 the first WS2811 is adressed. When the counter has a value from 3 to 5 the second WS2811 is adressed. The actual value determines which output then is activated.

So what happens is that you choose a number by repeatedly pressing the A button and activate the choosen output by pressing B.

That's all folks.


For clarity I show you here the underlying Javascript code.

Python

Next to programming in Blocks there is Python which has a loads more possibillities but is intended for the more experienced programmers.


The Python code almost speaks for itself.
First the libraries are imported. Then the WS-2811's are initialised on P0 (pin0)
Next step is a loop that sets the values of the output ports at a random PWM value so all led's will independently be dimmed at different values.

That's it.

I bet you can start all kinds of projects with this technique. This is not only good for attaching numerous leds to your Micro:bit. Attach transistors to each output and you can control multiple motors or ledstrips. As always: use your imagination and have fun.

Till next time

Luc Volders

Friday, April 19, 2019

Unlimited outputs for your microcontroller part II

For an index to all my stories click this line

In the previous part I showed you how to use WS2811 chips to create an almost unlimited number of PWM controlled outputs for an ESP8266. You can find that story here: http://lucstechblog.blogspot.com/2019/04/unlimited-outputs-for-your_12.html

The WS2811's are the chips that are build into the so called Neopixels. More detailed basic information about Neopixels can be found here: http://lucstechblog.blogspot.nl/2015/10/neopixels-ws2812-intro.html

So a Neopixel is basically a WS2811 and 3 leds build as a single chip. I am using just the WS2811's. As these can control 3 leds we should be able to use them as 3 outputs for a microcontroller. By daisy chaining them (just like we do with Neopixels) we can create an infinite number of outputs for any microcontroller. I did this succesfully with an ESP using LUA and Basic in Part 1 of this series.

Now let's see if we can use this technique also with an Arduino or an Attiny85.


Oh and by the way, with a little modification (mainly altering the pin number) you can use this also for the ESP8266 and ESP32 in Arduino language.

As both the Arduino and the Attiny85 have no Wifi capability it is more difficult to control them from the outside world. Control has to be taken care off with potentio meters or sensors. In the examples I am going to show here there is no outside control. The programs will control everything. For demo purposes this is sufficient and I am sure you find ways to incorporate this in your own projects.

Breadboard setup


As you can see the setup is almost the same as in the previous story. I attached the Arduino's ground and +5Volt to the ground and power rails of the rest of the circuit to power the complete setup. The Arduino's pin 6 is used to control the WS2811's through a 470 OHM resistor.
It is the same setup you would use to attach a bunch of Neopixels to your Arduino. As long as you use just a few WS2811's and leds youn can power the setup from your Arduino.

When you are going to attach more WS2811's use the seperate USB power supply for the WS2811's like discussed in part 1 in this series.


The Arduino program

The program is written in C++ the standard programming environment for the Arduino. Lets look at the code:


// WS2811 Test by Luc Volders
// This program sets multiple leds on and off in a sequence

#include <Adafruit_NeoPixel.h>
#include <avr/power.h>

// Which pin on the Arduino is connected to the NeoPixels?
#define PIN            6

// How many NeoPixels are attached to the Arduino?
#define NUMPIXELS      2

// When we setup the NeoPixel library, we tell it how many pixels, and which pin to use to send signals.
Adafruit_NeoPixel pixels = Adafruit_NeoPixel(NUMPIXELS, PIN, NEO_GRB + NEO_KHZ800);

int delayval = 500; // delay for half a second

void setup() 
{
  pixels.begin(); // This initializes the NeoPixel library.
}

void loop() 
{
    pixels.setPixelColor(0, pixels.Color(00,0255,255)); 
    pixels.setPixelColor(1, pixels.Color(00,0255,255));
    pixels.show(); 
    delay(delayval); 
    pixels.setPixelColor(0, pixels.Color(0255,0,0));
    pixels.setPixelColor(1, pixels.Color(0255,0,0));
    pixels.show();
    delay(delayval); 
}


The first thing the code does is to import Adafruit's Neopixel library. If you do not already have installed this library you will find a description on how to do that here:
https://learn.adafruit.com/adafruit-neopixel-uberguide/arduino-library-installation

Next step is that we tell the program that the WS2811's are attached to pin 6. I/O port no 6 on the Arduino is a PWM port and that is what we need to control the WS2811's.

Then we define the number of WS2811's which is 2 in this case. These 2 WS2811's will give us 6 output ports.

Adafruit_NeoPixel pixels = Adafruit_NeoPixel(NUMPIXELS, PIN, NEO_GRB + NEO_KHZ800);

This line does the actual setup for the WS2811's.
NUMPIXELS is the amount of WS2811's, PIN is on which IO port they are attached, NEO_GRB tells the library that it must use GRB instead of RGB and NEO_KHZ800 tells it the frequency with wthat the WS2811's should be controlled.

Let's look at the main loop:

pixels.setPixelColor(0, pixels.Color(00,0255,255));

The first zero is the number of the WS2811 in the line. The last 3 numbers are the PWM values we are going to send to the individual outputs of that WS2811. So in this line we set the first led OFF and the second and third led ON.

After the delay we turn that around:

pixels.setPixelColor(0, pixels.Color(0255,0,0));

This sets the first led ON and the other two OFF.

Altering the value 255 in any figure between 0 and 255 will DIM the led in stead of setting it to full brightness.

And here are the real life results:


So this works flawlessly. With 2 WS2811's I have created 6 extra outputs for the Arduino.

On to the Attiny85

We can use this technique also with an Attiny85. The Attiny85 normally just has 5 output pins. It would give our projects an enormous advantage if we could expand this to many more PWM able outputs. Well here we go.

Breadboard setup:


As you can see the breadboard setup is again almost identical to the previous setups.
In this case you need to use the USB external power supply.

As usual the WS2811's are attached through a 470 Ohm resistor to I/O port 1 of the Attiny85.


And this is what it looks like in real life.

The program


// Attiny85 code for controlling 6 output with ws2811
// Code written by Luc Volders
#include <Adafruit_NeoPixel.h>

// Which pin on the Attiny85 is connected to the NeoPixels?
#define PIN            1
// How many NeoPixels are attached to the Arduino?
#define NUMPIXELS      2

// Setup the NeoPixel library with how many pixels, and which pin to use to send signals.
// Note that for older NeoPixel strips you might need to change the third parameter
Adafruit_NeoPixel pixels = Adafruit_NeoPixel(NUMPIXELS, PIN, NEO_GRB + NEO_KHZ800);

int toets1=0;

void setup() 
{
  pixels.begin(); // This initializes the NeoPixel library.
  for(int i=0;i<NUMPIXELS;i++)
  pixels.setPixelColor(i, 0,0,0);
  pixels.show();
}

void loop() 
{
  for(int i=0; i<255; i++)
  {
  pixels.setPixelColor(0, 255-i,i,i);
  pixels.setPixelColor(1, 255-i,i,i);
  pixels.show();
  delay (10);
  }
}


I just altered the Arduino program a bit. The program is going to fade the leds in and out. This is done in the main loop.

The first leds are going to fade from bright to OFF and the other leds are fading from OFF to full bright.


And here is the result. Six extra (PWM) outputs for an Attiny85 !!!!

The next part is going to show you how we can use this technique for expanding the BBC's Micro:Bit output ports.

Till next time.
Have fun

Luc Volders

Friday, April 12, 2019

Unlimited outputs for your microcontroller

For an index to all my stories click this text

Sometimes I have these strange / stupid / twisted ideas let me explain.

While thinking about a project I realised I would need a controller with many outputs. Let's first look at the options.

- An ESP-01 has 2 I/O ports and with a trick you can use 4.
- A NodeMCU has 11 I/O ports.
- An Attiny 85 has 5 I/O ports.
- An Arduino Uno has 19 ports.
- An Arduino Mega has 53 ports

The Arduino Mega would have been an option however it lacks Wifi.
I could use a NodeMCU with several 74HC595 shift registers which each would give me 8 ports. For 50 output ports I would need 7 of these which would make programming a complicated matter.

I then had a twisted Idea.

Look at the Neopixels. I can attach a whole bunch of Neopixels to any of the above mentioned controllers and set each led to any RGB color individually. If you want to know more about these small wonders read this story:
http://lucstechblog.blogspot.nl/2015/10/neopixels-ws2812-intro.html

Neopixels contain 3 leds and a controller chip in one casing. That controller chip is the WS2811.

The WS2811 can be daisy-chained almost endlessly and each of these chips has 3 output ports. Well, well. If these chips could be bought without the led's, that would make an almost endless supply of output ports for any controller. And they would be easy programmable. 


And best of all: Not only would they be able to set a led on or off, they would be able to use PWM to dim the leds, or control the speed of a motor, or control multiple ledstrips !!!

Tell me. Isn't that a strange / stupid / twisted idea ???

The WS2811 chips

Let me start with some general information.

A search on the website of my favorite Chinese supplier immediately showed that the WS2811 chips indeed can be bought without leds. So I immediately ordered a few. I got 10 pieces for about 3 euro but they are even cheaper now. For economics sake this boils down to (in my case) 10 cents for every extra output on your Microcontroller.


Mine where shipped as a strip of 5 pieces. They were not interconnected so there is soldering involved.


Each individual PCB on which the WS2811's are soldered is 15 x 15 mm.


 This picture clearly shows you the size of the PCB's compared to an ESP01.

As the WS2811's are put on individual PCB's you could break the strips up and put them apart if you needed more adressable outputs over a larger distance. Adafruit advises a maximum distance of about 1 meter between each WS2812 neopixel. However I read on a forum that someone had good results with WS2812's which were 6 meter apart.
All depends on the quality of the soldering, the used wires and the power supply. So testing is required  !!!!

Please be aware that the WS2811's have a common Anode.
Normally you will attach a led to a signal and to the GND. This is the other way round. The led is attached to an I/O port which must provide the GND and the other side is attached to the +5V. Don't forget the delimiting resistor.
We will see more of this later on.

You should wire the WS2811's the same as you would wire Neopixels. Attach a large capacitor (1000 microfahrad at 6.3 volts or higher) across the GND and + of the power supply. And connect a 300-500 ohm resistor between the pin of your microcontroller and the first Neopixel in line.

Soldering

As you can see the individual PCB's have a GND and 5V connection on either side so the can easily be daisy-chained. On one side is the DI (data-in) connection and on the other side the DO (data-out) connection. The DI of the first in line will be connected to your Micro Controller and the DO can be connected to the next DI. The same as you would do with Neopixels.

At the center of the PCB are 4 connections. R G B and +. Normally the LED's will be soldered here. That would be RGB leds with a common Anode (+).

I started with wiring the connections to the first PCB. I sacrified some Dupont wires for this experiment. This made it easy to connect the WS2811's to a breadboard.


Next I interconnected 2 PCB's by soldering small pieces of wire between them.


And the last step, was to solder wires to the RGB connections. For clarity I used red, green and blue wires.

First test

Just be patient and keep reading this web-log. Because in the next part I am going to show you how to use the WS2811's with an Arduino and an Attiny85 programmed in C++ and even with a BBC Microbit programmed both in Python and in Java. Best part Is that I am going to show you how to attach and control 2 ledstrips at the same time !!!

However for all my rapid testing and fast devellopment I use ESPBasic.  As all programming an testing is done in a web-browser it is the fastest way to test anything on an ESP. Read a tutorial on ESP-Basic here: http://lucstechblog.blogspot.nl/2017/03/back-to-basic-basic-language-on-esp8266.html

First look at the breadboard setup


And this is how it looks in real life. As you can see I have soldered wires to 2 of the WS2811's and attached leds with a delimiting resistor.

Further you can see there are two USB cables. The first one (the pink one) powers the Wemos D1 (NodeMCU) and the second one (the green one) powers the WS2811's. You can not feed all of this from your Wemos D1 or NodeMCU module. Thats why I attached two separate power supplies, both an ordinary 5Volt phone charger from the dollar shop.

Attach a multimeter across the blue connection of the first WS2811 and GND.

And use the following program:


neo(0,0,0,0)

wprint |<h1 style="text-align:center;">Luc Volders</br>WS2811 Relay|
wprint "<br/><br/>"

button "<h3>Relay on</h3>",[relon]
button "<h3>Relay off</h3>",[reloff]

wait

[relon]
neo(0,0,0,255)
wait

[reloff]
neo(0,0,0,0)
wait

That's all


That small program looks like this on the screen of your computer / phone /tablet

Pressing the Relay-on button will give you 0 Volts and pressing the Relay off button will give you something like 0.9 volt. That brings us nowhere.

Now attach one end of the multimeter to +5V in stead of the GND and you will measure -5.22 volts when you press Relay-on and 0 volts when you press relay off. And that's what we need.

Like stated above the WS2811 have a common anode so the GND comes from the R,G,B side.

Attach a led with a 220 ohm resistor, and to make it go on and off, attach the Anode side of the led to +5 volt and the cathode side to the B wire of the first WS2811. Just press the button on the web-page to switch the led on and off.

As a side-note: Guess you know now why I use ESP-Basic so often as my favorite devellopment system. In just a few lines of code I have made a web-page with a button and control some WS-2811's

Next step is attaching a Relay.
This is easier. Just attach the power lines and attach the control line to the Blue line of the first WS2811.
Pressing the Relay on or Relay Off button will switch the realay accordingly on or off.
Modern relay modules have a common connection in the middle and a connection that closes when a GND signal is supplied and one that closes when a + signal is supplied.


So in this case the upper connection and the middle connection are closed when the button is not pressed and the value send to the WS2811 is 0. If a 1 (5volt) is send the middle connector is connected to the lower connector.

Something more complex.

I had 6 leds attached to the output lines of 2 WS2811's.

 
In order to test this setup I wrote a program in LUA.

 
The program builds a webpage and puts 12 buttons on it. Each led has 2 buttons: one for ON and one for OFF.

wifi.setmode(wifi.STATION)
wifi.sta.config("XXXXXXXX","YYYYYYY")
ws2812.writergb(3, string.char(0,255,0,0,255,0,0,255,0))
print(wifi.sta.getip())
led1 = 0
led2 = 0
led3 = 0
led4 = 0
led5 = 0
led6 = 0
tmr.delay(2000000)
ws2812.writergb(3, string.char(0,255,0,0,255,0,0,255,0))
srv=net.createServer(net.TCP)
srv:listen(80,function(conn)
    conn:on("receive", function(client,request)
        local buf = "";
        local _, _, method, path, vars = string.find(request, "([A-Z]+) (.+)?(.+) HTTP");
        if(method == nil)then
            _, _, method, path = string.find(request, "([A-Z]+) (.+) HTTP");
        end
        local _GET = {}
        if (vars ~= nil)then
            for k, v in string.gmatch(vars, "(%w+)=(%w+)&*") do
                _GET[k] = v
            end
        end
        buf = buf.."<h1>WS2811 Web Server</h1>";
        buf = buf.."<h1>Made By Luc Volders</h1>";
        buf = buf.."<p>Switch 1 <a href=\"?pin=ON1\"><button>ON</button></a>&nbsp;<a href=\"?pin=OFF1\"><button>OFF</button></a></p>";
        buf = buf.."<p>Switch 2 <a href=\"?pin=ON2\"><button>ON</button></a>&nbsp;<a href=\"?pin=OFF2\"><button>OFF</button></a></p>";
        buf = buf.."<p>Switch 3 <a href=\"?pin=ON3\"><button>ON</button></a>&nbsp;<a href=\"?pin=OFF3\"><button>OFF</button></a></p>";
        buf = buf.."<p>Switch 4 <a href=\"?pin=ON4\"><button>ON</button></a>&nbsp;<a href=\"?pin=OFF4\"><button>OFF</button></a></p>";
        buf = buf.."<p>Switch 5 <a href=\"?pin=ON5\"><button>ON</button></a>&nbsp;<a href=\"?pin=OFF5\"><button>OFF</button></a></p>";
        buf = buf.."<p>Switch 6 <a href=\"?pin=ON6\"><button>ON</button></a>&nbsp;<a href=\"?pin=OFF6\"><button>OFF</button></a></p>";              
        local _on,_off = "",""
        if(_GET.pin == "ON1")then
              led1 = 255
              ws2812.writergb(3, string.char(led1,led2,led3,led4,led5,led6))
        elseif(_GET.pin == "OFF1")then
              led1 = 0
        elseif(_GET.pin == "ON2")then
              led2 = 255
        elseif(_GET.pin == "OFF2")then
              led2 = 0
        elseif(_GET.pin == "ON3")then
              led3 = 255
        elseif(_GET.pin == "OFF3")then
              led3 = 0
        elseif(_GET.pin == "ON4")then
              led4 = 255
        elseif(_GET.pin == "OFF4")then
              led4 = 0  
        elseif(_GET.pin == "ON5")then
              led5 = 255
        elseif(_GET.pin == "OFF5")then 
              led5 = 0
        elseif(_GET.pin == "ON6")then
              led6 = 255
        elseif(_GET.pin == "OFF6")then 
              led6 = 0          
        end
        ws2812.writergb(3, string.char(led1,led2,led3,led4,led5,led6))
        client:send(buf);
        client:close();
        collectgarbage();
    end)
end)

As you can see there is a lot more code involved to build a webpage with some buttons on in LUA.

A little explanation.

wifi.sta.config("XXXXXXXX","YYYYYYY")

Fill in your own routers credentials.

Next a network connection is established.

buf = buf.."<p>Switch 1 <a href=\"?pin=ON1\"><button>ON</button></a>&nbsp;<a href=\"?pin=OFF1\"><button>OFF</button></a></p>";

These lines put the name "Switch x"on the webpage and put two buttons after the name being ON and OFF and they will get connected to the variables ON1 and OFF1

        if(_GET.pin == "ON1")then
              led1 = 255
              ws2812.writergb(3, string.char(led1,led2,led3,led4,led5,led6))
        elseif(_GET.pin == "OFF1")then
              led1 = 0

In these lines is tested wether the button is pressed and the accompanying led is set ON of OFF by setting the variable led1 to 255 or 0. This is done for all 6 leds.

        ws2812.writergb(3, string.char(led1,led2,led3,led4,led5,led6))

The WS2811 DATA IN line is connected to D3 on the NodeMCU and the led's are set according the value that is in the varaibles led1 through led6


As you can see in the picture I replaced a led with a relay for testing and it worked just fine.

Even more complex

The next step was to write a program that produced a webpage with sliders which would set the intensity of the leds. I did that in Basic as I have (until now) no clue on how to put sliders easily on a webpage with Lua or C++ code.


The first program was very simple and had no fancy layout.

neo.setup(d8)
timer 100, [change]

rgbval1=0
rgbval2=0
rgbval3=0
rgbval4=0
rgbval5=0
rgbval6=0

slider rgbval1, 0, 255
wprint "<br>"
wprint "<br>"

slider rgbval2, 0, 255
wprint "<br>"
wprint "<br>"

slider rgbval3, 0, 255
wprint "<br>"
wprint "<br>"

slider rgbval4, 0, 255
wprint "<br>"
wprint "<br>"

slider rgbval5, 0, 255
wprint "<br>"
wprint "<br>"

slider rgbval6, 0, 255
wprint "<br>"
wprint "<br>"

wait

[change]

neo(0,rgbval1,rgbval2,rgbval3)
neo(1,rgbval4,rgbval5,rgbval6)

wait

The code was equally simple.

De first WS28-11's Data-In line is connected to D8 on the NodeMCU. Then a timer is initiated that every 100 ms calls the routine [change]. In this routine the value of the sliders is send to the WS2811's which alter the intensity of the leds accordingly.


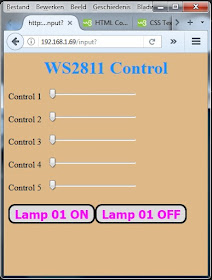
I wanted it to look a bit more fancy and that resulted in the above picture. Besides having a better looking web-page I decided to alter the last slider in an on-off button and like before I attached a relay in stead of the last led.


wprint "<!DOCTYPE html>" 
wprint "<html>"
wprint "<head>"
wprint "<style>"
wprint "h1 {text-align:center;}"
wprint "</style>"
wprint "</head>"
wprint "<body>"
wprint |<body style="background-color:Burlywood  ;">|
wprint |<H1><span style="color: Dodgerblue;">|
wprint "WS2811 Control"
wprint "<br>"
wprint "</H1>"

neo.setup(d8)
timer 100, [change]

ws0102=0
ws0102=0
ws0103=0
ws0201=0
ws0202=0
ws0203=0

wprint "Control 1"
slider ws0101, 0, 255
wprint "<br>"
wprint "<br>"

wprint "Control 2"
slider ws0102, 0, 255
wprint "<br>"
wprint "<br>"

wprint "Control 3"
slider ws0103, 0, 255
wprint "<br>"
wprint "<br>"

wprint "Control 4"
slider ws0201, 0, 255
wprint "<br>"
wprint "<br>"

wprint "Control 5"
slider ws0202, 0, 255
wprint "<br>"
wprint "<br>"

'wprint "Control 6"
'slider ws0203, 0, 255
'wprint "<br>"
'wprint "<br>"

button "Lamp 01 ON", [lamp01on]
a = "background-color:Gainsboro;"
a = a & "border: 3px solid black;"
a = a & "font-size: 22px;"
a = a & "font-weight: bold;"
a = a & "color: fuchsia ;"
a = a & "border-radius: 12px;"
cssid htmlid(), a

button "Lamp 01 OFF", [lamp01off]
a = "background-color:Gainsboro;"
a = a & "border: 3px solid black;"
a = a & "font-size: 22px;"
a = a & "font-weight: bold;"
a = a & "color: fuchsia ;"
a = a & "border-radius: 12px;"
cssid htmlid(), a

wait

[change]

neo(0,ws0102,ws0101,ws0103)
neo(1,ws0202,ws0201,ws0203)

wait

[lamp01on]
ws0203 = 255
neo(1,ws0202,ws0201,ws0203)
wait

[lamp01off]
ws0203=0
neo(1,ws0202,ws0201,ws0203)
wait

Again the code speaks for itself and you can see how easy it is to build something fantastic in just a few lines with Basic.

This gives you enough to play with for a short time. Story number 2 coming up soon and like I said before that will show you how to use this with an Arduino (attiny85) and even a BBC Microbit. And I'll show you how to control multiple RGB led strips simultaneous using this method.

So till next time.
Have fun !!!

Luc Volders

Monday, April 1, 2019

Always knowing where you are

For an index to all my stories click this line

I'll let you in to a little scret. I am notorious known for getting lost.
Drop me somewhere in a city, walk a few meters and turn some corners and I will never find my way back. Visit some place with me and come back a few weeks later: I really can not find where it was.

So luckily for me there is navigation. And Google Maps.
And just when you think verything is fine and the world a sunny place I realise I have forgotten my navigation and disaster strikes.

What I have learnt to do is to orient upfront. Before I go somewhere I look at the place on Google maps. And then I got this fantastic idea to never get lost again.


Suppose you want to go to the National Monument at the Dam in Amsterdam.
First open your webbrowser and type the name of the place you want to visit.


A list is shown with things Google found but look at the top off the screen. There you can find maps. Click on that.


 You'll be presented a map of the environment of the place you have searched for.


And exactly in the middle you'll find a red pin right at the spot you are looking for.

This gave me this tremendous idea.

Would this work the other way round ????

If you can see the red pin, you know where you are !!!

So here is the solution.


Copy the picture of the pin. Enlarge it in a drawing program and print it. Glue it to a piece of carton and punch a small hole in it so you can hang it on a wire.


Or even better. 3D print it. I made a version with a suspension eye. I have several of them and never leave the door without one. There is one permanent in my car, and one hanging on my bicycle.

Hang it on your coat or shirt, depending on the outside temperature, and you never can get lost again cause you are were the pin is.

For convenience I will put one on my backpack when I am participating in the Walk of the World in july so the people walking behind me know where they are.


To print some for yourself  you can find the STL file on my github account:

https://github.com/Lucvolders/Googlepin

Till next time
Make fun of yourself

Luc Volders

P.s. Remember what day it is today.