Pages

Friday, September 22, 2023

Freeboard revisited 5: install add-ons

For an index to all my stories click this text

This is another entry in my series about Freeboard. Before we go on I will give a quick overvieuw on the previous stories.

The first story on Freeboard was published in October 2019 on this weblog. This story is a tutorial on all the basics you need to know and use for working with Freeboard. So please read this first. You can find that story here: http://lucstechblog.blogspot.com/2019/10/freeboard.html

A few months later Freeboard was no longer a free service. You needed to pay a monthly fee to use their servers. That pissed me off as some of my readers were using this service as a result of my story. But there was nothing I could do about it.

Then I found a story written by a new service that brings block-based programming to the ESP8266, ESP32 and Raspberry Pi Pico. They used Freeboard as a means to display the IOT data and stated that it was easy to setup Freeboard on your own site. The Freeboard sourcecode was published on Github and free to use. So I forked Freeboard to my own Github repositry and tried to install Freeboard on Github pages which unfortunately failed. Why ?? Well read this story: http://lucstechblog.blogspot.com/2023/08/freeboard-revisisted-part-1.html

Next step was to try to install Freeboard on a free webhost and that succeeded. So if you want to use Freeboard and do not have your own server read this story and you are ready to go: http://lucstechblog.blogspot.com/2023/08/freeboard-revisited-2.html

For testing purposes I then build a small Javascript program that runs in your browser and sends random values, switch (on-off) values and a slider value to Freeboard. Here is the story that shows how to make such a console yourself: http://lucstechblog.blogspot.com/2023/08/freeboard-revisited-3-freeboard-console.html

Using a free webhost to run your webserver is a great means to get things done. However it makes you dependend on a cloud-based service. To avoid that I installed Freeboard on a spare Raspberry Pi and that works as a charm. So now I have my own Freeboard server. This story tells how to install Freeboard on your own Raspberry Pi webserver: http://lucstechblog.blogspot.com/2023/09/freeboard-revisited-4-install-freeboard.html

What we are going to do.


Just have a look at the above picture. It is a nice dashboard for your IOT projects. But something is missing. Freeboard offers gauges, a graph, and indicators for switches. But there are no sliders for controlling motor speeds or switchess for putting lamps on or off. The standard version of Freeboard can only display data. It can not send data to your esp's to set lamps on or off etc.

Luckily for us there are a lot of people working with Freeboard and there are some plug-ins available that makes the things we are missing available. Just search with Google for Freeboard add-ons or plugins and you will stumble upon some great expansions for Freeboard.

I am going to show you how to install the Onlinux plug ins. You can find these at the original Github page https://github.com/onlinux/freeboard-plugins Next to that you can find a copy (fork) at my own Github repositry: https://github.com/Lucvolders/freeboard-plugins I urge you to get a Github account and fork it yourself from the original Github page or from mine.

Installing the Freeboard plugins on 000webhost.

The first step is to browse to my Github repositry (or yours if you forked mine) and click the green Code button to download the repositry to your harddisk.


You can find my repositry at https://github.com/Lucvolders/freeboard-plugins

The downloaded file is a zip-file called freeboard-plugins-master. It will be in your download folder on your harddisk. Click on the zip file to open it.


Open a new window and choose a work-directory. Make a new map and call it freeboard-plugins
Copy the files from the zip file into the new map.


I had Freeboard already downloaded on my own computer and there is a map called plugins. Two maps were already present freeboard and thirdparty. So I added the freeboard-plugins map


 Use your web browser to visit the 000webhost, login and choose "manage website".

Click on the tools menu and then choose File Manager


Now drag the freeboard-plugins folder from your harddisk to the 000webhost filemanager and the files will be copied to the Freeboard public.html/plugins folder.


This is how the 000webhost file manager should show your just updated map.


The plugins folder contains 5 plugins which we are going to install in Freeboard: actuator.js, horizontal_linear_gauge.widgets.js, plugin_highcharts.js, slider-plugin.js and switch.js


To install these we have to modify the index.html file. So click on public_html to get back to the main part of our website. Now double-click on index.html to open this file in an editor.


In the editor look for the next lines

    <script type="text/javascript">
        head.js("js/freeboard_plugins.min.js",
                // *** Load more plugins here ***
                function(){


Change these lines to add the new plug-ins like shown below.

    <script type="text/javascript">
        head.js("js/freeboard_plugins.min.js",
                "plugins/freeboard-plugins/switch.js",
                "plugins/freeboard-plugins/actuator.js",
                "plugins/freeboard-plugins/horizontal_linear_gauge.widgets.js",
                "plugins/freeboard-plugins/plugin_highcharts.js",
                "plugins/freeboard-plugins/slider-plugin.js",
                // *** Load more plugins here ***
                function(){


When done click save and close the File Manager. You're Done !!

Installing Freeboard plugins on the Raspberry Pi.

The story where we installed Freeboard in the Apache webserver made it clear that all files should be installed in var/www/html. You can re-read that story here: http://lucstechblog.blogspot.com/2023/09/freeboard-revisited-4-install-freeboard.html


The photo shows that there is a subdirectory called plugins. We need to put the new plugins into that subdirectory.


There are already two directories in there called freeboard and thirdparty. We are going to add the new directory with plugins here.

We can copy the new plugin directory directly from github into the plugins directory. Open a terminal window and give the following commands.


pi@raspberrypi:~ $ cd ..
pi@raspberrypi:/home $ cd ..
pi@raspberrypi:/ $ ls
bin   dev  home  lost+found  mnt  proc  run   srv  tmp  var
boot  etc  lib   media       opt  root  sbin  sys  usr


Now we are sure we are in the system directory

pi@raspberrypi:/ $ cd var
pi@raspberrypi:/var $ cd www
pi@raspberrypi:/var/www $ cd html
pi@raspberrypi:/var/www/html $ cd plugins


These commands bring us to the /var/www/html/plugins directory

pi@raspberrypi:/var/www/html/plugins $ sudo git clone https://github.com/Lucvolders/freeboard-plugins

This command copies the freeboard-plugins repositry from Github right into our /var/www/html/plugins directory.
The command is: sudo git clone https://github.com/Lucvolders/freeboard-plugins

Cloning into 'freeboard-plugins'...
remote: Enumerating objects: 96, done.
remote: Counting objects: 100% (12/12), done.
remote: Compressing objects: 100% (12/12), done.
remote: Total 96 (delta 4), reused 2 (delta 0), pack-reused 84
Unpacking objects: 100% (96/96), done.
pi@raspberrypi:/var/www/html/plugins $


And it's done.

The only thing left to do is to alter Freeboards index.html file to include the new plugins.


First step is to get back to the the var/www/html directory


Clich with the right mouse button on the index.html file and edit it with the Text Editor (Simple Text Editor).

In the editor look for the next lines

    <script type="text/javascript">
        head.js("js/freeboard_plugins.min.js",
                // *** Load more plugins here ***
                function(){


Change these lines to add the new plug-ins like shown below.

    <script type="text/javascript">
        head.js("js/freeboard_plugins.min.js",
                "plugins/freeboard-plugins/switch.js",
                "plugins/freeboard-plugins/actuator.js",
                "plugins/freeboard-plugins/horizontal_linear_gauge.widgets.js",
                "plugins/freeboard-plugins/plugin_highcharts.js",
                "plugins/freeboard-plugins/slider-plugin.js",
                // *** Load more plugins here ***
                function(){


And we are done.
As you can see this is a lot easier as installing plugins on the 000webhost webpage. Although the basic commands are the same.

The result.

Open your browser to Freeboard wether it is on your 000webhost server or on your local Raspberry.


As you can see my Freeboard runs on my Raspberry Pi with my local IP number 192.168.1.87. Choose Add pane and then press the + to add a new widget. And there is the list with widgets including the new widgets.


What do the new plugins do.

There are 5 new plugins and I briefly tell you what they do.

Switch.
Well thet is obvious. You can put the switch on or off and then it sends a command to a certain URL. That URL is for example the IP adress of an ESP8266 or ESP32 with the command to put a led or relays on or off. However the commands are not limited to on or off, it also may be "red" or "slow" or whatever you might need.

The Actuator.
The Actuator has two functions. It tests the status of a switch (on or off) and represents that with a led. But if you click it it works the same as a switch and sends a command to an URL.

The Horizontal Linear Gauge
Well that is obvious. It displays a horizontal beam that represents a received value.

Time Series (Highcharts)
A chart with a different look as the standard  Sparkline chart.

Slider
The slider checks a value just like the actuator and shows that. If you change the slider manually it sends a command to an URL just like the switch or actuator.

The actuator, switch and slider can send data with an URL to an ESP8266 or ESP32. The ESP at that time must be running a webserver that gets the command and acts on it.
An example on how this works can be found at: http://lucstechblog.blogspot.com/2020/02/domoticz-sending-to-esp.html In that story information is send from Domoticz to an ESP webserver that sets a led on or off. Sending command from Freeboard to the ESP's webserver is not much different.
Please send a mail if you need assistance with this. I am not going to answer individual mails but if enough people send a request I will write a story on this weblog on how to do this.

So start experimenting and
have fun

Luc Volders


Friday, September 15, 2023

Freeboard revisited 4: install Freeboard on Raspberry

For an index to all my stories click this text


A few years ago I wrote a story on Freeboard. Freeboard is a dashboard for IOT purposes that was free to use at that time. You can re-read that story here: http://lucstechblog.blogspot.com/2019/10/freeboard.html
A few months after I wrote that story Freeboard suddenly became a paid service. Their servers were no longer free to use for hobbyists like you and me.

Then I found a story on how someone was able to use Freeboard (legally) for free again. Freeboard's source was published on Github and free to download and use by anyone. So I copied the software to my own repositry and tried to put it on a Github page which failed. You can re-read that story here: http://lucstechblog.blogspot.com/2023/08/freeboard-revisisted-part-1.html

The next step was to try to install Freeboard on a free webhost called 000webhost. And that worked great. Read here how to do that and build your own Freeboard dashboard again: http://lucstechblog.blogspot.com/2023/08/freeboard-revisited-2.html

When Freeboard worked again I needed an easy means to send data to it to display test data. The easiest way to do that was to design a webpage with some Javascript that send data to Freeboard. This story tells how to do that and gives the source code: http://lucstechblog.blogspot.com/2023/08/freeboard-revisited-3-freeboard-console.html

If you read the previous stories you know Freeboard is up and running again for free. You can use these stories to get Freeboard running for yourself and it'll work great. No strings attached. And no fees to be paid.

For me it worked great. But there was some small thing nagging me. Everything works fine but Freeboard is stored in the cloud. And I do like not to be dependend. Then a thought crossed my mind.
If Freeboard just needs a webserver to function why not use a Raspberry Pi for that. Raspberry's are cheap and make a great webserver. And best of all, they make you independend of the cloud again.

I have several Raspberry's doing different stuf and I still have some spare ones. So I took a Raspberry 3B, installed it and started building a webserver.

Freeboard on a Raspberry Pi

I am not going to tell you how to install a Raspberry Pi as there are loads of webpages that cover this in detail. If you have no idea just follow the steps in the documentation from the Raspberry Pi foundation: https://www.raspberrypi.com/documentation/computers/getting-started.html

I always run my Raspberry's headless. This means I do not attach a mouse, keyboard and monitor but run VNC and do all the work from my PC. Is a tiny bit slower as working direct on the Raspberry but saves desk-real-estate. If you do not know how to install VNC consult the Raspberry documentation: https://www.raspberrypi.com/documentation/computers/remote-access.html#virtual-network-computing-vnc

After setting the Pi up the first thing we have to do is to install a webserver program on the Raspberry Pi. The most popular is Apache. So open a terminal window on the Raspberry and give the next command:

sudo apt install apache2 -y

This downloads and installs the Apache webserver software.

Apache stores the web-page in /var/www/html

So we need to transfer the Freeboard files from the Github repositry to that directory on the Raspberry.

That is easy.

git clone https://github.com/Freeboard/freeboard.git


Just type this command in a Raspberry terminal and a new folder will be made with the name freeboard. All necessary files are downloaded from Github and placed inside this folder.

The access to the /var/www/html directory is restricted so we need to open it.

The easiest way to copy files is with the file manager. However the /var/www/html directory has a restricted access. To overthrow this type the next command in a terminal window:

sudo pcmanfm

This opens the filemanager in sudo mode and now we have all the rights we need.

Open the freeboard directory in a Filemanager window and open a second window with the var/www/html directory.


Now you can drag the files in the freeboard directory into the var/www/html directory just like you would do when dragging files in windows.

Done !!!

How to access Freeboard.

First step is to find your Raspberry's IP adress.


The easiest way is to hoover your mouse over the up-down arrow on the top-right of Raspberry's screen. It will show you it's IP adress.


Another option is to type hostname -I into a terminal window. This shows you the IP-number of your Raspberry.

As you can see my Raspberry's IP adres on my internal net is 192.168.1.87.


Now open your webbrowser on your PC, tablet or phone and type the IP number in the browsers URL bar and there you are !!


Access your data world-wide

To access your Freeboard from outside your house you need to set port-forwarding in your router. As every router is different I can only show how it is done in my Zyxell router.


Open the web-page of your router.

First make sure you know the IP adress of the Raspberry. In my case it was 192.168.1.87


Clicking on the Freeboard icon in my router reveals the same IP adress.


At the bottom of the screen from the network settings click on NAT


As you can see I added Freeboard to my Port Forwarding list.


And this is how I filled in my settings.
The Freeboard server IP is 192.168.1.87. It is a webserver so accessed through port 80 and I redirected that port to 8085.

The last step is to point your browser to https://www.whatsmyip.org/


The whatsmyip service shows your internet IP adress. This adress together with port 8085 makes Freeboard available to you from anywhere in the world.


Judt point your phone's or tablet browser to YOUR-IP-ADRESS:8085 from anywhere in the world and you get access to your Freeboard.

And that's it !!!! We've done it !!
Freeboard is up and running for free again, be it from a webhost like the previous story in this range showed or be it from your own Rasberry Freeboard server.

Something is lacking.

I think you might have noticed that something is lacking.
There is no means to set switches, lamps, fans etc on or off. We can only display data on Freeboard.

Well luckily there are add-ons freely available that makes sending data to an ESP possible. That is what we are going to tackle in an upcoming story.

Till next time.
Have fun !!

Luc Volders


Friday, September 8, 2023

Simple Android countdown timer in App Inventor

For an index to all my stories click this text.

Every year we have a family weekend. Well actually it is more than a weekend. Generally we spend 4 to 5 days together in a rented house somewhere in The Netherlands or Belgium. And dutring that time we enjoy playing games. Board games or creativity games.

So I was asked if I had a countdown timer that we could use to limit thinking times during the games. Well I did not have one but said that I could build one. As time was short (I was asked just a few days before the weekend started) I decided to build a countdown timer on my smart phone using MIT's App Inventor

Despite all the new methods to build App's like Javascript and B4X I still like App Inventor for it's simplicity and interactive testing.

App Inventor

For those not familiar with App Inventor I advise to have a look at it. App Inventor is free to use and easy to understand. It uses block coding, just like scratch, to build programs. There is an on-screen editor for placing buttons, sliders, images, switches, textboxes etc. There is a connection with on and off-line databases for storing and retrieving large volumes of data. And of course it supports all the sensors your phone can have like GPS, Accelerometer, Proximity sensor, Near field etc. etc. etc.

I already wrote several times about App Inventor on this weblog. You can find those stories on my index page: http://lucstechblog.blogspot.com/p/index-of-my-stories.html

If you want to play with App Inventor there are plenty tutorials on their website and there is a forum where you can find loads of info. Here is the link to the site: https://appinventor.mit.edu/

The good part is that App Inventor nowadays also is capable of making Apps for Apple's IOS. Not a thing I have tested so far as I do not own an Apple Iphone.

Best of all is that any app you create can be saved as an APK file and then installed on any Android phone. You can even upload your App's to the Google Play Store if you like.

The countdown timer App

I wanted a simple countdown timer. A slider with which the gamemaster can set a time between 1 and 120 seconds. A start button. When the set time has passed the screen will change color and an audible signal is generated. As audio signal I wanted a voice that spoke out "Time is up". So nothing to fancy. That is due to the short timespan I had for building the app.

The screen

In App inventor you will switch between two windows while building your app. The first is the designers window in which you build your app's screen. And a block window in which you build the actual program.


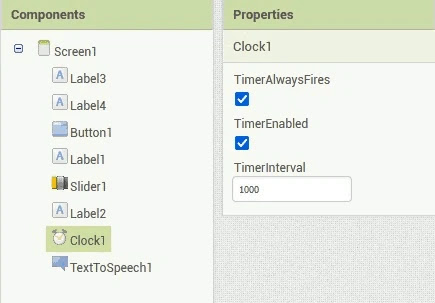
Here is the window with the components.

There are 4 labels. Two labels contain text. Two labels are hidden and are just used to make some vertical space. The first label is just a lable containing the title of the app. The second label shows the value of the slider.

There is one button with a red background, cyan text and rounded corners. The textalignment is set to center so the button is displayed in the middle of the screen. The font size is set to 100 to get a real large font. As you can see, you can alter almost any feature of the button.

Then there is a slider. I set the minimum value to 0 and the maximum value to 120. The left color is set to green and the color on the right ro red. I gave the slider a width of 60% of the screen.

And then there are two hidden components. The first is the clock which can be found in the sensors section. The second component is the TextToSpeech component which can be found in the Media section of the designer.


Here you can see that the clock component is highlighted which brings up the properties of that component. The clock component is not a normal clock but it is a timer which can initiate an action every x milliseconds. I set the TimeInterval at 1000. This means that every 1000 miliseconds, so every second) the timer will give a signal on what we can have the program do something.

The blocks

This is where the actual program is build.


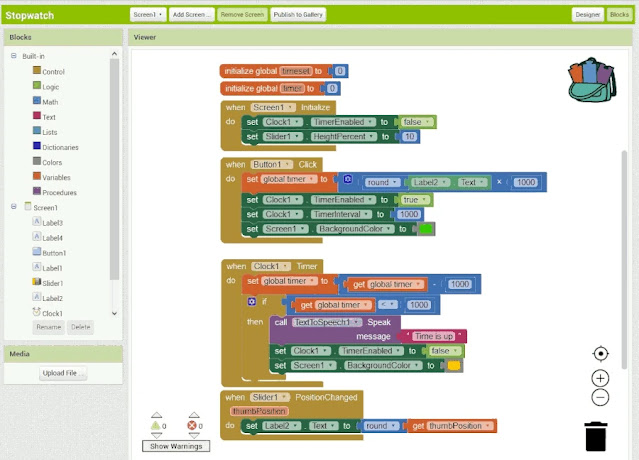
Let's have a look at all the blocks and that will show you how easy it is to build a program in App Inventor.


This is how variables are declared and initialised. Just one variable is needed. It is called "timer" and set to 0.


Whe3n the app's screen opens the clock's times is diabled. Otherwise the timer would start immediately when the app starts. That is not what we want. We want the timer to start when we press the START button.

The height of the slider is altered. I personally think the standard slider is a bit to slim so I made it higher. I set the hight to 10% of the screen height.


You will want to set the slider at the right position (number of seconds) when the program starts. This block checks the slider's value and puts it into Label2 so you can see what the exact timer setting is. The value is rounded so we will get integer values (full seconds).


This block performs the things that must be done when the button is clicked.
The timer variable is set to the value in Label2. This is thye value you set with the slider. The value is in seconds. The program calculates with miliseconds so we have to multiply the value by 1000.

Next the timer is enabled.
And there is an interval set at 1000. This makes the program erform a check every second.

To have a visual feedback that the program has started we set the background of the screen to green.


This block gets executed every second. It is executed by the TimerInterval.
Every time thisw block is executed a second has passed so we subtract 1000 miliseconds fr4om the timer variable (which is set to the time in Label2).

Next we test with an if statement if the timer variable has become less then 1000. If so that means the set time has passed.

Then the program speaks the words "Time is up" so make sure the volume of your phone is up.
The timer interval is disabled as we do not want to start again till the START button is pressed.
And as a visual feedback the screen color is set to orange/yellow. So we now the time is up in case you missed the audio signal.


And here is how it looks on an Android phone when the set time has past. In my version I have set the App's name in Dutch as you can see.

Improvements

As said before I was lacking time but there are certainly a few improvements that could be made. The screen could be made visually more attractive. There could be made a countdown field that decreases the set time every second.

App inventor is still going strong and a great product to play with. Give it a go. You might develop something great !!

Till next time
have fun


Luc Volders