Pages

Friday, September 17, 2021

ESP32cam programming board

For an index to all my stories click this text

Lately I have been playing with the ESP32cam. A small board containing an ESP32, a SD card slot and a camera !! If you haven't heard about it by now you have been living under a rock. The picture and video quality is all in all very satisfying for a board of this price. For around 6 dollar from your favorite chinese supplyer you will get a complete IP-camera.

I will not go into details about installing the software on this board because there are enough tutorials on the internet about his. Well.......unless you want me to write one that is.


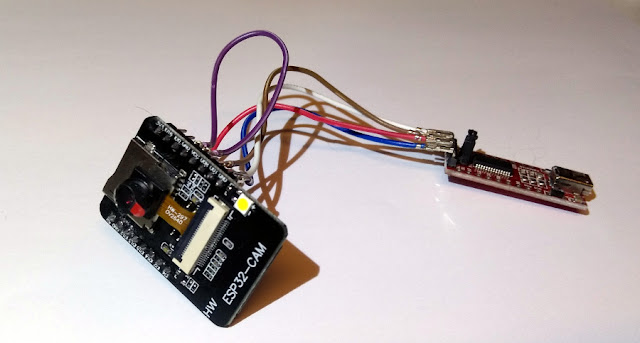
The problem with this board however is that it lacks a USB port. So to program it you will need a FTDI (USB to serial converter). These can be had for a few dollar and can also be used to program Attiny microcontrollers and ESP-01's. Long time ago I published an ESP-01 programming board which also uses an FTDI. You can read that story here: https://lucstechblog.blogspot.com/2019/11/esp-01-programming-board-new.html


Attaching the ESP32cam to the FTDI is easy but involves several wires to be attached. It looks like a bunch of spaghetti.

So to simplify things I decided to build a small programming board for the ESP32cam. I did it on stripboard so you can easily reproduce it.

Schematics.

This is how the board is wired.


At the bottom you can see a USB connector of which only the VCC and GND are connected.

This can be used only as a USB power supply when the FTDI is not connected. You can only program the ESP32cam with the FTDI connector.

At the left there is a header in which we can place the FTDI converter.

Please note thatb the GND and VCC of the FTDI and USB connector are connected to the ESP32 and to eachother. So NEVER connect an USB cable to your computer and at the same time an FTDI converter to your computer. Als DO NOT connect a USB power supply and the FTDI together. This might damage your computer beyond repair.

At the left on the top you can see a switch. When closed it connects GND to IO0 and then you can program the ESP32cam board. If the switch is open the board can be used. A bit like the boot switch on a ESP32 Devkit Board.

BEWARE

There are several different FTDI converters available. The one displayed here has 6 pins. I also have a 5 pin version. These are not compatible !!! So when using this schematic make sure you adjust it for the pin-layout of the FTDI you are using.

Breadboard

After looking at the schematics you can see that the stripboard layout is simple.


Again: your FTDI might have a different pin layout so beware of that.

At the bottom is the USB connector of which only VCC and GND are connected. At the top is the FTDI header. As you can see the lines of the stripboard have been cut in the middle so the FTDI and USB are not connected. The only line that is intact is the line at the left which is the GND.

On the right side there is a header for the ESP32cam board. Here also the lines in the middle are cut so the top pins of the ESP32cam do not connect to the lower pins.

VCC is connected to the ESP32cam on the right side at the bottom and on the FTDI pin and the USB connector.
GND is connected to the top left pin of the ESP32cam and also to the FTDI and the USB connector.

At the top right side there is the switch, it is connected to GND and IO0.

And then there are 2 wires that connect the TX and RX lines from the FTDI to the ESP32cam.


Here you can see the stripboard when the ESP32cam module is mounted on its headers.

Real life

Just put the FTDI in its header, put the switch in connect state and you can program the ESP32cam. 


After programing slide the switch back to the open state and remove the FTDI. You can then plug in a USB power supply or powerbank and look at the pictures on the ESP's website.

As you can see I put a small folded piece of paper beneath the USB connector so the pins are not bending all the time and stressing the print. For making it last I will put some hot-glue beneath the USB connector.

I am glad I build this board. Programming the ESP32cam is now a piece of cake. just slide it into the headers, program it, get it out and start using it.

Till next time
have fun

Luc Volders


Friday, September 10, 2021

Domoticz sending to ESP

For an index to all my stories click here

This is another story in my series about using the ESP8266 (or ESP32) with Domoticz.

Until now I have written several stories on how to send data from an ESP8266 to Domoticz.

The first story showed you how to switch a light on and off by sending commands from the ESP8266 to Domoticz. Re-read that story here: http://lucstechblog.blogspot.com/2020/01/sending-data-from-esp-to-domoticz.html
The second story showed you how to connect a Dallas DS18B20 thermometer to an ESP8266 and send the data to Domoticz. Re-read that story here: http://lucstechblog.blogspot.com/2020/01/sending-data-from-esp-to-domoticz-part.html
This third story showed how to build a web-page in the ESP8266 that incorporates two buttons to send commands to Domoticz setting a light ON or OFF and displays the temperature of the Dallas DS18B20 on the webpage and automatically sends the temperature to Domoticz every 5 minutes. Re-read that story here http://lucstechblog.blogspot.com/2020/01/sending-data-from-esp8266-to-domoticz.html
The fouth story used an ESP01 for Geofencing. It demonstrated how to automatically switch off the lights when you leave your home, and switch them on again if you return. Re-read that one here
http://lucstechblog.blogspot.com/2020/01/geofencing-for-domoticz-with-esp8266.html
This is all fine. But what if we want to build a smart lightbulb with the ESP8266 that can be controlled by Domoticz. That is the other way round. It means sending commands from Domoticz to the ESP8266.

What are we going to build.

The goal is to have an ESP8266 or ESP32 to which two leds are attached. The ESP will have its own (simple) webpage from which it can be controlled. And at the same time it can be controlled from Domoticz. When you have a working prototype you can replace the leds with relays so you can control real lamps in your home.

Breadboard setup.

First I'll show you the setup for the ESP8266


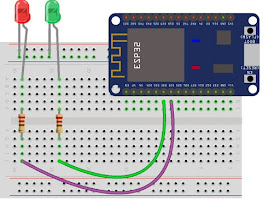
As you can see this test setup is very simple. Just 2 leds connected through an 220 ohm current delimiting resistor to D7 and D8 of a Wemos D1.

And here is the ESP32 setup


Almost the same setup. Just 2 leds with 220Ohm current delimiting resistors but now attached to pins D32 and D33
The ESP32 does not fit well to a breadboard and that is why I just put the lower half of the board on the breadboard. You can find an easy solution for the ESP32 breadboard problem here:
https://lucstechblog.blogspot.com/2018/08/breadboard-hack-for-esp32-and-esp8266.html

ESP Software

We need to have some way to communicate between the ESP and Domoticz. There are several solutions for this. The way I tackled it was by having the ESP act as a webserver. The advantage lies in the fact that you will have a seperate web-page that you can use for testing purposes, next to Domoticz control.

So let's build a webserver with two buttons that controls the two leds on the ESP.

The program uses the technique which I described here https://lucstechblog.blogspot.com/2019/12/universal-code-for-esp8266-and-esp32.html
This way you can use the same program for both the ESP32 and the ESP8266. Just mind the I/O pins where you attach the leds.

The program is from my book ESP32 uitgelegd. In there I describe how to add CSS codes to make the webpage more fancy. That is beyond the scope of this article. So buy the book on Amazon https://www.amazon.com/ESP32-Simplified-Control-your-internet/dp/171694211X/ref=sr_1_1?dchild=1&keywords=esp32+simplified&qid=1631302910&sr=8-1  or the Dutch version https://www.bol.com/nl/nl/p/esp32-uitgelegd/9200000116004013/?bltgh=ptKbVAsVAT4DSfDIOpFI1w.2_9.12.ProductImage


// Complete working webserver for ESP8266 and ESP32
// adapted by Luc Volders
// Two buttons for controlling led's
// and ready for getting commands from Domoticz
// or a webpage

// code for getting the settings for
// ESP8266 or ESP32
#ifdef ESP8266
#include <ESP8266WiFi.h>
#include <WiFiClient.h>
#include <ESP8266WebServer.h>
int ledpin = 15;
int ledpin2 = 13;
ESP8266WebServer server(80);
#elif defined ESP32
#include <WiFi.h>
#include <WiFiClient.h>
#include <WebServer.h>
int ledpin = 32;
int ledpin2 = 33;
WebServer server(80);
#endif

// Replace with your network credentials
const char* ssid = "XXXXXXXXXXXXXXXX";
const char* password = "YYYYYYYYYYYYYYY";

String webPage = "";
 
void setup()
  {
  Serial.begin(115200);
  WiFi.begin(ssid, password);
  Serial.println("");

  // Wait for connection
  while (WiFi.status() != WL_CONNECTED) {
  delay(500);
  Serial.print(".");
  }
  Serial.println("");
  Serial.print("Connected to ");
  Serial.println(ssid);
  Serial.print("IP address: ");
  Serial.println(WiFi.localIP());

  pinMode(ledpin, OUTPUT);
  pinMode(ledpin2, OUTPUT);

  server.on("/", []()
  {
    buildpage();
  });

  server.on("/Led1On", []()
  {
    buildpage();
    digitalWrite(ledpin, HIGH);
    delay(1000);
  });
  server.on("/Led1Off", []()
  {
    buildpage();
    digitalWrite(ledpin, LOW);
    delay(1000); 
  });
  server.on("/Led2On", []()
  {
    buildpage();
    digitalWrite(ledpin2, HIGH);
    delay(1000);
  });
  server.on("/Led2Off", []()
  {
    buildpage();
    digitalWrite(ledpin2, LOW);
    delay(1000); 
  });

  server.begin();
  Serial.println("HTTP server started");
}

void loop(){
  server.handleClient();
} 

void buildpage()
{
   webPage = "";
   webPage += "<!DOCTYPE html>" ;  
   webPage += "<html> <body>"  ;
   webPage += "Domoticz ESP Control" ; 
   webPage += "<br>" ; 
   webPage += "<p>Led No. 1   <a href=\'Led1On\'><button class='button'>ON</button>";
   webPage += "</a>&nbsp;<a href=\'Led1Off\'><button class='button'>OFF</button></a></p>";
   webPage += "<p>Led No. 2   <a href=\'Led2On\'><button class='button'>ON</button>";
   webPage += "</a>&nbsp;<a href=\'Led2Off\'><button class='button'>OFF</button></a></p>";
   webPage += "</a></p>";
   server.send(200, "text/html", webPage);
}

As usual on my weblog I am going over some details so you'll get a good understanding on whats happening in the program.

// code for getting the settings for
// ESP8266 or ESP32
#ifdef ESP8266
#include <ESP8266WiFi.h>
#include <WiFiClient.h>
#include <ESP8266WebServer.h>
int ledpin = 15;
int ledpin2 = 13;
ESP8266WebServer server(80);
#elif defined ESP32
#include <WiFi.h>
#include <WiFiClient.h>
#include <WebServer.h>
int ledpin = 32;
int ledpin2 = 33;
WebServer server(80);
#endif

The #ifdef looks at your Arduino IDE settings and determines from that if the program is meant for the ESP8266 or ESP32. The required libraries are then loaded and the I/O pins are set for the choosen board. D13 and D15 are used on the ESP8266 and D32 and D33 are used on the ESP32.

// Replace with your network credentials
const char* ssid = "XXXXXXXXXXXXX";
const char* password = "YYYYYYYYYYY";

Dont forget to replace the XXXXXXXXXXXXXXXX and YYYYYYYYYYYYYY with your own routers credentials.

The first part of the setup() should be familiar. The Serial port is set so we can check things through the Serial Monitor.
Wifi is started up and waits till a connection is made with your router. The IP adress is then shown in the Serial Monitor.

  pinMode(ledpin, OUTPUT);
  pinMode(ledpin2, OUTPUT);

The chosen I/O pins are set as output.

  server.on("/", []()
  {
    buildpage();
  });

When you point your browser to the IP adress that is shown in the Serial Monitor, the index webpage is shown and that is what this part does.

  server.on("/Led1On", []()
  {
    buildpage();
    digitalWrite(ledpin, HIGH);
    delay(1000);
  });
  server.on("/Led1Off", []()
  {
    buildpage();
    digitalWrite(ledpin, LOW);
    delay(1000); 
  });

The webpage shows you 4 buttons. 2 buttons for each led. One for ON and one for OFF. If you click one of the the buttons for led1 this routine is called. Click on the button for led 1 On and the webpage is build anew and the ledpin is set HIGH. Same for led 1 Off only the ledpin is set to LOW and the led will go off.

This routine is copied for led number 2 and only the names in the webroutines are altered in Led2On and Led2Off

  server.begin();
  Serial.println("HTTP server started");

The webserver is started and that is mentioned in the Serial Monitor so you know the ESP is ready to start its duties.

void loop()
{
  server.handleClient();
} 

In the loop() there is a library call that looks for incoming messages from the webpage and sends them to the /Led1On, /Led1Off, /Led2On or /Led2Off routine.

The buildpage() routine is where the web page is build and send to your browser. The complete webpage is build inside a string with the (obvious) name webPage.

   webPage = "";
   webPage += "<!DOCTYPE html>" ;  
   webPage += "<html> <body>"  ;
   webPage += "Domoticz ESP Control" ; 
   webPage += "<br>" ; 

The webPage string is emptied so we are sure to start with a new blank webpage. Next the name of the webpage is shown.

   webPage += "<p>Led No. 1   <a href=\'Led1On\'><button class='button'>ON</button>";

This is where the button is put in the webPage string. First the name of the button is put on the webpage and then there is a reference to the routine the button points to. In this case the routine is \'Led1On' and lastly the text (ON) is put on the button.

The lines for the other buttons are similar just the names are different.

   server.send(200, "text/html", webPage);

This line is the important one. It sends the string called webPage which contains the complete webpage to your broswer.

That's it.

As you can see the code can easily be expanded for more buttons and leds.

Start the program

Start the program and open the Serial Monitor.


Here you can see the startup sequence from my ESP32 followed by the lines that show that the ESP is connected to my Zyxell router and which IP adress it has. The IP adress is important for the next step I am going to show.


Now open your browser and point it to the indicated IP adress in the Serial Monitor and you should see something similar to the webpage above. You can also open that IP adress on your phone or tablet.

A neat trick

I am going to show you a neat trick which you can use for testing purposes. It even makes it easy for the next step: connecting to Domoticz.


This is the webpage you see in your browser. When you press a button you will see the command that is send to the ESP in the URL.

192.168.1.82/Led1Off
192.168.1.82/Led1On
192.168.1.82/Led2On
192.168.1.82/Led2Off

These are the commands you can see in the URL at the top of your browsers window.
Naturally your IP numbers will be different. But you get the drift.

Now open a new tab in your browser and copy one of the commands in. You will see that the webpage is loaded and that the command will also be executed (look at the leds).

So the command to switch a led ON or OFF is just the IP-Adress of the ESP followed by /Led1ON or one of the other commands. This is the HTTP command we are going to use in Domoticz.

Give the ESP a fixed IP adress

If you power your ESP down and start it up again it might get a different IP adress from your router. We can look-up the IP adress in the Serial Monitor each time if we have to. However we are goin to connect Domoticz to the ESP and Domoticz can not check the IP adress each time. So the ESP needs to get a fixed IP adress.

Open your router software (mine is a webpage) and look for the ESP in the wifi section. Mine is called Espressif.


Click on the name and I get a drop down menu with an info window. In that window I can click the checkbox that says Add device into Static DHCP.
When checked the ESP has a fixed IP adress.

How this works ?
When the ESP connects to your router it sends it's serial number to the router. Technically that is called the MAC Adress. Your router sees the Mac Adress and then knows it has to give it the same IP number as always.

Domoticz

So now we have an ESP8266 or ESP32 with two leds attached and a webserver running. We are now ready to have it connected and controlled from Domoticz.


In the Settings menu (Instellingen in Dutch) choose hardware and add a new virtual switch and call it Virtual ESP Led1.

As type define it as a Dummy just as the screen above shows you. Confirm and add it with the button at the bottom.


When done click on the Make Virtual Sensors button. Call it ESP Led1 and define it as a switch.


Now switch over to the Domoticz Switches tab and your newly build switch is there.


Choose "aanpassen" which should be something as adapt in the English version.
This is where we need the commands we noticed earlier. Remember that the command for switching led number 1 on is 192.168.1.82/Led1On and the command for switching it off is 192.168.1.82/Led1Off The only thing you have to do is to put these commands in the fields called "Aan actie" and "Uit actie" and your done.

So the commands you have to fill in are:
http://192.168.1.82/Led1On
http://192.168.1.82/Led1Off

Adapt this for your own IP adresses as they will be different for sure !!
And dont forget to save !!

Second led

The Routine for the second led is off course the same as for the first. Make a new Virtual Switch and call it Virtual ESP Led2. Then with this virtual switch make a new Virtual Sensors Button and call it ESP Led2. Go to the Switches and there will again be a new switch. Fill in the codes for the second led:

http://192.168.1.82/Led2On
http://192.168.1.82/Led2Off

Again adapt the IP adresses to your own finding in the Serial Monitor as described above.
And your done.

Adapting and expanding

It is easy to expand the ESP program and the switches in Domoticz to serve more leds. As the ESP8266 has about 8 usable I/O ports and the ESP32 has many more you can attach a lot of peripherals.

You could even use some IO ports for switching leds and others to send sensor information to Domoticz as was described in previous stories. This way you can use 1 ESP for a multitude of tasks.

You can easily replace the led with relays to have real light bulbs switching from Domoticz. Just like Sonoff, Belkin (Wemo) and the Dutch Action stores are doing under the brand name LSC. You can use simple relays which need a transistor to be controlled like I showed in this story: http://lucstechblog.blogspot.com/2015/04/ledstrip-controlling-2-ok-so-last-times.html
You can also use a relay module that can directly be attached to your microcontroller like the one I used in this story:
https://lucstechblog.blogspot.com/2016/09/esp-relayserver.html


When using relays you can change the Lightbulb Icon to an accompanying wall socket in Domoticz.

Till next time
Have fun

Luc Volders

Friday, September 3, 2021

Hook for paintings

 For an index to all my stories click this text

My girlfriend asked me for some help. She is a painter and needed a fast solution to hang some paintings. Mind you she makes miniature paintings. 


In this case it were miniature winter landscapes. They measure about 6 x 4 cm and are frameless. They are painted on wood and it would be allright if I could design something that could be glued on.Wanna see more ? Here is the link to her site: http://elsmulder.weebly.com/


Well that is an easy assignment. I designed it in Tinkercad and within an hour I had printed a few test samples.

Don't be fooled by the picture. The hook just measures 2 x 2 cm and the hole where the rope goes through is just 3 mm.


It works like a charm, and she is very pleased with it.

For larger objects you can glue multiple of these hooks to the back.


You can download the design from Tinkercad and adjust it to your own needs.

Till next time,
have fun.

Luc Volders