Friday, March 27, 2020

Steady hand game

 For an index to all my stories click this text


In these days of the Corona crisis simple games can help to keep your kids (and yourself) occupied. Therefore I build one. I guess everybode knows this game. There is a track made of wire and there is a loop wich must maneuvered along the track without touching it.


Here is the basic idea. This is a picture from Wikipedia


You can build this with a few electronic parts. You can even build this with just a led and a battery. And you can build it with a ESP8266. Using the latter you can ad leds, 7 segment displays etc. to fancy it up.


Above are a few samples of commercially available versions. Here is my version: 3 strike out !!


I build this with an ESP8266. It can easily be altered for using an Arduino or one of its family members. By exchanging the leds for neopixels and altering the program accordingly you could even use an Attiny85 to make this project.

Breadboard.


The setup is simple. 3 leds are attached to D7, D6 and D5. A button is attached to D0. The track wire is connected to GND and the loop wire is connected to D1. If you do have a Piezo Buzzer attach it to D2.

The program

Nothing special in the program. Each time the wires touch a led is lit, and the buzzer sounds. If you touch the wire more as three times your done and nothing further happens till you push the button and the game is reset for the next attempt or contestant.


const int BuzzerPin = 4; 
const int ContactPin = 5;
const int ButtonPin = 16;
const int ledpin1 = 13;
const int ledpin2 = 12;
const int ledpin3 = 14;
int count;

void setup() 
{
  pinMode(ContactPin,INPUT_PULLUP);
  analogWrite(BuzzerPin, 0);
  pinMode(ledpin1, OUTPUT);
  pinMode(ledpin2, OUTPUT);
  pinMode(ledpin3, OUTPUT);
  digitalWrite(ledpin1, LOW);
  digitalWrite(ledpin2, LOW);
  digitalWrite(ledpin3, LOW);
  count = 0;
}

void loop() 
  {
    if(digitalRead(ContactPin)==0)
    {
    analogWrite(BuzzerPin, 200);
    delay(400);
    analogWrite(BuzzerPin, 0);
    if (count <3)
      {
      count ++;
      }
    }
    switch (count) 
     {
     case 1:
     digitalWrite(ledpin1, HIGH);
     break;
     case 2:
     digitalWrite(ledpin2, HIGH);
     break;
     case 3:  
     digitalWrite(ledpin3, HIGH);
     break;
     }
    if ((digitalRead(ButtonPin)== LOW) && (count == 3))
       {
       digitalWrite(ledpin1, LOW);
       digitalWrite(ledpin2, LOW);
       digitalWrite(ledpin3, LOW);
       count = 0;
       analogWrite(BuzzerPin, 0);
       delay (1000);
       }
  }

If you do not own a buzzer you can easily leave that part out. The program can easily be modified to use a display instead of leds etc.

In real life.

I just used a solid electrical wire for the track and a piece of the same wire for the loop.


Above is my prototype on a breadboard. The track is a wire across the breadboard. The loop is on the left side at the bottom. A coathanger is the best material for the loop and track. Put it on a wooden shelf for sturdiness and experiment with different shapes.

Have fun

Luc Volders

Friday, March 20, 2020

Piezo becomes buzzer

For an index to all my stories click this text

I was experimenting with making some sound and noises with the ESP32.


To get some sound of the ESP32 there are two options. You can use an amplifier with a speaker or a Piezo Buzzer. I attached a Piezo Buzzer which worked just fine.


Few years ago I purchased some Piezo's to be used as a sensor. I started wondering what would happen if I attached one of these instead of a buzzer. I did and nothing happened. No sound came from the bare Piezo.

Then I put it out of the way on a plastic box with the wires still attached and suddenly I heard a sound. I moved the Piezo a bit around and the sound got better.

Obviously the difference between the bare Piezo and the buzzer was the housing. That started me wondering. There is a distinct price difference between the two. The buzzer is much more expensive as the bare Piezo. So how about building my own casing.


I sat behind my computer and designed a casing in Tinkercad. It consists of 2 parts.


The bottom which has a small opening at its side to let the wires out.


And a lid with a small hole so the sound can get out.


And here is the end result.

If you want to print them yourself. Just download the STL files from my Github repositry and go ahead.


https://github.com/Lucvolders/Piezohousing

Have fun and keep safe

Luc Volders

Friday, March 6, 2020

ESP32 makes Google Assistant talk

For an index to all my stories click this line.

Often when I am strolling around the internet I stumble upon something which I think is usefull or just plain fun. As I have no immediate plans for it I bookmark it for future use. And sometimes I find something which seems so much fun to play around with that I drop everything and start experimenting.

When I stumbled upon an interesting new library for the ESP8266 and ESP32 I immediately wanted to try it. And it is fun!!

I tried to get this working on the ESP8266 and failed miserably. I always got a compilation error indicating that I was missing some libraries. On the ESP32 however it worked flawlessly. Maybe you have more luck. So I'll stick to the ESP32 for this project.

Before I go on I have to give you some background information.

Two year ago I build a Google Home Assistant clone with a Raspberry. This works great but has some flaws. First it can not play music or radiostations as that function is disabled. Second I can not controll it with the Google APP. And lastly I can not alter the language in Dutch. The language part is the least interesting to me as I am confortable with English anyhow.


As soon as it became available in the Netherlands I bought a Google Home mini. First thing I did was making a connection to my Domoticz system. And now my mancave is really something from the future. When I walk into my room I just have to speak out loud the commands: "Hey Google set the hobby room lights on" and "Hey Google play NPO radio 1" and presto the lights turn on and Dutch radio 1 is played on the Google Home Mini.

I believe most of you (and which nerd or geek like me doesn't have one) who are familiar with the Google Assistant series think it is fun to give the Assistant commands and ask it all kind of things like weather forecast, traffic etc. etc.

I can ask Google Assistant all kinds of information it can find on the internet and command it to switch on lights and do other tasks in my home. It is however not possible to have the Assistant SAY anything you want. Well it is do-able by delving deep into the developer options and creating custom actions. But it could not be done in an easy way until now.

And then I found the Google Home Notifier library on the internet. This actually makes the Google Assistent say anything you want when you want !!!

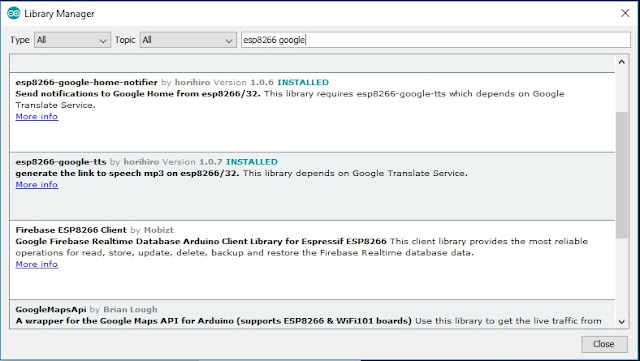
Actually you will need two libraries. The first one is esp8266-google-tss which can be found here: https://github.com/horihiro/esp8266-google-tts 
and the second one is esp8266-google-home-notifier which can be found here:
https://github.com/horihiro/esp8266-google-home-notifier


I urge you to install the latest Arduino IDE and then you can find there libraries also in the Libary manager found under the Sketch tab of the IDE.


The first library being esp8266-google-tts takes some text as input and sends it to Google. Google makes an MP3 file from that text.
The second library, esp8266-google-home-notifier, gets the MP3 file and sends it to your Google Home Assistant.

Install both libaries and let's have some fun.

Before the library can send information to your Google home it has to know where to find your Assistant. Please be aware that there are two things to consider. The library can only find an Assistant which is on the same network as the ESP is. And the language of your assistant must be set to english although that can be altered.

How to find your assistant.

There are two ways to find your assistant. Both have to be done on your Android Phone. 


If you have google Assistant installed on your phone swipe to the assistant screen and scroll down till you see the name of the Google Assitant. Mine is called Living Room speaker.


The second way to find your Assistant is to open the Assistant App on your phone and there you can also find the name of your Assistant. Again you can see the name I gave it is Living Room speaker.

With this information you are ready to start programming.

The first program.

Let us start with someting simple. The program will make Google Assistant tell you it is ready for your commands.


#include <WiFi.h>
#include <esp8266-google-home-notifier.h>

const char* ssid     = "YOUR ROUTER NAME HERE";
const char* password = "YOUR PASSWORD HERE";

GoogleHomeNotifier ghn;

void setup() 
{
  Serial.begin(115200);
  Serial.println("");
  Serial.print("connecting to Wi-Fi");
  WiFi.mode(WIFI_STA);
  WiFi.begin(ssid, password);

  while (WiFi.status() != WL_CONNECTED) 
  {
    delay(250);
    Serial.print(".");
  }
  Serial.println("");
  Serial.println("connected.");
  Serial.print("IP address: ");
  Serial.println(WiFi.localIP()); 
  
  const char displayName[] = "Living Room speaker";

  Serial.println("connecting to Google Home...");
  if (ghn.device(displayName, "en") != true) 
  {
    Serial.println(ghn.getLastError());
    return;
  }
  Serial.print("found Google Home(");
  Serial.print(ghn.getIPAddress());
  Serial.print(":");
  Serial.print(ghn.getPort());
  Serial.println(")");

  ghn.notify("Hi Luc, I am waiting for your commands");

  Serial.println("Done.");
}

void loop() 
{
}


A quick analyse of what is happening in the program.
As you can see everything is happening from within the setup routine. This makes sure the program only runs once.

#include <WiFi.h>
#include <esp8266-google-home-notifier.h>

const char* ssid     = "YOUR ROUTER NAME HERE";
const char* password = "YOUR PASSWORD HERE";

GoogleHomeNotifier ghn;

The above lines start with loading the libraries. We installed two libraries for this program. The esp8266-google-tss library is loaded from within the esp8266-google-home-notifier library. So we do need it but it is not included in our own program the other library takes care of that.

Do not forget to fill in your own routers credentials otherwise the ESP32 can not connect.

The setup starts wit6h connecting to the internet as usually and then it prints the it's IP adress in the Serial Monitor.

  const char displayName[] = "Living Room speaker";

  Serial.println("connecting to Google Home...");
  if (ghn.device(displayName, "en") != true)
  {
    Serial.println(ghn.getLastError());
    return;
  }

This section defines the name of the Google Assistant and looks if it is available, and also checks wether the language is set to English. Fill in exactly your own Assistant's name otherwise nothing will happen.

Sidenote:
The check for English language is important. The TSS library which is called from within the esp8266-google-home-notifier sends an English text to the google service which makes an MP3 from your request. The response would be really akward if the English Assistant tried to pronounce an foreign language text.

  Serial.print("found Google Home(");
  Serial.print(ghn.getIPAddress());
  Serial.print(":");
  Serial.print(ghn.getPort());
  Serial.println(")");

If everything checked positive the information about your Assistants IP adress and port are printed in the Serial Monitor.

ghn.notify("Hi Luc, I am waiting for your commands");

And this is the important line. This will actually have the Assistant speak your text.

That's it for now.
Play with this and let your assistant say whatever you want.

In the next part I'll show you how to have the assistant say some usefull things like sensor information.

Till next time.
Have fun.

Luc Volders