While working on projects I often wander the internet looking for drivers and tech news. And sometimes I stumble upon something amazing. That is how I found wandbox.org
wandbox.org is a place where you can test programs. Just point your browser to wandbox.org.
On the left side there is a list of all the languages you can use. Among others there are C, C++, Javascript, Lua, PHP and Python. There are 35 languages you can choose from.
Click on the language of your choice and on the right side you can see which compiler is used to test your program. You can change that by clicking on the X and then choose another compiler from the presented list.
For this example I chose Python as the language and you can see the various versions of the Python language I can use to test my programs. Unfortunately no MicroPython which is used on the Raspberry Pi Pico and Pico W and other microcontrollers like the ESP series. But there is standard Python which is close.
Above you can see a simple Python program and part of it's output.
And here is a small Javascript snippet as a test. This was taken from my alternative website with Javascript tips: https://javascript-tips.weebly.com/
There are more than 500 Javascript tips on this site..........
wandbox.org is a nice addition to my toolbox and great for quick testing programs in the various programming languages I use. And best of all: it is free. Just give it a try.
Till next time
have fun
Luc Volders

Friday, February 23, 2024
Wandbox
Sunday, February 11, 2024
IFTTT sets its users in the dark if they don't pay
For an index to all my stories click this text
Offering a service to users costs money. Offering a free service to customers also costs money.
What I do hate is when a service has done things for free for many years and suddenly wants to cash in, after they made you addicted.
I am talking about IFTTT.
I got this mail from IFTTT and it really pissed me off.
I have written several stories on IFTTT on this weblog. And I really liked their webhook service. IFTTT sat between your Google Assistant and, speaking pre-defined messages allowed to send commands to, ESP8266 or ESP32.
You could also send notifications to your phone if one of your microcontrollers noticed a temperature rising, a door opening etc.
Then a few years back IFTTT decided that free users were no longer allowed to have more than 3 applets. That really restricted a lot of users who build my projects. But hey it was still free.
And now they made things worse.
No webhooks can be used anymore with a free account as you can read in the above mail !!
And it is not that they give us ample time to look for an alternative. No this mail was send on 6 february, just a week before the free service is shut down !!
So first they make you addicted with a free account.
Then they restrict the service.
Then they make you pay.
The most I am pissed about is that many of the readers of this weblog and readers of my book ESP32 Simplified relied on IFTTT to get a lot of their home automation done.
And now that everything has been working for many years they suddenly have to pay.
To the readers of this weblog and my book ESP32 Simplified I say: sorry that I introduced you to IFTTT.
What I say to IFTTT is not suitable for publishing.
Luckily there are several free services that you can use to make your microcontrollers send notifications to your phone.
- Telegram has an API that you can use. There are stories on that on this web-log
- Pushbullet is a free service that has an API.
- NTFY is a service with a large free tier. I am going to do a story on this.
But maybe we should abandon cloud services all together and build a simple IOT server in our home using a cheap Raspberry Pi. Because IFTTT is not the first to pull this trick: remember Blynk ???
Luc Volders
Friday, February 9, 2024
The Pi5 has arrived
For an index to all my stories click this text
At last it is here in the Netherlands and I got one !!! A Raspberry Pi5
I have been a longtime fan of the Raspberry Pi family. Here is an (incomplete) overview of all the models I have bought (and used) in all the years they exist.
At the top there is the Pi Zero. I have several of them and I use these as an Internet radio. No screen, keyboard or mouse attached. An USB sound-card and a USB to network converter do the hard work. The Pi Zero has just 2 buttons attached to choose between two radio stations.
https://lucstechblog.blogspot.com/2018/10/raspberry-pi-internet-radio-part-3.html
Here is the full story on how to build it. The humble Pi Zero is perfectly capable for this task. I even used A Pi Zero to give a presentation (yes using office) for our local art-club.
At the bottom from left to right are the Pi2, Pi3, Pi4 and last but certainly not least the Pi5.
I use the Pi2,Pi3 and Pi4 for several purposes at home.
Hell I even still have a Pi (that is the Pi one) used as an IP-cam. And I wrote about that in 2016 !!! Here is that story:
https://lucstechblog.blogspot.com/2016/06/make-your-own-ip-cam-with-raspberry-pi.html
I use these Pi's for:
- My home automation system (Domoticz)
- A printer server so any body with a network connection in my house can print on my office printer
- A media player for playing music stored on my hard-disk.
- Octopi for controlling my 3D printer.
And now there is the Pi5.
The Pi5 is a beast. The Pi4 was already a fast machine but the Pi5 beats all my expectations. You can find all it's specifications here:
https://www.raspberrypi.com/products/raspberry-pi-5/

I installed Ubuntu on the Pi5 and it boots within 15 seconds. Starting Libre Office writer just takes 4 seconds and starting Firefox just 3 seconds. Very impressive. I have to admit I bought the 8Gb version so I can open several programs (or large documents) at the same time without running into memory problems that slow the machine down.
My Desktop machine is not the latest state of the art but an AMD Ryzen 1400 with 8GB memory. And the Pi5 beats it easily !!
Not the cheapest.
The Raspberry started as the 25-30 Euro/USD Linux computer. Well you can still get a powerful Raspberry Zero 2W for that price. The Raspberry Pi5 is in a different league.
To take full advantage of it's speed you will need a fan to cool the processor down. I opted for the active cooler. There is a Raspberry casing with build in fan. That fan however makes more noise (as I am told). And I can print my own casing.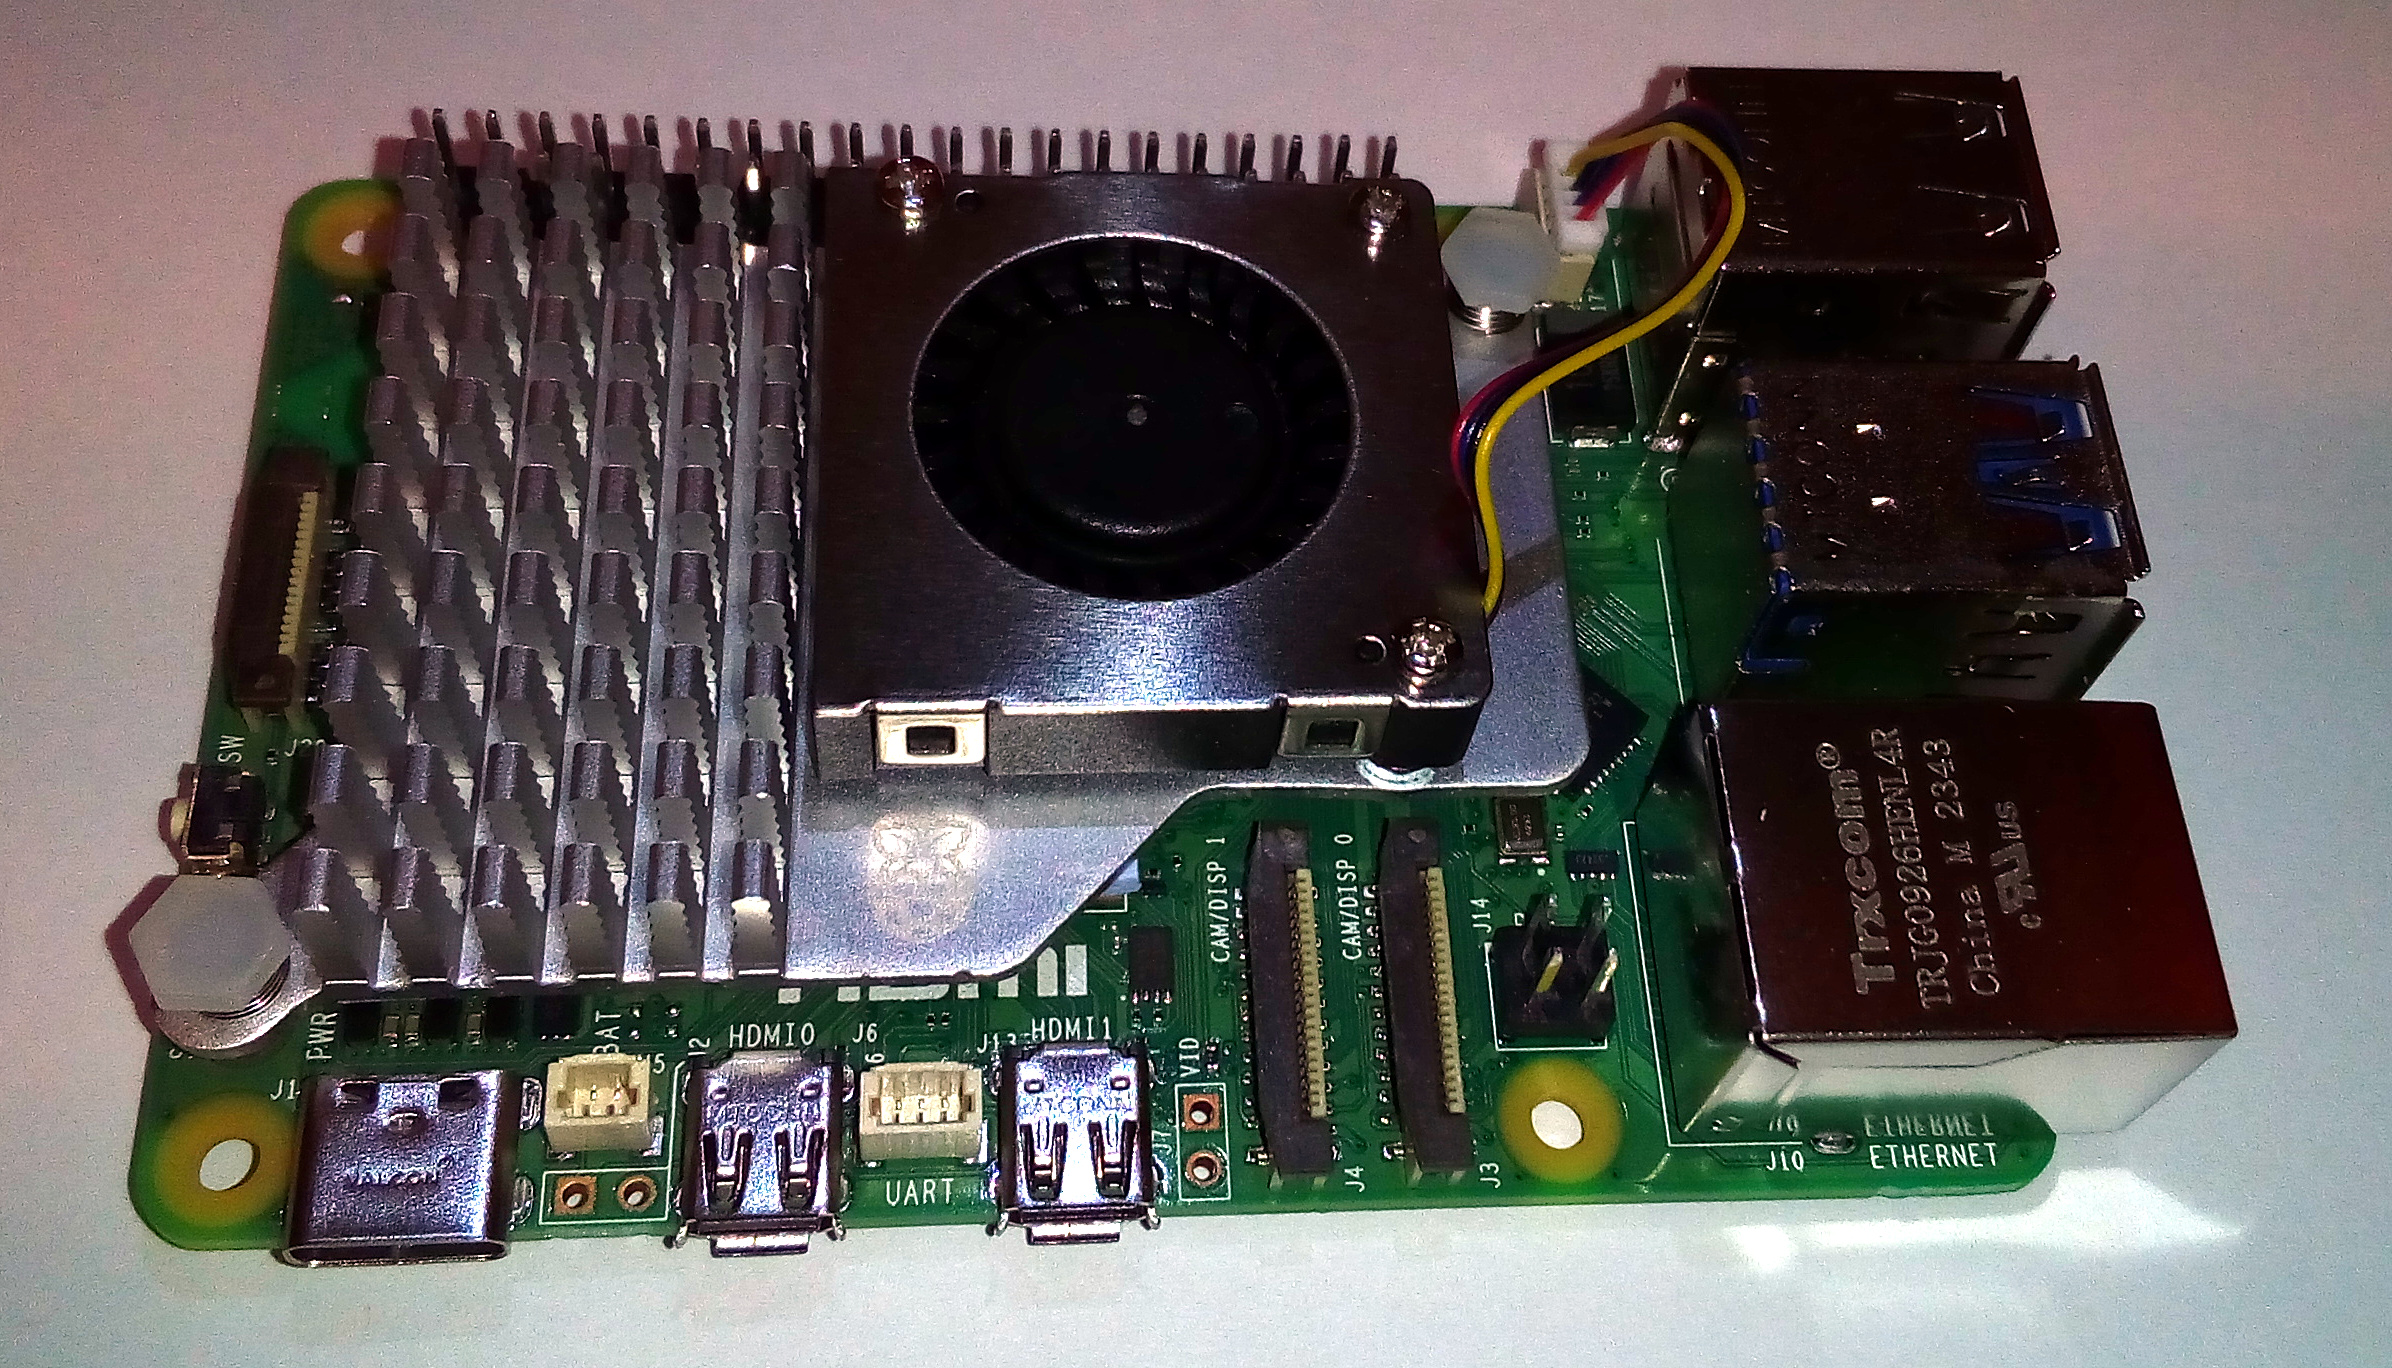
This is how the Pi5 looks with the active cooler attached.
Next to the cooler you will need:
- the original Raspberry power supply
- an HDMI to micro-HDMI cable or connector
- a fast SD card.
Combined this will set you back around 140 Euro/USD.
And you will need of course a mouse, a keyboard and a HDMI monitor.
Any desktop computer has a large storage capability nowadays. I use a 256Gb sd card on the Pi5 which is not a lot of storage nowadays. However you can attach USB sticks and drives as external storage.
I have several NAS systems in my network and use these as storage for all my computers. And the Pi communicates easily with these.
Nas systems have a lot of advantages. For example I can slice a 3D object with Cura or Prusa slicer on a computer. Send the files to a NAS. And my Raspberry Pi3 with Octopi gets the file and prints it on my Creality CR20 Pro.
Did you know you can build a NAS from a Raspberry PI (any model) and a USB drive ?? I still have some 1Tb USB harddisks and I am planning to use them as a NAS.
Booting the PI
When the Cooler was attached I powered up the Pi and got some stange error messages. So I carefully looked at them.
Fact was that I forgot to put the SD card in the slot on the Pi5. When I rebooted with the SD card, with Ubuntu installed, the Pi stated without problems.
However the error messages intrigued me.
The Pi was constantly probing the USB ports when there was no SD card.
So I started an experiment.
I powered the PI off and removed the SD card. Then I installed Ubuntu on an USB stick. Put the stick in one of the USB ports of the Pi5 and rebooted and presto: the Pi5 automatically booted from the USB stick !!!
So there are a few boot options. Put the OS on an SD card or on a USB stick.
If you want to boot from a USB stick use a USB3 compatible stick and indeed use one of the USB3 ports on the Raspberry Pi5. Otherwise your system will work (yes I used a USB2 stick on a USB2 port) but it will be slow.
Next
I am not sure yet. Most of the programs I need are available on Ubuntu 23.10 which is currently the only version of Ubuntu which is working on the Pi5. Not working is Discord, Cirkit, Prusa Slicer and Kicad as far as I know now. I'd rather have Ubuntu 22.04 working as that is a Long Term version, supported till 2027, and does support the aforementioned programs.
And there is of course Raspbian.
On Raspbian Prusa Slicer and Kicad are supported but no sign of Discord (yet). So maybe Raspbian is the better choice for now. Still thinking.........
Then, the Pi5 is just out a few months. From their forum I read OpenSuse is working at a version for the Pi5 and without a doubt I can state here that others will follow.
Back to playing !!!!
Till next time
Luc Volders
Friday, February 2, 2024
ESPEAsy part 5: ESPEasy to Telegram
For an index to all my stories click this text
After my previous stories on ESPEasy I received a few mails from readers that wanted to know if it is possible to send data direct from ESPEasy to Telegram. The advantage in that is that you can send alarm notifications direct to your phone.
If you do not know what ESPEasy is I urge to at least read my introduction tutorial and the tutorial about communication between two ESP's with ESPEasy. You will be amazed about the amount of features and drivers for sensors are crammed in this alternative operating system for the ESP8266 and ESP32. You can find these stories here:
http://lucstechblog.blogspot.com/2023/10/espeasy-part-1-iot-without-programming.html
http://lucstechblog.blogspot.com/2023/12/espeasy-part2-send-data-from-esp-to-esp.html
I also did a story on how to send data from ESPEasy to WhatsApp.
http://lucstechblog.blogspot.com/2024/01/espeasy-part-4-espeasy-send-data-to.html
Some readers pointed out to me that sending data from ESPEasy to Telegram should be easier as Telegram can communicate through a Bot. Well actually that is true and also not true.
Indeed Telegram can communicate through a Bot however that communication is done over HTTPS (secure HTTP) and ESPEasy does not (yet ???) support HTTPS.
The ESPEasy developers have stated that HTTPS communication requires a lot of memory and memory is scarce in ESPEasy as it is already crammed with features.
So as HTTPS communication is (as for now) out of the question rests just one other option at this moment and that is sending data to Telegram using the CallMeBot service.
CallMeBot
CallMeBot is a free service that is especially created to have electronic devices like the ESP8266 and ESP32 or programs send messages to WhatsApp, Telegram, Signal and Facebook. You can find it's website here: https://www.callmebot.com
We have to use the CallMeBot API to send messages from ESPEasy to CallMeBot. In a previous story I showed how to send data from an ESP8266 to WhatsApp and that explained how this works. Please re-read this story before you go on. You can re-read it here: http://lucstechblog.blogspot.com/2021/05/esp8266-and-esp32-sending-messages-to.html
That story showed that to send a message to WhatsApp through CallMeBot we have to use the following format:
http://api.callmebot.com/whatsapp.php?phone=+XXXXXXXXXXXX&text=This+is+a+test&apikey=YYYYYY
For Telegram there is a similar command:
https://api.callmebot.com/text.php?user=@myusername&text=This+is+a+test+from+CallMeBot
You can see the difference. CallMeBot does not sends the message to a Phone number but to your username. So start with setting your username in Telegram if you have not done so yet.
On your phone in the main Telegram menu click the hamburger icon at the top left of your screen. And then click General Settings.
Look at your profile settings and give yourself a username. Choose it carefully as all your contacts can use this username to send messages to you.
When done open your webbrowser to the CallMeBot webpage: https://www.callmebot.com/ 
Choose in the drop down menu Send Text Messages.
On this page you will find the explanation on how to use this service. And you can see the api call you need to use to send data to Telegram. As shown before in this text the api call looks like this:
https://api.callmebot.com/text.php?user=@myusername&text=This+is+a+test+from+CallMeBot
There is a green button on the page that says "Try to Send a test message now!" Click that button.
Fill in your username and your Text Message to Send and at the bottom you can see what URL you need to use to send the message.

Before the message is send a new screen opens which asks for a confirmation and Authentication. Press the green button and the message will be send to Telegram on your phone.

A confirmation message will be send to your phone. The above message is in Dutch as my phone is set into Dutch.

Now lets try a test message. Send the text First test.

And if all went well the message will appear in Telegram on your phone.
Breadboard

For this simple test we will only use a switch connected to D5 on our Wemos D1 Mini.
ESPEasy device setup.
I Will not go into all the details about installing the software on your ESP8266. That has been covered before on this weblog. Please re-read the stories in the following links for that:
http://lucstechblog.blogspot.com/2023/10/espeasy-part-1-iot-without-programming.html
To use the button on the breadboard got to the devices tab. Press Add and choose an input switch as the device. This also has been covered in the pre-mentioned stories. So re-read those for the details.
First let's have a look at the upper part of the devices screen.
The switch is called sw1 and it is enabled. We use the internal pull-up resistor of the Wemos D1 so check this button. The button on the breadboard has been attached to D5 which is GP14. The type is a switch and it is active when pressed so Push Button Active Low.
At the bottom make sure that Send to Controller 1 is checked and rename the variable (Values) to sw1val
ESPEasy Controller setup
The controller is a software driver that actually sends the data to another device or webservice. This is explained in the before mentioned previous stories so please re-read those for detailed information.
So switch over to the Controller Tab and Add a new Controller. As we are going to send over HTTP choose Generic HTTP as the protocol.
To locate the controller we do not use the IP adress but Use Hostname. And the Controller Hostname is api.callmebot.com
As we are sending data over HTTP the port number is 80.
We are sending data and commands to a service outside our own network so it might take a second or two to get a confirmation or acknowledgement. Therefore set the Client Timeout to 1000 ms (1 second)
The only thing left to do is to set the text we are going to publish. We have seen that the general command is:
https://api.callmebot.com/text.php?user=@myusername&text=This+is+a+test+from+CallMeBot
The hostname already has been set so we need to edit the text:
text.php?user=@myusername&text=This+is+a+test+from+CallMeBot
Replace user=@myusername with the username you have chosen for yourself.
The text we are going to send is an indication of what the data is and the data itself. The indication is simply button= and the data from the button is found in sw1#sw1val.
So the complete call will be:
text.php?user=@myusername&text=button+=+[sw1#sw1val]
Make sure to have enabled checked otherwise the Controller is not activated and then chose Submit.
Done !!!
Press the button attached to the ESP8266 and 
There you are. We just send some messages to Telegram from ESPEasy.
You can have multiple data in one command and put each of them on a new line using %0A. Here is an example that would send the data from two buttons:
text.php?user=@myusername&text=button+=+[sw1#sw1val]+%0A+button2+=+[sw2#sw2val]
And here is the result.
That's it for now. Till next time
Have fun.
Luc Volders