
For an index to all my stories click this text
So we have an energy crisis. And in the Netherlands we all are advised to reduce our energy use. One thing we are asked to do is to take shorter showers. Preferably maximum 15 minutes. And as docile citizens we do as asked..................Wrong !!! We indeed shorten our shower time not because the Government asks us but because energy prices have more then tripled last year.
I have no clock in my shower. And I stopped wearing wristwatches ages ago. So how am I going to know if 15 minutes have past.
Well if you call yourself a tinkerer you should live up to it. Let's build a shower clock !!
My requirements
I do not want a mechanical clock with hands. I want an electronic one. Next to that a small display is not convenient. And it should be watertight.
So then I got an idea.
The time is fixed. So I do not have to have buttons to adjust it. And a small display is an annoyance in the shower so I don't need that either. So why not have a bunch of leds that give a color code. Green when you start showering and red when your 15 minutes are spend.
To have a visual indication on how much time is left I decided to decrease the number of leds that were lit according to the time that has passed. In reality this means that the more time has passed the more the amount of light will get dimmed.
The easiest way to achive this is by using a neopixel ring.
To control the neopixel ring I used a Raspberry Pi Pico. The Pico is widely available and cheap. Next to that it's prime programming language is MicroPython and I love MicroPython.
If you want to learn more about MicroPython on the Raspberry Pi Pico consider buying one of my books on this subject:
http://lucstechblog.blogspot.com/2021/08/raspberry-pi-pico-simplified-now.html
or
http://lucstechblog.blogspot.com/2022/10/pico-w-simplified-released.html
The books are available on Amazon worldwide and through every major bookstore.
The breadboard setup.
If you do not know what neopixels are you really have been living under a rock the last few years, or just stepped into this hobby. In 2015 I already wrote a general introduction to these adressable leds. You can find it here : http://lucstechblog.blogspot.com/2015/10/neopixels-ws2812-intro.html
Neopixels are attached to a microcontroller through a 300-500 ohm resistor. Choose whatever you have available. I usually use a 470Ohm resistor. Next to that attach a large capacitor (1000 microfahrad at 6.3 volts or higher) across the GND and + of the power supply.
That is all.
I had a Neopixel ring of 12 leds and attached it (through the resistor) to GPIO pin 5 of the Raspberry Pi Pico.

Wokwi simulation.
Last year I wrote a story on Wokwi. Wokwi runs on your PC. You can build a circuit in it, add some code and do a real time simulation. You can test circuits with ESP32 or Raspberry Pi Pico and test code in C++ (arduino language) or MicroPython.
If you want to know more just read my story on Wokwi:
http://lucstechblog.blogspot.com/2022/04/simulate-your-controllers-with-wokwi.html
So I thought to put it to the test. And it works flawlessly.
Just point your browser to:
https://wokwi.com/projects/360215418797037569
and you can test the shower timer !!!

Here is how it looks in your browser.
In the simulation I have set the time to .2 minutes. That is 12 seconds so the Neopixels will go out one by one each second. Just adjust this line. Press the green button (where the red arrow points) to start the simulation.
minutes = .2
To any other number of minutes.
Wokwi is a great tool to test your prototypes before building them on a breadboard. There are still some components missing (like capacitors) but it is getting better all the time.
There is just one small problem. In the simulator this program automatically runs twice. In real time it stops after the 15 minutes. I had a conversation with the Wokwi team and they are working on that problem, so maybe it is even solved when you are reading this. So don't worry in real time it works as it should.
The program
For this program I used the simple Neoppixel driver which is included with MicroPython for the Pico. There is a far better library with much more functionality which I described in my book Raspberry Pi Pico Simplified. But that is overkill for this project.
Next to that we only need the machine library to control the IO pin and the utime library to get the clock working. Both libraries are included in the MicroPython distribution.
Here is the full program.
'''
Shower Timer with a fixed time of 16 minutes
http://lucstechblog.blogspot.com
'''

import machine
import neopixel
import utime

# Set up the neopixels
numpixels = 12
pixelpin = machine.Pin(5)
neopixels = neopixel.NeoPixel(pixelpin, numpixels)

# Set up the timer
minutes = 16
seconds = minutes * 60


print("Starting timer")
for i in range(numpixels):
    neopixels[i] = (0, 255, 0)  # Set all neopixels to green
neopixels.write()

while seconds > 0:
    # Update the neopixels
    remaining = seconds / (minutes * 60)
    num_lit = int(numpixels * remaining)
    for i in range(numpixels):
        if i < num_lit:
            neopixels[i] = (0, 255, 0)  # Set lit neopixels to green
        else:
            neopixels[i] = (0, 0, 0)  # Set unlit neopixels to black
    neopixels.write()
    # Decrement the timer
    seconds -= 1
    utime.sleep(1)

print("Timer finished")
for i in range(numpixels):
    neopixels[i] = (255, 0, 0)  # Set all neopixels to red
neopixels.write()
As you can see this is a straight forward program. No functions and no endless loops that keep the program running.
As usual on this weblog I describe some parts of the program in detail.
import machine
import neopixel
import utime

# Set up the neopixels
numpixels = 12
pixelpin = machine.Pin(5)
neopixels = neopixel.NeoPixel(pixelpin, numpixels)

# Set up the timer
minutes = 16
seconds = minutes * 60
Nothing special in the above part. The required libraries are loaded and the Neopixel ring with 12 pixels is attached to GP5. The number of minutes is set to 16 which I will explain later. The number of minutes are used to calculate the number of seconds.
print("Starting timer")
for i in range(numpixels):
    neopixels[i] = (0, 255, 0)  # Set all neopixels to green
neopixels.write()
For debugging purposes I added some print statements that will do nothing in the final setup. All 12 neopixels are set to green.
while seconds > 0:
Here starts the program. It runs as long as the number of seconds is larger as 0
    remaining = seconds / (minutes * 60)
    num_lit = int(numpixels * remaining)
This is where the calculation is made on how many Neopixels must be lit and how many are black.
Let us say 3 minutes have passed.
When the program starts the number of seconds = 16 minutes x 60 seconds = 960.
When 3 minutes have past 3 x 60 = 180 seconds have passed. This means that there are 960 - 180 = 780 seconds left.
remaining = (780) / (16 x 60)
remaining = 0,812
num_lit = int(12 * 0,812)
num_lit = int(9,75) = 9
So after 3 minutes 9 Neopixels will be lit and 3 will be dark.
    for i in range(numpixels):
        if i < num_lit:
            neopixels[i] = (0, 255, 0)  # Set lit neopixels to green
        else:
            neopixels[i] = (0, 0, 0)  # Set unlit neopixels to black
    neopixels.write()
This is where the Neopixels are set to green or black according to the calculation just made.
    # Decrement the timer
    seconds -= 1
    utime.sleep(1)
And in this last part the program stops for a second and the number of seconds remaining is decreased by one.
print("Timer finished")
for i in range(numpixels):
    neopixels[i] = (255, 0, 0)  # Set all neopixels to red
neopixels.write()
When the number of remaining seconds reaches 0 all Neopixels are set to red as a warning that the time is up !!!
Why 16 minutes and not 15
Well I took the easy way out. I attached the Pico to a powerbank. So to start the program just plug the powerbank in and the program runs. No need for an on/off switch or a start button.
But then I need some time to put the cable into the watertight housing and screw the lid on, and then step into the shower This takes not much time but I decided to reserve a minute for this. That is why I opted for 16 minutes in stead of 15.
If you build this for yourself and need more or less time just adjust the line:
minutes = 16
In real life.
Save the program on your Pico and call it main.py. A program with the name main.py will automatically start when the Pico is powered up.
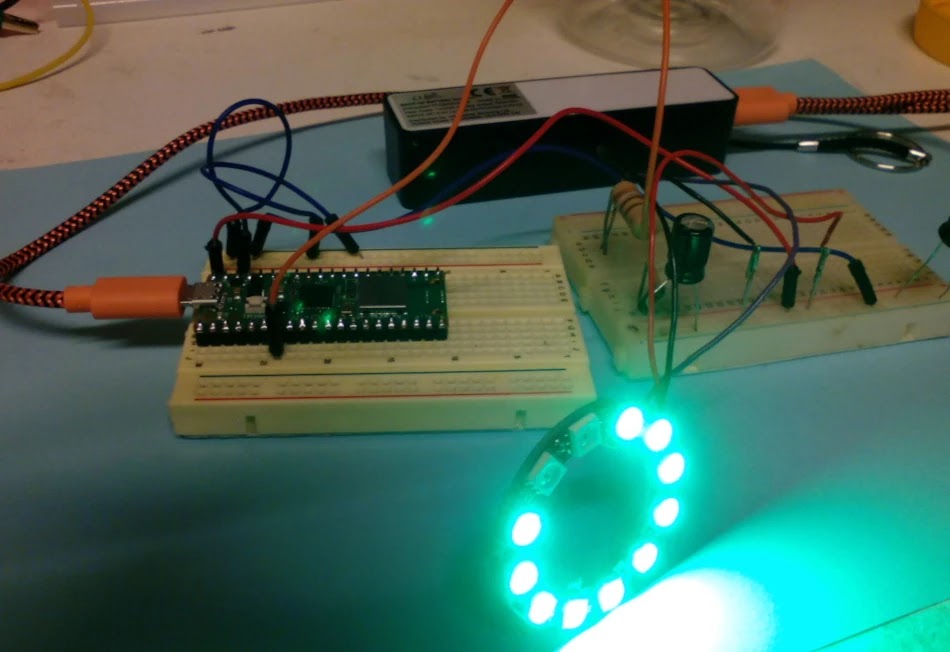
Here is the picture of the breadboard setup with my attached powerbank in the back.

Here you can see how it is all crammed into a jar. I did some testing and the jar is watertight. I did not test for waterproof as I am not going to submerge this into my bath. It is standing on a shelf in my bathroom and for that is is sufficient watertight.

And here is how it looks when the time is up !!!
Last and next thing to do is to put it on a stripboard for permanent use.
Other purposes.
Well this timer can be used for many other purposes. How about a timer for tasks behind your desk. Set the time to 30 minutes and after these you stop whatever you're doing and start something else.
Till next time,
Have fun
Luc Volders