
I have several new projects coming up that use IFTTT to trigger an alarm on my Android Phone. As you know I have used IFTTT before. Those projects were written in ESP-Basic and then I got several mails from readers who asked if I could do the projects in Arduino C++.
Actually it is not all that difficult to write an Arduino program that triggers the IFTTT webhooks just like the ESP-Basic programs do. It is actually quite easy. There is an Arduino library and that is even overkill. A few lines of C++ code is all it takes.
So before I am going to show you the new projects I am working at, I am going to give you a general explanation on how to use IFTTT in Arduino code.
A general IFTTT alarm
For each sensor that you attach to an ESP8266 you can write a different IFTTT recipe (rule). You could make a recipe that sends a notification to your phone when the washing machine is finished, and another receipe that notifies you when the temperature is to high in your mancave, and another recipe that alarms you when motion is detected etc. etc. etc.
But how about making a general alarm recipe that tells which sensor triggered the alarm. In that case you would only make 1 recipe that would be multifunctional. And actually this is easier then you might expect.

Go to the IFTTT website (https://ifttt.com/) and sign in if you have an account or sign-up to start one.

Start a new applet and start at the this part.

For the service at the IF side search for webhooks and choose that one.

IFTTT then asks you to choose a trigger. Actually there is only one being "Receive a web request" so choose that one.

IFTTT now asks you to give the trigger (event) a name. I choose "Hey Luc" but you can give it any name you want. Just remember the name as you will need it later on in the Arduino part.
Choose create trigger and move on to the THAT part

In the THAT part you have to choose an action service. Search for Notifications (the one with the bell) and choose it by clicking on it.

You get the option of choosing between two kinds of notifications. A simple one (on the left) and the rich notification (on the right). Choose the simple one on the left.

The next screen gives you the opportunity to edit the message that is going to be send to your phone/tablet and I called it the same as the name of the applet "Hey Luc"

In stead of finishing you now choose Add Ingredient and choose Value1. Make sure there is a space between "Hey Luc" and Value1
Then choose create action and finish.

We just need to know one thing to use it and that is the unique IFTTT key.

On the right side of the screen is your menu. Choose services.

You are presented with a range of services you can use but choose WEBHOOKS as we need the details from that service.

On the WEBHOOKS screen choose on the top right side DOCUMENTATION.

You will get a screen similar to the above one in which you can see your unique key. Do not give this key to anybody as by having this key they can trigger your actions......
You will need this key in the ESP Arduino program so write it down somewhere safely.
The applet is now ready. So we can test it now.
Testing the applet.
In a previous article which you can read here: https://lucstechblog.blogspot.com/2019/02/simple-ifttt-webhook-test.html I showed you how to trigger an IFTTT action from your webbrowser. Let's use that to test the just created applet.

Type the following code in your browser:
https://maker.ifttt.com/trigger/Hey%20Luc/with/key/PUTYOURKEYHERE
And you can see that you will get a notification back telling you that you fired the event.
A few things are important here.
As you can see the spaces in Hey Luc are replaced with %20. That is necessarry as communication over the internet has an issue with spaces and therefore replaces it with the ASCII code being %20
You can also see that the event is fired but no extra information is send. So we only will get a notification saying HEY LUC but we still not know what fired the event. That is going to be taken care off in the ESP32 program.
An extra check can be done within IFTTT

Within IFTTT look at your activities and there you will see that the Applet ran.
Done with the IFTTT part. Now let us look at the ESP8266 part.
ESP8266 Program.
I will give you here a simple program that will send an alarm message to your phone. The message is Hey Luc the alarm went off.
Lets go over the program there are some interesting things in there.
// IFTTT Webhook trigger
// Simple trigger to get a notification
// on your phone

#include <ESP8266WiFi.h>
#include <ESP8266HTTPClient.h>

const char* ssid = "ROUTERNAME";
const char* password = "PASSWORD";

void setup()
  {
  Serial.begin(115200);
  delay(100);

  Serial.println();
  Serial.println();
  Serial.print("Connecting to ");
  Serial.println(ssid);

  WiFi.begin(ssid, password);

  while (WiFi.status() != WL_CONNECTED)
    {
      delay(500);
      Serial.print(".");
    }

  Serial.println("");
  Serial.println("WiFi connected");
  Serial.println("IP address: ");
  Serial.println(WiFi.localIP());

  Serial.print("connecting to ");
  Serial.println("maker.ifttt.com");

  HTTPClient http; //Declare an object of class HTTPClient
  http.begin("http://maker.ifttt.com/trigger/Hey Luc/with/key/PUTYOURKEYHERE?value1=the%20alarm%20went%20off"); //Specify request destination
  int httpCode = http.GET(); //Send the request
  if (httpCode > 0)
    { //Check the returning code
      String payload = http.getString(); //Get the request response payload
      Serial.println(payload); //Print the response payload
    }
  http.end(); //Close connection
}

void loop()
{
}
First we need two libraries.
#include <ESP8266WiFi.h>
#include <ESP8266HTTPClient.h>
The first library is the standard library for wifi communication. The second library is the library that makes HTTP communication possible and that is what we need for sending a GET request to IFTTT.
const char* ssid = "ROUTERNAME";
const char* password = "PASSWORD";
Replace the name and password with the credentials for your router so a wifi connection can be established.
Next notice that everything happens in the setup. That looks strange and is not a recommended practice. However the setup is just part a normal part of the C++ program so we can put anything in what we want. The advantage is that it will happen only once. After the setup is finished the program is transferred to the void loop() where nothing happens. We are therfore sure the IFTTT part is just activated once.
First part is fairly standard. It activates the Serial Port so we can monitor what is happening and then it starts the wifi connection to your router. The next part is the interesting part.
HTTPClient http; //Declare an object of class HTTPClient
This line starts thye HTTPClient library with the name http as parameter.
http.begin("http://maker.ifttt.com/trigger/Hey Luc/with/key/PUTYOURKEYHERE?value1=the%20alarm%20went%20off"); //Specify request destination
This is the actual GET call to IFTTT. You can see all the ingredients. You can see the trigger name Hey Luc which you should replace with your own trigger name which you gave it in IFTTT. You can see the part where you have to fill in your own key.
And lastly you can see the text that is send as value 1. This is the text you should alter for each of your sensors or alarms. Don't forget to alter any spaqces in %20.
int httpCode = http.GET(); //Send the request
This last line just sends the GET request.
This is how you can make a universal IFTTT alarm.
You can use this to make a washing machine alarm like I showed in this story:
https://lucstechblog.blogspot.com/2018/05/washing-machine-monitor.html
Or make an alarm when someone enters your room like in this story:
https://lucstechblog.blogspot.com/2017/05/ifttt-part-3-basic-alert-over-ifttt.html
Or build an anti teft alarm like this one:
https://lucstechblog.blogspot.com/2018/11/alarm.html
Or get an alert when it is raining aqnd your wash is drying outside:
https://lucstechblog.blogspot.com/2016/08/rain-sensor-using-esp8266.html
The only thing you have to do is to alter the ESP8266 code. The IFTTT code can always be the same yet you will get different notifications. Neat !!
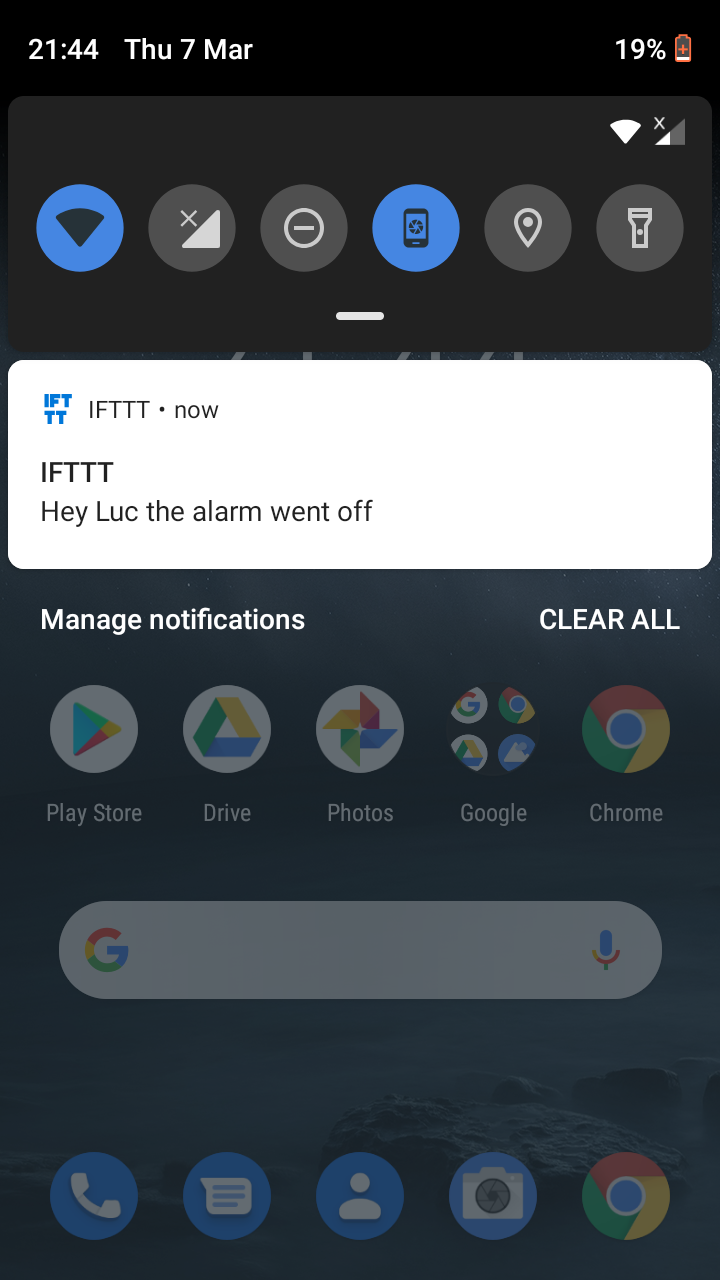
And this is how the alarm will look on your phone. Do not forget to download the IFTTT app and activate IFTTT notifications in your phones settings.
Next steps are (like I told you) some new projects that use IFTTT to send an alarm. So keep coming back. And use your imagination to put this to use for your own purposes.
Till next time
have fun
Luc Volders