Friday, February 24, 2023

Request ESP sensor data with Telegram

 For an index to all my stories click this text

In a previous story about Telegram I demonstrated how to set a led on and off by giving commands in your Telegram Bot. This story shows how to send data from sensors to your Telegram account. Using these two you can control your complete home automation with Telegram.

Before you can send sensor data to Telegram you wull have to get a Telegram account and make a bot for communicating with your ESP. This sounds complicated but actually is not. You can find the complete setup in this story http://lucstechblog.blogspot.com/2023/01/telegram-messenger-for-iot.html
Read that story carefully because this episode is leaning heavily on it.

I also urge you to read the story where I showed how to get Telegram on a webpage. As this is a lot easier to read as on the small telephone screen. Communication with Telegram on the road is great on your smartphone. For home use I prefer a larger screen. How to do that can you read here; http://lucstechblog.blogspot.com/2023/02/convenient-working-with-telegram.html

Now you have the basic setup ready let us start sending sensor readings from our ESP to Telegram. In the previous story I used an ESP8266. This story uses the ESP32. Do not dispair as changes are minimal and can easily be adapted for use on the ESP8266.

As this is a tutorial I am going to show you how to send data from 3 sensors from the ESP to your Telegram account. I will split things up so if you just have one of these sensors in your stock you can adapt the program to using just that sensor.

Breadboard layout.

Like said I am going to attach 3 sensors to the ESP32. A Dallas 18B20 thermometer, an LDR and a push button. By understanding how this works you will be able to attach any sensor to the ESP and send its data to Telegram.


Nothing special here.

The Dallas DS18B20 is attached with a 4.7K resistor to pin 32 of the ESP32. Alter this to a suitable pin on the ESP8266 and change the program accordingly.
The pushbutton is attached with a 10K pull-up resistor to pin 14, again alter this to any suitable pin for the ESP8266. And the LDR is attached with a 10K pull-down resistor to pin 32. Not a lot choice there as the ESP8266 only has one analog pin.

ATTENTION:
There seems to be a problem when using the Wifi and AsyncTelegram libraries together with analogRead. Only ADC1 (Analog Digital Converter 1) works when these libraries are used. So when using the Telegram Libraries and you need analog input use GPIO 32, 33, 34, 35, 36 or 39 being ADC0, ADC3, ADC4, ADC5, ADC6 and ADC7

If you want to know more about how the IO pins work you could buy my book on the ESP32:
http://lucstechblog.blogspot.com/2020/10/esp32-simplified-world-wide-available.html

The Telegram sensor program

Basically it is the same program as used in the first story on Telegram which you can re-read here: http://lucstechblog.blogspot.com/2023/01/telegram-messenger-for-iot.html

So copy this program and make the following alterartions.

Dallas DS18-B20

#include <DallasTemperature.h>
#include <OneWire.h>

# define ONE_WIRE_BUS 23
OneWire oneWire(ONE_WIRE_BUS);


Start with including the library and attach it to pin 23. Alter this in pin D8 for the ESP8266.

DallasTemperature dallas(&oneWire);

float temp = 0;


Define a new variable that will be used for storing the temperature.

  dallas.begin();

In the setup() add the above statement so the DS18B20 library gets activated.

In the loop we made a test for the commands Lon (lamp ON) and Loff (lamp Off). We are going to add a test for another command called Temp.

    else if (msg.text.equalsIgnoreCase("Temp"))
    {       
      dallas.requestTemperatures();
      Serial.print("Temperature is: ");
      temp=dallas.getTempCByIndex(0);
      Serial.println(String(temp));
      tosend = "The temperature is now : ";
      tosend += String(temp);                 
      myBot.sendMessage(msg, tosend);      
    }


First we test wether "Temp" is received from the Telegram bot. If that is the case we print the current temperature in the Serial Monitor. This has two advantages. It shows that the Dallas DS18B20 is wired correctly and that its library is working.

Next we build the sting toSend in which we put the message "The temperature is now : "and we add the reading from the DS18B20 to it.

The button

int button = 14;

At the beginning of the program where all variables are declared we assign the variable button to pin 34.

pinMode(button, INPUT);

In the setup() we make sure the button pin is set as an INPUT pin.

    else if (msg.text.equalsIgnoreCase("Button"))
    {       
      Serial.print("The Button is: ");
      Serial.println(digitalRead(button));  
      tosend = "The Button is : ";    
      tosend += digitalRead(button);     
      myBot.sendMessage(msg, tosend);      
    }


And the above code is attached to the loop().
First we test wether the command "Button" is received.
If that is true then we test the button and send the state of the button to our bot.


The LDR

For sending the LDR value to the Telegram Bot we only have to make another entry in the loop() and that is similar to the routine for the thermometer.

    else if (msg.text.equalsIgnoreCase("LDR"))
    {       
      Serial.print("The LDR's value is: ");
      Serial.println(analogRead(32));
      tosend = "The LDR's value is : ";
      tosend += String(analogRead(32));                 
      myBot.sendMessage(msg, tosend);      
    }


The menu

The only thing left to do is to alter the menu for it to incorporate our new commands. It will look as follows.

    {                                                  
      // generate the message for the sender
      String reply;
      reply = "Welcome ESP8266 number 1\n" ;
      reply += "You can use these commands :\n" ;
      reply += "============================\n\n" ;
      reply += ". Mancave Light on = Lon\n";
      reply += ". Mancave Light off = Loff\n\n";
      reply += ". What is the temperature = Temp\n";
      reply += ". Buttonstate = Button\n";
      reply += ". The light value = LDR\n";
      myBot.sendMessage(msg, reply);
    }


As you can see the new commands are added to the user menu of the bot. So when you type /start in the bot it will show the menu.

/*
Name:                     Telegram sensor readings
Library and demo Author:  Tolentino Cotesta <cotestatnt@yahoo.com>

Adapted by:               Luc Volders
                          http://lucstechblog.blogspot.com/
*/

#include <Arduino.h>
#include "AsyncTelegram.h"

#include <DallasTemperature.h>
#include <OneWire.h>

# define ONE_WIRE_BUS 23
OneWire oneWire(ONE_WIRE_BUS);

AsyncTelegram myBot;

DallasTemperature dallas(&oneWire);

float temp = 0;
int button = 34;
String tosend = "";


const char* ssid = "ROUTERS_NAME";
const char* pass = "PASSWORD";
const char* token = "TELEGRAM TOKEN";   

int led = LED_BUILTIN; 

void setup() 
{
  // initialize the Serial
  Serial.begin(115200);
  Serial.println("Starting TelegramBot...");

  WiFi.setAutoConnect(true);   
  WiFi.mode(WIFI_STA);
  
  WiFi.begin(ssid, pass);
  delay(500);
  while (WiFi.status() != WL_CONNECTED) 
  {
  Serial.print('.');
  delay(500);
  }

  myBot.setUpdateTime(1000);
  myBot.setTelegramToken(token);
  
  Serial.print("\nTest Telegram connection... ");
  myBot.begin() ? Serial.println("OK") : Serial.println("Not OK");

  dallas.begin();

  pinMode(led, OUTPUT);
  digitalWrite(led, LOW); //<== high for esp8266

  pinMode(button, INPUT);
}

void loop() 
{
TBMessage msg;

  if (myBot.getNewMessage(msg)) 
  {
    if (msg.text.equalsIgnoreCase("Lon")) 
    {      
      digitalWrite(led, HIGH); //<== low for esp8266                         
      myBot.sendMessage(msg, "Light is now ON");       
    }
    
    else if (msg.text.equalsIgnoreCase("Loff")) 
    {       
      digitalWrite(led, LOW); //<== high for ESP8266                        
      myBot.sendMessage(msg, "Light is now OFF");     
    }
    
    else if (msg.text.equalsIgnoreCase("Temp")) 
    {       
      dallas.requestTemperatures();
      Serial.print("Temperature is: ");
      temp=dallas.getTempCByIndex(0); 
      Serial.println(String(temp)); 
      tosend = "The temperature is now : ";
      tosend += String(temp);                 
      myBot.sendMessage(msg, tosend);      
    }

    else if (msg.text.equalsIgnoreCase("Button")) 
    {       
      Serial.print("The Button is: ");
      Serial.println(digitalRead(button));  
      tosend = "The Button is : ";    
      tosend += digitalRead(button);     
      myBot.sendMessage(msg, tosend);      
    }


    else if (msg.text.equalsIgnoreCase("LDR")) 
    {       
      Serial.print("The LDR's value is: ");
      Serial.println(analogRead(15)); 
      tosend = "The LDR's value is : ";
      tosend += String(analogRead(32));                 
      myBot.sendMessage(msg, tosend);      
    }

    else 
    {                                                  
      // generate the message for the sender
      String reply;
      reply = "Welcome ESP8266 number 1\n" ;
      reply += "You can use these commands :\n" ;
      reply += "============================\n\n" ;
      reply += ". Mancave Light on = Lon\n";
      reply += ". Mancave Light off = Loff\n\n";
      reply += ". What is the temperature = Temp\n";
      reply += ". Buttonstate = Button\n";
      reply += ". The light value = LDR\n";
      myBot.sendMessage(msg, reply);
    }
  }
}


For your convenience I hereby show the complete program.

As stated before this is the same program from the first story on Telegram but with the above modifications. For a complete explanation on the program read that previous story here: http://lucstechblog.blogspot.com/2023/01/telegram-messenger-for-iot.html

How does it work

In your Telegram's Bot screen type /start.
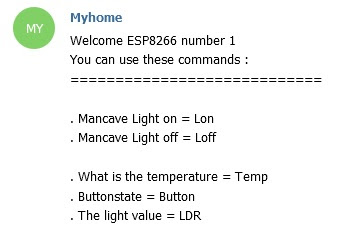


As you can see the menu we created in the ESP32 is displayed.
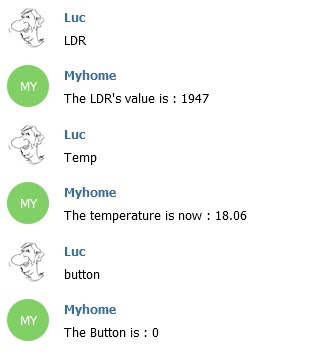


Type any of the commands an you will get the results from the ESP.

Adapting.

You can easily adapt the ESP's program to replace the button with a door contact, a pir sensor a tilt sensor, a vibration sensor, the door-bell sensor or whatever you want. As the ESP8266 and ESP32 have many IO ports you can attach a multitude of sensors to one ESP.

Alerts

There is much more you can do with Telegram. One important feature is that you can also send alerts to your Bot that is coming up in another story.

Till next time
have fun


Luc Volders


Friday, February 17, 2023

ChatGPT - Try it !!!

For an index to all my stories click this text.

Sometimes something comes up that is so current that it needs attention and other things have to wait a bit. ChatGPT is such a thing.

Undoubtedly you have heard about ChatGPT. It is an AI (Artificial Intelligence) program that allows you to pose questions in natural language and gives amazing answers. You could compare it to a search fuction (like Google). The difference is that you do not get links to webpages but a real, conversation like, answers. ChatGPT was fed millions of documents and distills the information out of those. It is up to date with documents till 2021 (at this moment). So you will not find information on the Ukrain war. Neither can (will ??) it predict share prices.

Kids and students are using it for writing their school homework and essays. Some journalists are using it for researching stories, just like researchers. And........programmers are using it to write code.

Fear for AI.

There is a lot going on about ChatGPT. Some think it is a threat for jobs, independence, freedom etc. I am not a philosofer or visionary but I have heard this about 10 times before in the almost 50 years I have been around in the computer world. When computers were invented and became a mass product people were afraid that millions of jobs would be lost. Never happened. Robots would take over our work. Never happened. Calculators would make our kids lose their ability to calculate. Never happened. Etc. etc.
What happened is that we learned to adapt these inventions to our needs. And that is what (in my opinion) is also going to happen with this technology.

Alan Turing and Eliza

Alan Turing was a computer scientist specialised in AI. In 1936 he wrote an essay about computer intelligence. From this originated the Turing test. The Turing test is about a human sitting behind a computer screen and keyboard and starting a conversation with someone not in the room. If you can not determine if the answers you get are from a human or a computer we can say there is artificial intelligence.

It took till 1964-1966 that another scientist from the MIT, Joseph Weizenbaum, wrote a program called Eliza that could more or less carry a "normal" conversation. I had Eliza running on my Pet computer in the seventies. 


There is a Javascript version that you can play with:
http://psych.fullerton.edu/mbirnbaum/psych101/eliza.htm
Play a bit with Eliza. Although limited in modern view it still is fun, especially considering this was made in 1966 !!!

And now we have Google Home, Amazon Echo and ChatGPT. And the last one is getting better and better.

AI on this blog.

In the past I have written on this blog about AI. Think Google home. I wrote several stories on that mostly on how to use it for IOT purposes. On this blogs index page you can find links to these stories. Just scroll down till you see Google Home Assistant.
http://lucstechblog.blogspot.com/p/index-of-my-stories.html

And there was a story about writing an app for your Android phone that did image recognition. It works pretty good. If you want to give that a try you can find the link here:
https://lucstechblog.blogspot.com/2019/02/image-recognition-for-free.html

And now ChatGPT.

There is no computer knowledge or programming experience required for using ChatGPT. Anyone can use it. As stated before you can "talk" to it using everyday speech. And it is free to use !!!!


First step is to visit the website. ChatGPT is at this moment (for us mere mortals) only available through this link: https://openai.com/blog/chatgpt/  There is however an API available and that makes it possible to incorporate ChatGPT into your own projects.......

Press the purple "Try ChatGPT" button.


You are presented with a login page with the choices to log-in if you have already worked with the program or Sign up if it is your first visit.


You can log-in with your MicroSoft Account, your Google Account or your email adress.

If it is your first visit the logjn page asks for some personal information. Not really very personal. Just your name.


And then you are directed to the opening screen.
On the left side at the top you can see some previous conversations. In the main screen you can see some ideas on what you can do.

The above picture and the rest on this page shows my conversation in English. You can try to pose questions in your own language. Many languages will work. Dutch did !!


So I tried to play TicTacToe.


And it actually cheated !!!
My cross was at the upper left corner and ChatGPT overwrites it and even says so !!!!!

Well I don't really think it cheated. I guess the underlying program is just bad. But here it shows that there is no underlying intelligence here.........


As I mentioned that it was cheating it apologized. Nevertheless I won. See the three crosses at the bottom.


So is it better as Google's search engine ??? We leave that answer to ChatGPT itself.


Raspberry Pi Pico audio

Playing games is fun but I wanted to try something serious. At the moment I am experimenting with audio on the Raspberry Pi Pico. And that is a great success. The audio on the Pico in no way resembles the audio I was doing on the ESP32 with talkie. That sounded like an Apple II in the old days. Audio on the Pico sounds like real audio and I am doing a multi-story series on that so stay tuned.

So I wanted to know if ChatGPT could offer some help.   


My first question was if ChatGPT could write a program for The Raspberry Pi Pico that plays tones without using a sound-card.


And there it is. Right on the nose. Compleet with the necesary libraries and reference to a pin number. There was one little flaw. pwm.duty(period //2) gave an error. For MicroPython you need to alter this in pwm.duty_u16. I needed the tones to play on GP3 so I modified the program in Thonny and it worked like a charm.

NOTE: This is not the audio quality I was looking for. This is like the old computer bleeps. But as a test this works fine. To get this working you need a low-pass filter on pin GP3 and a active speaker (like your computer speaker). But this will all be discussed in upcoming stories about Pi Pico audio.

UPDATE TO NOTE:
Just ask ChatGPT how to build a low-pass filter with only resistors and capacitors and be amazed !!!


ChatGPT gave me the hint that it was possible to get a better sound using multiple harmonics. So I re-formulated the question.


And almost immediate came this up. WOW !!!


So obvious this was the next question: make a program that plays the full scale.


And there you are !!!
Trust me I have tried this and it works !!!


Concluding.

I am fan !!!! This is fun real fun. And it is a glimpse of what the future will bring us. It still has flaws like not exactly being aware of a programming languages syntax but it can be a tremendous aid in developing projects. Next to that you really need to think how you formulate your questions. Trial and error is what it takes. And please check the answers, there might be flaws in it. Note that it is not limited to MicroPython. Javascript is also one of the languages it can handle.

Nevertheless: play with it !!! Not only ask computer related questions but also ask about art, technical questions, ask it to write poems, ask it to write short stories on any subject you may think of, and play games. I did and got some amazing answers and even suggestions which I myself might never had thought of..........

This is costing me a lot of time. But man what fun !!!!

Oh, and from now on you never can be sure if the programs on this web-log are really written by me.

Till next time
Have fun

Luc Volders


Friday, February 10, 2023

Convenient working with Telegram

 For an index to all my stories click this text.

Technology is here to make your life easier. And one of the things I am using frequently now is Telegram. I am using it as a replacement for Whatsapp. Telegram has much more functionality as Whatsapp, is not realted to any of the data sponging companies and allows me to connect my ESP's and other home automation devices.

My ESP's send data and notifications to my Telegram account which is great when I am not at home. But at home I like to work on my PC as it is more comfortable to work on a large screen. And guess what: Telegram can work on your PC as well.

First step is to point your browser to the Telegram webpage : https://telegram.org/


Scroll to the bottom of the page and there look at the Desktop Apps. You can install a dedicated program for your computer but I chose the Web-browser app.


Telegram now asks you to fill in your telephone number and the country you live in. The telephone number mustbe the number with which you activated your Telegram account.


Then you will get a verification screen in which you can check the number which you just filled in.


Telegram then sends a code to your Telegram account. Get that code form your phone.


You need to fill in that code on this screen so it is certified that it is you.


And there we are. Telegram on the PC screen. Much more convenient to work with as with the small phone's screen.

That's it.

Till next time.
Have fun.

Luc Volders