Friday, May 15, 2020

Filament sensor with alarm on your phone

For an index to all my stories click this text.

Long story Short: I have a new 3D printer. My Beagle broke down after 5 years of service beyond being repairable. So I got myself a new printer. It is a Creality CR20. However it uses 1.75mm filament while my Beagle used 3mm filament.

Luckily a friend of mine came to the rescue. He traded my old 3mm filament for some new 1.75 filament.
What I received was some older filament and at some places it was brittle. During printing I noticed just in time that the filament on the roll was broken. The print finished just at the right moment.

This is however something you do not want to happen during long prints. And my prints were getting longer as I was printing more earsavers for face-masks at the time.

Not a big problem when you are in the same room as where the printer is. You can check its proceedings every few minutes. However I am lazy. So I often put the printer to work and leave the room to do something really important like sitting in my garden with a good book and cold drinks.

I searched the internet for a filament sensor and found several. The idea is as ingenious as simple. Run the filament tightly along a microswitch so the switch keeps getting pressed. When the filament breaks the switch is released and sounds an alarm. And there was my problem.

The alarm these sensors use are generally piezo buzzers taken from a fire alarm. They do make a hell lot of noise. But I could not hear it when I was in my garden. So I had to find a solution.

I always carry my phone with me. Why not send a notification to my phone when broken filament is detected. That proved to be much simpler as I thought.

The setup.

The first thing is to build the filament sensor. I used Tinkercad to design it and then 3D printed it. The switch is attached to a Wemos D1 mini through a pull-up resistor. The switch is pressed all the time till the filament is broken and then the switch connects pin D1 of the Wemos D1 to GND. When this happens the Wemos D1 sends a signal to IFTTT and IFTTT sends an alert to my phone.

Filament sensor.

There are several versions of microswitches which you can use.


The one on the left has a straight lever and the one on the right has a bulge at the end. Both wil do the job and can be used with my casing. There is another version with a wheel on top of the lever and to use that you might have to alter the design of the casing.

The casing was designed in Tinkercad and I made 2 versions. First version is for 3mm filament and second version for 1.75mm filament. The lid is for both versions the same. The picures show how they look and there is a download link included.

After downloading slice them. I set my slicer to .3mm


Filamentsensor175 link:  https://www.tinkercad.com/things/1Qptw2SZne4


Filamentsensor3MM link:  https://www.tinkercad.com/things/4S6d4y6LUjC


Filamentsensor lid:  https://www.tinkercad.com/things/9F9C5g1iI2A

Maybe you need to make some adjustments if you own a different micro-switch as the one I used. To do so get yourself a free Tinkercad account at https://www.tinkercad.com/ Go to the design you need and copy and adjust it.

You can find all my public Tinkercad files by opening https://www.tinkercad.com and look for user lucvolders (no spaces).


And here is a picture of the final version.

As there is some margin in the casing I glued the switch into the casing.

You might want to design a casing for the Wemos or NodeMCU or whatever version of the ESP8266 you are going to use. I left it on the breadboard for now as I have plans for an extension.

You could use an ESP-01 for this. However as the prices of the Wemos D1 have fallen and you would need to build your own power supply for the ESP-01 it might be more expensive as the Wemos D1 version.

The electronics.

This is the easy part. I attached the microswitch to GND and with a 10K pull-up resistor to a Wemos D1. The switch was connected to pin D1 of the Wemos mini D1.


The setup is really easy and the breadboard layout shows all.

IFTTT

IFTTT is covered extensively in these stories:

IFTTT introduction - What is IFTTT and what can we do with it part 1
https://lucstechblog.blogspot.nl/2017/04/ifttt-if-this-then-that.html

IFTTT part 2 Maker Channel - Tutorial part 2
https://lucstechblog.blogspot.nl/2017/05/ifttt-part-2-maker-channel.html

IFTTT part 3 Alert over IFTTT - Tweet an alarm when your PIR has noticed motion
https://lucstechblog.blogspot.nl/2017/05/ifttt-part-3-basic-alert-over-ifttt.html

IFTTT part 4 - Send a notification to my phone
https://lucstechblog.blogspot.nl/2017/09/ifttt-4-send-notification-to-my-phone.html

IFTTT test - a simple test for IFTTT triggers from your browser
https://lucstechblog.blogspot.com/2019/02/simple-ifttt-webhook-test.html

IFTTT alarm from ESP8266 using Arduino language
http://lucstechblog.blogspot.com/2019/04/ifttt-alarm-from-esp8266-using-arduino.html

Look at this last story specifically. I am going to use that technique to send the alarm to my phone.

The program

As usual the program is written in C++ (Arduino language).

// IFTTT Webhook trigger
// Simple trigger to get a notification
// on your phone when 
// the filament on your 3D printer is broken

#include <ESP8266WiFi.h>
#include <ESP8266HTTPClient.h>

const char* ssid = "XXXXXXXXXXXXXXXX";
const char* password = "YYYYYYYYYYYYYYYYY";

int FilPin  = 5;
int IftttSend = 0;

void setup() 
  {
  pinMode(FilPin, INPUT);
      
  Serial.begin(115200);
  delay(100);
    
  Serial.println();
  Serial.println();
  Serial.print("Connecting to ");
  Serial.println(ssid);
    
  WiFi.begin(ssid, password);
    
  while (WiFi.status() != WL_CONNECTED) 
    {
      delay(500);
      Serial.print(".");
    }
  
  Serial.println("");
  Serial.println("WiFi connected");  
  Serial.println("IP address: ");
  Serial.println(WiFi.localIP());  

}

void loop() 
{
 if ((digitalRead(FilPin) == HIGH) && IftttSend == 0)
 {
  sendifttt();
  IftttSend = 1;
 }
}

void sendifttt()
{
  Serial.print("connecting to ");
  Serial.println("maker.ifttt.com");
  HTTPClient http; //Declare an object of class HTTPClient
  http.begin("http://maker.ifttt.com/trigger/Hey Luc/with/key/PUTYOURKEYHERE?value1=The%20filament%20is%20broken%20!!!");
  int httpCode = http.GET(); //Send the request
  if (httpCode > 0) 
    { //Check the returning code
      String payload = http.getString(); //Get the request response payload
      Serial.println(payload); //Print the response payload
    }
  http.end(); //Close connection
}


I am not going over the program as it was discussed intensively in the previous story: http://lucstechblog.blogspot.com/2019/04/ifttt-alarm-from-esp8266-using-arduino.html

The only thing you have to notice is that I canged the line which sends information to IFTTT from the previous story into this:

http.begin("http://maker.ifttt.com/trigger/Hey Luc/with/key/PUTYOURKEYHERE?value1=The%20filament%20is%20broken%20!!!");

Alter the text to your own liking but do not forget to alter spaces in your text to %20 like seen above otherwise the notification on your phone looks messy.
Naturally you must change "Hey Luc" in the trigger you are going to use with IFTTT. And exchance the tekst "PUTYOURKEYHERE" with your own IFTTT webhooks key.

Also do not forget to alter your routers credentials otherwise the ESP8266 can not connect to IFTTT

Real life use.

Put the sensor at a reasonable distance from your printer extruder. That will give you ample time to get off from your lazy chair and react.


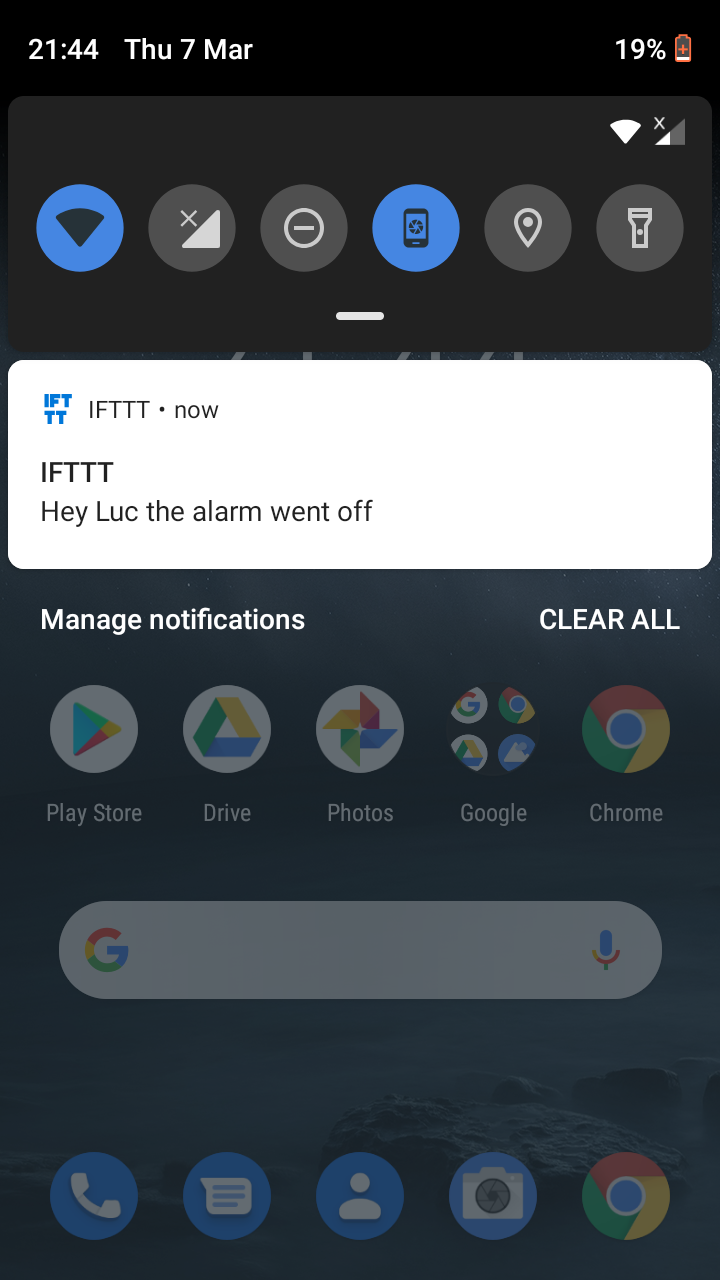
This is how the notification looks on my phone.

If your filament has broken and you have received the notification replace the filament and press reset on the Wemos D1 to re-start the program. You could design a webpage with a button to restart the program but I did not think it's worth the trouble.

There is just one small other thing. I have to go to the printer to check whether the print has finished. Or I need to set a timer on my phone with an estimate when the print will finish. Thats the next thing I am going to automate...... Enough pins on the Wemos D1 mini to check that too.

Happy printing.
Till next time.

Luc Volders

Friday, May 8, 2020

IFTTT alarm from ESP8266 using Arduino IDE

For an index to all my stories click this text.

I have several new projects coming up that use IFTTT to trigger an alarm on my Android Phone. As you know I have used IFTTT before. Those projects were written in ESP-Basic and then I got several mails from readers who asked if I could do the projects in Arduino C++.

Actually it is not all that difficult to write an Arduino program that triggers the IFTTT webhooks just like the ESP-Basic programs do. It is actually quite easy. There is an Arduino library and that is even overkill. A few lines of C++ code is all it takes.

So before I am going to show you the new projects I am working at, I am going to give you a general explanation on how to use IFTTT in Arduino code.

A general IFTTT alarm

For each sensor that you attach to an ESP8266 you can write a different IFTTT recipe (rule). You could make a recipe that sends a notification to your phone when the washing machine is finished, and another receipe that notifies you when the temperature is to high in your mancave, and another recipe that alarms you when motion is detected etc. etc. etc.

But how about making a general alarm recipe that tells which sensor triggered the alarm. In that case you would only make 1 recipe that would be multifunctional. And actually this is easier then you might expect.


Go to the IFTTT website (https://ifttt.com/) and sign in if you have an account or sign-up to start one.


Start a new applet and start at the this part.


For the service at the IF side search for webhooks and choose that one.


IFTTT then asks you to choose a trigger. Actually there is only one being "Receive a web request" so choose that one.


IFTTT now asks you to give the trigger (event) a name. I choose "Hey Luc" but you can give it any name you want. Just remember the name as you will need it later on in the Arduino part.
Choose create trigger and move on to the THAT part


In the THAT part you have to choose an action service. Search for Notifications (the one with the bell) and choose it by clicking on it.


You get the option of choosing between two kinds of notifications. A simple one (on the left) and the rich notification (on the right). Choose the simple one on the left.


The next screen gives you the opportunity to edit the message that is going to be send to your phone/tablet and I called it the same as the name of the applet "Hey Luc"


In stead of finishing you now choose Add Ingredient and choose Value1. Make sure there is a space between "Hey Luc" and Value1
Then choose create action and finish.


We just need to know one thing to use it and that is the unique IFTTT key.


On the right side of the screen is your menu. Choose services.


You are presented with a range of services you can use but choose WEBHOOKS as we need the details from that service.


On the WEBHOOKS screen choose on the top right side DOCUMENTATION.


You will get a screen similar to the above one in which you can see your unique key. Do not give this key to anybody as by having this key they can trigger your actions......
You will need this key in the ESP Arduino program so write it down somewhere safely.

The applet is now ready. So we can test it now.

Testing the applet.

In a previous article which you can read here: https://lucstechblog.blogspot.com/2019/02/simple-ifttt-webhook-test.html I showed you how to trigger an IFTTT action from your webbrowser. Let's use that to test the just created applet.


Type the following code in your browser:
https://maker.ifttt.com/trigger/Hey%20Luc/with/key/PUTYOURKEYHERE

And you can see that you will get a notification back telling you that you fired the event.

A few things are important here.

As you can see the spaces in Hey Luc are replaced with %20. That is necessarry as communication over the internet has an issue with spaces and therefore replaces it with the ASCII code being %20

You can also see that the event is fired but no extra information is send. So we only will get a notification saying HEY LUC but we still not know what fired the event. That is going to be taken care off in the ESP32 program.

An extra check can be done within IFTTT


Within IFTTT look at your activities and there you will see that the Applet ran.

Done with the IFTTT part. Now let us look at the ESP8266 part.

ESP8266 Program.
I will give you here a simple program that will send an alarm message to your phone. The message is Hey Luc the alarm went off. 

Lets go over the program there are some interesting things in there.


// IFTTT Webhook trigger
// Simple trigger to get a notification
// on your phone 

#include <ESP8266WiFi.h>
#include <ESP8266HTTPClient.h>

const char* ssid = "ROUTERNAME";
const char* password = "PASSWORD";

void setup() 
  {
  Serial.begin(115200);
  delay(100);
    
  Serial.println();
  Serial.println();
  Serial.print("Connecting to ");
  Serial.println(ssid);
    
  WiFi.begin(ssid, password);
    
  while (WiFi.status() != WL_CONNECTED) 
    {
      delay(500);
      Serial.print(".");
    }
  
  Serial.println("");
  Serial.println("WiFi connected");  
  Serial.println("IP address: ");
  Serial.println(WiFi.localIP());  

  Serial.print("connecting to ");
  Serial.println("maker.ifttt.com");

  HTTPClient http; //Declare an object of class HTTPClient
  http.begin("http://maker.ifttt.com/trigger/Hey Luc/with/key/PUTYOURKEYHERE?value1=the%20alarm%20went%20off"); //Specify request destination
  int httpCode = http.GET(); //Send the request
  if (httpCode > 0) 
    { //Check the returning code
      String payload = http.getString(); //Get the request response payload
      Serial.println(payload); //Print the response payload
    }
  http.end(); //Close connection
}

void loop() 
{
}


First we need two libraries.

#include <ESP8266WiFi.h>
#include <ESP8266HTTPClient.h>

The first library is the standard library for wifi communication. The second library is the library that makes HTTP communication possible and that is what we need for sending a GET request to IFTTT.

const char* ssid = "ROUTERNAME";
const char* password = "PASSWORD";

Replace the name and password with the credentials for your router so a wifi connection can be established.

Next notice that everything happens in the setup. That looks strange and is not a recommended practice. However the setup is just part a normal part of the C++ program so we can put anything in what we want. The advantage is that it will happen only once. After the setup is finished the program is transferred to the void loop() where nothing happens. We are therfore sure the IFTTT part is just activated once.

First part is fairly standard. It activates the Serial Port so we can monitor what is happening and then it starts the wifi connection to your router. The next part is the interesting part.

  HTTPClient http; //Declare an object of class HTTPClient

This line starts thye HTTPClient library with the name http as parameter.

  http.begin("http://maker.ifttt.com/trigger/Hey Luc/with/key/PUTYOURKEYHERE?value1=the%20alarm%20went%20off"); //Specify request destination

This is the actual GET call to IFTTT. You can see all the ingredients. You can see the trigger name Hey Luc which you should replace with your own trigger name which you gave it in IFTTT. You can see the part where you have to fill in your own key.
And lastly you can see the text that is send as value 1. This is the text you should alter for each of your sensors or alarms. Don't forget to alter any spaqces in %20.

  int httpCode = http.GET(); //Send the request

This last line just sends the GET request.

This is how you can make a universal IFTTT alarm.

You can use this to make a washing machine alarm like I showed in this story:
https://lucstechblog.blogspot.com/2018/05/washing-machine-monitor.html

Or make an alarm when someone enters your room like in this story:
https://lucstechblog.blogspot.com/2017/05/ifttt-part-3-basic-alert-over-ifttt.html

Or build an anti teft alarm like this one:
https://lucstechblog.blogspot.com/2018/11/alarm.html

Or get an alert when it is raining aqnd your wash is drying outside:
https://lucstechblog.blogspot.com/2016/08/rain-sensor-using-esp8266.html

The only thing you have to do is to alter the ESP8266 code. The IFTTT code can always be the same yet you will get different notifications. Neat !!


And this is how the alarm will look on your phone. Do not forget to download the IFTTT app and activate IFTTT notifications in your phones settings.

Next steps are (like I told you) some new projects that use IFTTT to send an alarm. So keep coming back. And use your imagination to put this to use for your own purposes.

Till next time
have fun

Luc Volders

Sunday, May 3, 2020

Earsavers

For an index to all my stories click this text

I have been very busy lately.
Like many fellow 3D printer owners I have been printing ear-savers for my local hospital.

For those of you who are in the dark a small explanation.
Most face masks professional health service personell is using are face masks which have to be secured with a rubber band which you put behind your ears.
After a few days your ears are sore.


So someone called Suraky posted an ear saver. The picture of the woman wearing the earsavers is his.
You can download it freely from this link if you want to print them for your local health services:
https://www.thingiverse.com/thing:4249113

So I printed a few examples and delivered them at one of our local hospitals. Few days later I received a call from the hospital if I was able to deliver a lot of these.


I first used a different design which had some hearts in the middle. The hospital opted for the design Suraky desgn. That was also a good choice for us as it printed a bit faster and uses a bit less plastic. However my prints would not win a beauty contest.

I called some of my friends who have a 3D printer and all were very willing to help. So I send them the link and the STL files and they started to print.


For those of you who wonder: we are doing this for free. Those people at the hospitals are working their as*** off to keep us safe so this is the least we can do to help them.

Then my Beagle delta 3D printer broke down. Desperately I stripped it and with its parts I tried to get my old Mendel 3D printer working again. And that did not turn out well. Mendels plastic parts were all brittle and broke down during printing.

I ordered a new 3D printer a Crealitu CR10S pro. It was not in stock but the owner of the shop Reprapworld lended me a demonstration model of a Creality CR20. I had it up and running in less then half an hour and the quality is overwhelming.


The 3D printing technique has evolved enormously since I stepped into that world about 8 years ago. But that is a different story.

So now I am printing these ear-savers. I print them in batches of 3 pieces and it takes the Creality CR20 about an hour to print 3 pieces. That is in the lowest print quality. But that is OK. I am not printing for a beauty contest. We need to get them out fast and they just have to be practical.

The Creality came with some filament which was old. And the filament was broken at some place on the spool. It would be a nightmare if the printer was runninhg and run out of filament. So I made a filament sensor. Now I can leave the room where the printer is at work and I get a message on my phone if the filament is broken. I'll show you how to make one of these sensors next time.

Till then
Stay safe and have fun

Luc


P.s.

here is an overview of the first batch our group made. In total 160 pieces.