Friday, March 29, 2024

Webservices that turn a website into an app

For an index to all my stories click this text

In a previous story I showed how to make a simple reaction game in Javascript. You can find that story here: http://lucstechblog.blogspot.com/2024/03/javascript-reaction-game.html

Yet another story showed how you could save HTML code with Javascript on Github and make a full working webpage from these. Re-read that story here.
http://lucstechblog.blogspot.com/2023/07/using-github-for-building-website.html

By combining these 2 you will have a webpage on which a game runs that you can access with your PC, phone or tablet.

The next step is to turn this webpage into an Android APP

Websites come and websites go

Since a few years it is possible to turn HTML code with Javascript (basically a website) into a dedicated app for your Phone. One of the leading services to do so was Phonegap-Build. Phonegap-Build was a service provided by Adobe. And unfortunately they ceased maintaining it and shut the service down. An open-source version is still around. It is called Cordova and maintained by Apache. However Cordova is not as easy to use as PhoneGap was.

Then there was a webservice called Appenguin. You can still find their website here: https://appenguin.com/ This worked fine. You just filled in your name and email adress, provided a name for your app and made a link to the website where the webpage resided. Few moments later you would receive a download with an APK file. Unfortunately this service seems to have ceased operation also. I even send the original developer an email and never got any response.

However websites and services come and go and lately I have been playing with 3 web-services that turn your website into an app for free.


AppCreator24     
https://www.appcreator24.com/


AppsGeyser       
https://appsgeyser.com/


<WEBINTOAPP>     
https://www.webintoapp.com/


The first two offer ready to use chat programs, forums, a small webshop, pre-defined games, video and audio players etc. etc. etc. All these can be turned into an app for free. This might be fun for some of you but I was interested in something else.

What all three have in common is that they can make an app from HTML code or from a website for free. And that is what I was looking for.

Revenu Model.

So how are these companies earning their money. All three offer a system to place advertisements in your app. You can earn money from these advertisements and they take a small share from that.

And they have pro-plans that offer some more functionality for a one-time or monthly fee.

Remember all services have a free plan with full functionality.

App size

This is where the differences occur. My reaction game (http://lucstechblog.blogspot.com/2024/03/javascript-reaction-game.html) in html is just a 1K file. Let's see what the services need to turn it into an app.


And there you have it.
AppCreator 24 is the most memory hungry. The app is no less then 26.45 MB And that from a 1K file.

Appsgeyser is the second in line, but still needs 17.39 MB !!!!

The best score is from WEBINTOAPP and that just takes 1.95Mb. Still al lot of memory but just 1/13th of what AppCreator24 needs and about 1/9th of what AppsGeyser needs.

Another example. I made a website for Freeboard (an IOT dashboard described here:
http://lucstechblog.blogspot.com/2019/10/freeboard.html). And then I turned that into an app with the same three services.


AppCreator24 again used more as 26MB, Appsgeyser used again around 17MB and the winner was WEBINTOAPP as that agin took just 1.91Mb.

I am not taking into account the Data and Cache memory the apps need when they are in use. If you bother to check these yourself you can see that here also WEBINTOAPP is the most economical.

But there is more..........

Are they real apps ???

Most of these services operate as follows. The app is in reality a kind of web-browser with a lot of  stripped off functionality. So what happens is when you start the app it downloads the original webpage and displays that.

So what happens if you set the Wifi functionality on your phone of browser off.


Well this is what happens when Wifi is hut off on your phone/tablet and you start the AppCreator24 app.


And the same happens with AppsGeyser.


Hey ??? WEBINTOAPP does what it should do. It starts and works like it should. Even if Wifi is turned off.

Are AppCreator24 and AppsGeyser bad solutions ??

Well not exactly. They offer some functionality that WEBINTOAPP does not. AppCreator24 offers for example the possibility to send a message to all its users. Next to that it automatically updates the "app" if you make any changes in it. WEBINTOAPP does not offer this functionality.

Concluding.

If you need a chat service, pre-made games or video and audio services into your apps and offer these to friends AppCreator24 and AppsGeyser is what you should look into.

If you just want a plain app, small and capable of working off-line WEBINTOAPP is what you need. It is my first choice at this moment.


So here is the link again. Go ahead, visit the site and look around :
https://www.webintoapp.com/

Next time I am going to show you how to use WEBINTOAPP to build an app.

Till next time.
Have fun

Luc Volders


Friday, March 22, 2024

Javascript reaction game

For an index to all my stories click this text

One of the most, if not THE most, used programming languages is Javascript. You might not be writing Javascript programs yourself but you are surely using Javascript programs every day.
Javascript is build into every browser be it on your PC, Phone or Tablet. Everytime you click a button, move a slider, fill in a text form or whatever the underlying Javascript motor performs the function.

Javascript can also be used on an ESP8266 or ESP32 webserver page to display the status of a led, put a graph or gauge on your screen, examine the state of an onscreen button or get the value of a slider. I am going to publish a series of articles on this to enhance your ESP's webpages.

And do you remember Freeboard ?? I wrote a story on this IOT dashboard in 2019. Freeboard is completely written in Javascript. You can find the story on Freeboard here: http://lucstechblog.blogspot.com/2019/10/freeboard.html

And I'll let you in, in a little secret.
You can build a webpage with Javascript and easily turn that into an app for your phone. Until now I have been using MIT's App Inventor for building apps for my phone and tablet but I am more and more switching to Javascript.

As an excercise I wanted to build a small simple reaction game in Javascript and turn that into an App for my phone. This story tells how the game was written. Another story that's coming up tells how the game is turned into an app.


The reaction game.

The game is quite simple. On an empty screen a red dot is placed. You have to press the dot as soon as you see it. Then the dot jumps to another part of the screen. The object of the game is to click the dot as soon as possible and the time you needed and the best time are shown.

A webpage framework.

Basically a webpage with Javascript code is build up as follows:

<!DOCTYPE html>
<html>
<style>

</style>
<body>

<script>

</script>

</body>
</html>


As the framework shows every part of the page is placed within limits. For example the javascript part starts after the <script> tag and ends with the </script> tag. There is some CSS code between the <style> and </style> tags. CSS code describes the look of the elements on the page.
Between the <body> and <script> html code can be placed that puts text, buttons, sliders etc. etc. etc on the page.

I will not get too much into the details as there are books of hundreds of pages written on HTML, CSS and Javascript. There are some good (free) courses on the web where you can learn all this. Check for example https://www.w3schools.com/  and https://javascript.info/


Some highlights on the program.

First thing is to calculate the time that passes between when a new dot is placed on the screen and the dot is clicked.

With new Date() we can get the actual date and time.

var start = new Date();

At the start we put this in a variable called start.

var end = + new Date();

When the dot is clicked we get the date and time anew and put it into a variable called end.

var timeused = end-start;

By subtracting start from end we get the time in milliseconds. And that is the time we have to beat each turn.

Each turn the red dot needs to be placed at at random value on the screen.

window.innerWidth
window.innerHeight


These statements supply the Width and Height of the webpage. Nice trick is that they automatically change if we resize the window.

   var newx = (Math.random()*window.innerWidth)-50;
   var newy = (Math.random()*window.innerHeight)-50;


As Math.random() gives  a random value between 0 and 1 the formula nicely calculates a value between 0 and the window Width and window Height. We subtract 50 from that value as that is the radius of the dot so the dot will always be placed within the window.

   var d = document.getElementById('divtest');
   d.style.position = "absolute";
   d.style.left = newx+'px';
   d.style.top = newy+'px';


These commands first get the information about the dot element and then alter the co-ordinates of that element to the newx and newy. We have to add 'px' to the value to tell the command that we are working in screen pixels.

document.getElementById("divtest").addEventListener("click", clicked );

This Javascript statement adds a so called Event Listener to the dot element. The Event it checks is wether the dot is clicked. And if it is it runs the function clicked.

At the beginning of the webpage there is the <style> description.

<style>
.red {
height: 50px;
width: 50px;
background-color: #f00;
border-radius: 50%;
display: inline-block;
}
</style>


This gives the element with the class "red" (which is the dot) a width of 50 pixels and a height of 50 pixels and sets the border-radius to 50% which makes it a circle. The color is in RGB and #f00 is red.

That covers the most part of the program. So I present it here in full.

<!DOCTYPE html>
<html>

<style>
.red {
height: 50px;
width: 50px;
background-color: #f00;
border-radius: 50%;
display: inline-block;
}
</style>

<body>
<h3 id = "besttijd">Start</h3>
<h3 id = "nwtijd"></h3>
<div id="divtest" class='red'></div>

<script>
document.getElementById("divtest").addEventListener("click", clicked );
var start = new Date();
var best = 1000000;

function clicked()
{
   var newx = (Math.random()*window.innerWidth)-50;
   var newy = (Math.random()*window.innerHeight)-50;
   if (newx < 0) {newx=0};
   if (newy < 0) {newy=0};
   var d = document.getElementById('divtest');
   d.style.position = "absolute";
   d.style.left = newx+'px';
   d.style.top = newy+'px';

var end = + new Date();
var timeused = end-start;
start = end;

if (timeused < best)
{
best = timeused;
document.getElementById('besttijd').innerHTML= "best time = "+best;
}
document.getElementById('nwtijd').innerHTML= "your time = "+timeused;

}

</script>

</body>
</html>


You can copy the program, pste it in wordpad (or any other editor) and save it as game.html and when you click that file a webpage will open and you can start playing. As it checks the page width and height all the time you can open this webpage on your PC, Tablet or Phone.

How does it look.

Here is a small frame with the program running. You can play it right away. Try not to get too addcited ;)


The game on the web

I copied the game to a Github repositry and then made a Github webpage from that. You can read how to do that in this story: http://lucstechblog.blogspot.com/2023/07/using-github-for-building-website.html

I urge you to do the same and make some alterations like altering the text, the background color, the color of the dot etc. That way you get some experience with web-programming.

Here is the link: https://lucvolders.github.io/htmltest02/

You can open that link on your PC, Tablet or Phone and start playing the game.

In an upcoming story I am going to show you how turn this webpage into an app.


I wrote a book that is not a tutorial but just chockfull with Javascript tips (more as 500). It is available on Amazon (also internationally) and the regular bookstores. If you are going to program in Javascript frequently this book can save a lot of time. Here is the link: Javascript tips by Luc Volders

Till next time
Have fun

Luc Volders

Friday, March 15, 2024

Fence caps revisited

For an index to all my stories click this text.

Time flies !!
In 2015 I wrote a story on how I printed caps for my fence. You can read that story here: http://lucstechblog.blogspot.com/2015/07/fence-caps-few-moths-ago-my-son-in-law.html


The caps where printed in PLA.


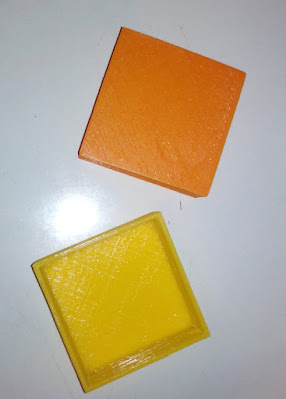
As I love color I printed every cap in a different color. Yellow, Orange, Blue and Green. And my neighbours never complained.

But look at them now:


After nearly 10 year they are totally worn down.
They served me well. Endured high summer temperatures (it was 35 degrees Celsius last summer), freezing winters, snow, rain, wind and hailstorms

So I am printing new ones. And again in different colors: black, red, white, purple, and just to see what happens: glow in the dark. If they also last about 10 years that suits me fine.

PLA is alledgedly biodegradable but dont take your hopes up too high.

Till next time,
have fun


Luc Volders


Friday, March 1, 2024

Solving the CORS error in MicroPython

For an index to all my stories click this text

I was doing a large project when something unforeseen happened. A javascript program which was accessing a webserver on a Raspberry Pico W got a CORS error. In this story you will find the solution as this might happen to you to.

The project I was doing was made with a Raspberry Pi Pico programmed with MicroPython. The controller acted as a webserver that displayed some simple data on a webpage. So nothing special on this side.
 
The next step was a bit more complicated. I needed to fetch that data and do some calculations on them. For that I build a webpage on my PC with some Javascript code that would fetch the data and do the calculations.

And then the unforeseen happened.
Everything looked like it should but the Javascript code was not able to fetch the code.

Let me start with giving you the MicroPython code. The code is straightforward and just builds a simple webserver.

import socket
import network

# Router credentials
ssid = "MY-ROUTERS-NAME" # wifi router name
pw = "PASSWORD" # wifi router password
print("Connecting to wifi...")

# wifi connection
wifi = network.WLAN(network.STA_IF) # station mode
wifi.active(True)
wifi.connect(ssid, pw)

# wait for connection
while not wifi.isconnected():
    pass

# wifi connected
ip = str(wifi.ifconfig()[0], "\n")
print("Connected. IP: ",str(wifi.ifconfig()[0], "\n"))

def open_socket(ip):
    address = (ip, 80)
    connection = socket.socket()
    connection.bind(address)
    connection.listen(1)
    return connection

def webpage():

    html = ""
    html = html + '<!DOCTYPE html>'
    html = html + '<html>'
    html = html + 'Hi, this is the Pico'
    html = html + '<br>'
    html = html + '============='
    html = html + '</html>'
    return (html)

def serve(connection):
    while True:
        client = connection.accept()[0]
        request = client.recv(1024)
        request = str(request)
        print(request)
        html = webpage()
        client.send(html)
        client.close()
        
connection = open_socket(ip)
serve(connection)

Nothing special or complicated here.
A socket is opened and when the server gets a request the webpage is send.

To test if this functioned I just opened the URL in my webbrowser.


And there is. A simple webserver that sends a webpage that displays 2 lines of text. Of course the complete project would send far more data. But this is just for demonstrating the problem.

If you want to know more about MicroPython on the Raspberry pi pico W please consider buying one of my books on this subject:

You can buy it from Amazon by clicking the picture or this line of text.  

You can also click one of the links at the bottom of this page.

So the webserver worked.

Now let us look at the second webpage. This one was made on my PC and has Javascript code to fetch the data from the Pico's webserver.

<!DOCTYPE html>
<html>
 
<head>
    <title>
        Luc's test page
    </title>
</head>

<h1>here comes the received data</h1>
<div id="testtext"></div>

<script>

repeatrequest = setInterval(getpage, 5000);

function getpage()
{
  fetch(`http://192.168.1.82`).then(function(response) {
  return response.text().then(function(text) {
  receivedtext = text;
    });
   });
  document.getElementById("testtext").innerHTML=receivedtext;
}

</script>
 
</html>


Again nothing exciting here. A simple webpage with a fetch command that adresses the IP address of the Pico and gets the data from Pico's webpage.

It looks like this:


There was only just one small problem. The page says: here comes the received data. But nothing came.


However Thonny's shell was telling me that it received a request from a windows machine running the Firefox browser. So The Pico received a request from my Javascript code. And still the webpage on my computer did not display any information.

I checked my code, and rechecked my code and rechecked my code. But could not find any error. Then I opened the webdevelopers console in my browser and there it was.


The dreaded CORS error.

The CORS error name is an abbreviation for Cross-Origin Resource Sharing.

I herebye cite Wikipedia:

Cross-origin resource sharing (CORS) is a mechanism that allows restricted resources on a web page to be accessed from another domain outside the domain from which the first resource was served.

Now that explains it all, doesn't it.
Well I think for most of the readers of this weblog this is all mumbo jumbo.

No worries.

Basically CORS is a safety measurement that makes sure that a computer in your local network can not access data from another computer in your local network without explicit permission. So if a hacker gets hold of a computer in your local network CORS is a way to prevent him/her getting access to other computers in the same network.
In this case it affects my computer trying to get information from my Pico.

The important part is how to get rid of it.

To get rid of the error we need to have the Pico's webserver give explicit access to it's information if another computer in our own network asks for it.
That information must be send in the header of the webpage.

We can do that by adding the following lines to our Pico webserver:

        client.send('HTTP/1.1 200 OK\n')
        client.send('Access-Control-Allow-Origin: *\n')
        client.send('Access-Control-Allow-Methods: GET, POST, PUT, DELETE, OPTIONS\n')
        client.send('Access-Control-Allow-Headers: Content-Type\n')
        client.send('Content-Type: text/html\n')
        client.send('\n')

For clarity I herbye give the complete MicroPython webserver code:

import socket
import network

# Router credentials
ssid = "MY-ROUTERS-NAME" # wifi router name
pw = "PASSWORD" # wifi router password
print("Connecting to wifi...")

# wifi connection
wifi = network.WLAN(network.STA_IF) # station mode
wifi.active(True)
wifi.connect(ssid, pw)

# wait for connection
while not wifi.isconnected():
    pass

# wifi connected
ip = str(wifi.ifconfig()[0], "\n")
print("Connected. IP: ",str(wifi.ifconfig()[0], "\n"))

def open_socket(ip):
    address = (ip, 80)
    connection = socket.socket()
    connection.bind(address)
    connection.listen(1)
    return connection

def webpage():
    html = ""
    html = html + '<!DOCTYPE html>'
    html = html + '<html>'
    html = html + 'Hi, this is the Pico'
    html = html + '<br>'
    html = html + '============='
    html = html + '</html>'
    return (html)

def serve(connection):
    while True:
        client = connection.accept()[0]
        request = client.recv(1024)
        request = str(request)
        print(request)
        html = webpage()
        
        client.send('HTTP/1.1 200 OK\n')
        client.send('Access-Control-Allow-Origin: *\n')
        client.send('Access-Control-Allow-Methods: GET, POST, PUT, DELETE, OPTIONS\n')
        client.send('Access-Control-Allow-Headers: Content-Type\n')
        client.send('Content-Type: text/html\n')
        client.send('\n')
        
        client.send(html)
        client.close()
        
connection = open_socket(ip)
serve(connection)


The new program lines are added before

        client.send(html)
        client.close()


so the headers are send before the webpage is send.
This gives a signal to Javascript that the webpage can safely receive data from the Pico.


And this is how the result looks.

Problem solved. 


Till next time
have fun

Luc Volders