For an index to all my stories click here.
Blynk - an introduction
Blynk has been around since 2015 and has a great popularity amongst users
and devellopers of IOT applications. But for some reason or another I never
have paid any attention to it. That is going to change now.
The
front end of Blynk is an APP for Android and APPLE phones/tablets. On it's
page you can put buttons, switches, sliders, text fields, leds, gauges etc
etc etc. Each of these can be individually placed on the screen and adapted
by you. And in my opinion it looks great !!
Above is a Blynk page on my phone that shows some of the
possibilities. It is from a demo project I am going to re-create here. You
can put as many buttons, sliders graphs etc etc as you want in a project.
However Blynk uses a system called energy. You start with a certain amount
of energy and each widget that is put on the screen uses some of that
energy. So in the end you are limited with the standard version to a certain
amount of widgets. You can buy more energy and that is where the guys from
Blynk earn their money. The starting amount of free energy supplied is
however enough for some decent projects.
There is however a workaround
that lets you use as much energy as you want and its is free, and ligit
!!! We will get to this in a follow up story.
Blynk works
with a myriad of controller boards amongst them the ESP8266, ESP-01, ESP32,
arduino's, Micro:Bit, Raspberry, Particle Photon, Particle Core, Particle
Electron etc etc etc. Drivers are availbale for all of these boards. You can
check the complete list at their develloper pages:
https://github.com/blynkkk/blynkkk.github.io/blob/master/SupportedHardware.md
Next to a nice interface Blynk has excellent documentation, an
API so you can control it with your own programs, an active user community,
and a special webpage that contains frameworks for example programs.
How does Blynk work.
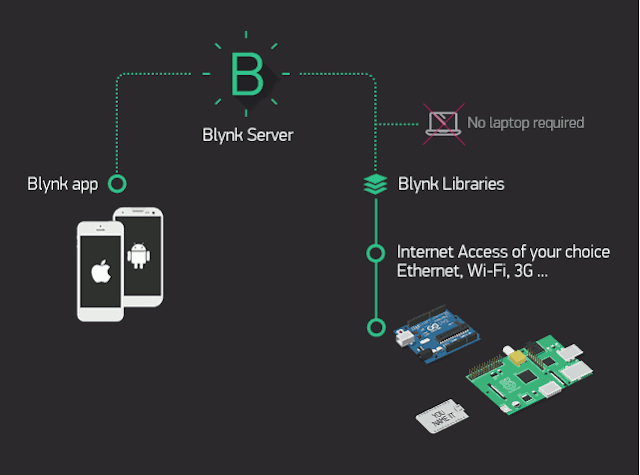
There are 3 things involved in getting Blynk working.
-
First you need to download the APP (which is free) from the Google Play
store (just look for Blynk) or from Apple.
- The app contacts a Blynk
server
- The server sends commands from your Blynk App to your
microcontroller. The Microcontroller sends data (like temperature, door
sensors etc) to the server which sends the info to the App.
So there is always a sever that intermediates between your App
and the microcontrollers. It works a lot like MQTT.
You are not
limited to communicating with just one microcontroller you can have a lot of
them and even have the server send commands and data between the
controllers.
The Blynk Server can be used with a limited number
of Energy. This determines how many widgets you can use on your Blynk
screen. In an upcoming story I will show you how to build your own server
and have unlimited Energy.
Before starting with the first project
I will give you the links to the relevant Blynk pages on the web.
https://blynk.io/
This is the main page from the manufacturer.
https://blynk.io/en/developers
This is the page where you can find all documentation and links
to Github pages with demonstration programs and libraries. The documentation
is really extensive and clear.
https://examples.blynk.cc/?board=ESP8266&shield=ESP8266%20WiFi&example=GettingStarted%2FBlynkBlink
This is one of the most interesting pages. It is an Example
Code Builder. 
On the left side choose your board and connection and then
chose one of the example programs and you will be presented with a framework
with the basic functionality.
So let's get starting with a first
project.
Hardware
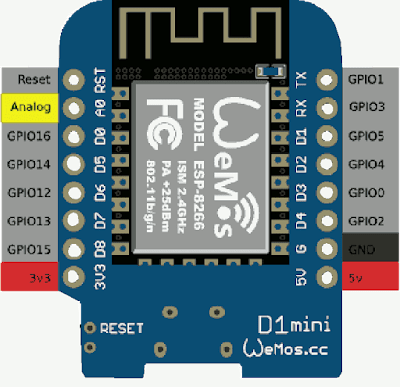
For the first test I am going to use an ESP8266 (the Wemos D1
version) with a led and a button.
The setup is simple. A button with a 10K pull-up resistor
connected to D6 and a led with a 220Ohm delimiting resistor connected to
D5.
Blynk does not use the D numbers but uses the GPIO numbers. So
for your convenience I herebye give you a pin layout with the GPIO
numbers.
Build the control screen.
Start with installing the Blynk App from Google Play. When installed click on
the icon to start it.
For my own convenience I am not doing this on
my phone. I am using an android Emulator called LDPlayer4. I am using this
emulator on my PC cause it makes it easy to make screendumps direct on my PC
without having to transfer them from my phone to my PC. The emulator runs on
Android 7 which is fine for Blynk. You can read more about htis emulator in
the story that can be found here http://lucstechblog.blogspot.com/2021/03/ldplayer-android-emulator.html
When the App has started it presents you with the inlog screen.
You can log in with an existing account (if you already used it before) or
make a new one.
As this is the first time you are using Blynk create a
new account. Fill in your e-mail adress and choose a password.
The e-mail adress is important as Blynk will send an
authentification code to that adress. And you will need that code in your
ESP8266 program.
The next screen offers you to build a new project so click on the
+
Give your project a name. Suprisingly I called it 'test'.
As
board I choose the ESP8266. Click on that line to see all available boards.
As
connection I choose wifi as that is the obvious way the ESP8266 communicates
with the world. Click on Create to go on.
An authentification token is send to your email-adres. Keep this
token at a safe place as this needs to be put into the ESP's program so the
Blynk Server knows which board it is communicating with and what is attached
to that board.
You are now presented with an empty board. The dots are the indicators where a widget can be placed. Press on the + sign at
the top right side of the app.
Look at all the widgets that are available. There is a wealth of
functionality that allows you to build great IOT dashboards. Let's start
simple and click on the button icon.
The button is placed on the empty screen. Long press it to move
it to the place where you want it. Click it to open the buttons settings
page.
The first picture shows how the setting pages starts. The second picture shows
how I altered it. I altered the PIN in GP14 which is D5 on the Wemos D1. I
also altered the font size and the color of the text and at the top I named
the Button LED1
Here is the result. Now press the triangle at the top right part
of the screen. This will take you from editing to running the program.
Now press the button and the text will alter from OFF to ON.
This
finished our first step in the APP.
To get this working we need to
program the ESP8266.
Installing the Blynk library.
First things first. To get things running we need to install the
Blynk library on the ESP8266. Fortunately this is easy.
In the Arduino IDE go to the sketch tab, choose Include Library
and then manage libraries.
The libraries window will open and type in search "Blynk". The
Blynk library will show up and install it.
The library includes many
example programs. have a look at them. They will demonstrate how to work with
Blynk.
ESP8266 program.
This is really very easy. Basically it is the ESP8266_Standalone
program from the examples with some minor changes.
#define BLYNK_PRINT Serial

#include <ESP8266WiFi.h>
#include <BlynkSimpleEsp8266.h>

// Fill your authentification token in
char auth[] = "YOUR TOKEN HERE";

// Your WiFi credentials.
char ssid[] = "YOUR-ROUTERS-NAME";
char pass[] = "PASSWORD";

void setup()
{
  Serial.begin(9600);

  Blynk.begin(auth, ssid, pass);
}

void loop()
{
  Blynk.run();
}
I'll go over the lines for a small explanation.
#define BLYNK_PRINT Serial
#include <ESP8266WiFi.h>
#include <BlynkSimpleEsp8266.h>
The first line opens Blynk's communication lines. The next lines load the libaries.
char auth[] = "YOUR TOKEN HERE";
This is where you put your authentification token which you received by mail.
char ssid[] = "YOUR-ROUTERS-NAME";
char pass[] = "PASSWORD";
Of course you will have to replace these with your routers credentials to get internet access.
In the setup() we find:
Blynk.begin(auth, ssid, pass);
Which starts the Blynk libraries and connects to the internet with your credentials.
In the loop there is just one line:
Blynk.run();
This keeps Blynk running.
That's all !!!
Press the button on the app and the led goes ON. Release the button and the led goes off.
This is a rather lengthy post. Next time I am going to show how to send information from the ESP8266 to the Blynk app.
Conclusion.
With this post I just covered the first step in working with Blynk. And I must say I am enthousiatic. Not only does it look good, it is functional and easy to work with. It will not replace Domoticz which is my home automation system but Blynk is a valauble add on. It is a lot easier then building your own web interface and gets things done in a really short time.
There is a lot to be discovered and in upcoming stories I am going to show you how to have Blynk communicating with Domoticz but also how to use its API to control certain aspects from within your own programs.
Till next time.
Have fun.
Luc Volders


