For an index to all my stories click this text
In a previous story about Telegram I demonstrated how to set a led on and off by giving commands in your Telegram Bot. This story shows how to send data from sensors to your Telegram account. Using these two you can control your complete home automation with Telegram.
Before you can send sensor data to Telegram you wull have to get a Telegram account and make a bot for communicating with your ESP. This sounds complicated but actually is not. You can find the complete setup in this story http://lucstechblog.blogspot.com/2023/01/telegram-messenger-for-iot.html
Read that story carefully because this episode is leaning heavily on it.
I also urge you to read the story where I showed how to get Telegram on a webpage. As this is a lot easier to read as on the small telephone screen. Communication with Telegram on the road is great on your smartphone. For home use I prefer a larger screen. How to do that can you read here; http://lucstechblog.blogspot.com/2023/02/convenient-working-with-telegram.html
Now you have the basic setup ready let us start sending sensor readings from our ESP to Telegram. In the previous story I used an ESP8266. This story uses the ESP32. Do not dispair as changes are minimal and can easily be adapted for use on the ESP8266.
As this is a tutorial I am going to show you how to send data from 3 sensors from the ESP to your Telegram account. I will split things up so if you just have one of these sensors in your stock you can adapt the program to using just that sensor.
Breadboard layout.
Like said I am going to attach 3 sensors to the ESP32. A Dallas 18B20 thermometer, an LDR and a push button. By understanding how this works you will be able to attach any sensor to the ESP and send its data to Telegram.

Nothing special here.
The Dallas DS18B20 is attached with a
4.7K resistor to pin 32 of the ESP32. Alter this to a suitable pin on the
ESP8266 and change the program accordingly.
The pushbutton is attached
with a 10K pull-up resistor to pin 14, again alter this to any suitable pin
for the ESP8266. And the LDR is attached with a 10K pull-down resistor to
pin 32. Not a lot choice there as the ESP8266 only has one analog pin.
ATTENTION:
There
seems to be a problem when using the Wifi and AsyncTelegram libraries
together with analogRead. Only ADC1 (Analog Digital Converter 1) works when
these libraries are used. So when using the Telegram Libraries and you need
analog input use GPIO 32, 33, 34, 35, 36 or 39 being ADC0, ADC3, ADC4, ADC5,
ADC6 and ADC7
If you want to know more about how the IO pins work
you could buy my book on the ESP32:
http://lucstechblog.blogspot.com/2020/10/esp32-simplified-world-wide-available.html
The Telegram sensor program
Basically it is the same program as used in the first story on
Telegram which you can re-read here: http://lucstechblog.blogspot.com/2023/01/telegram-messenger-for-iot.html
So
copy this program and make the following alterartions.
Dallas DS18-B20
#include <DallasTemperature.h>
#include
<OneWire.h>
# define ONE_WIRE_BUS 23
OneWire
oneWire(ONE_WIRE_BUS);
Start with including the library and attach it to pin 23. Alter
this in pin D8 for the ESP8266.
DallasTemperature dallas(&oneWire);
float temp =
0;
Define a new variable that will be used for storing the
temperature.
dallas.begin();
In the setup() add the above statement so the DS18B20 library
gets activated.
In the loop we made a test for the commands Lon
(lamp ON) and Loff (lamp Off). We are going to add a test for another
command called Temp.
else if (msg.text.equalsIgnoreCase("Temp"))
{
dallas.requestTemperatures();
Serial.print("Temperature is: ");
temp=dallas.getTempCByIndex(0);
Serial.println(String(temp));
tosend = "The temperature is now : ";
tosend +=
String(temp);
myBot.sendMessage(msg,
tosend);
}
First we test wether "Temp" is received from the Telegram bot.
If that is the case we print the current temperature in the Serial Monitor.
This has two advantages. It shows that the Dallas DS18B20 is wired correctly
and that its library is working.
Next we build the sting toSend
in which we put the message "The temperature is now : "and we add the
reading from the DS18B20 to it.
The button
int button = 14;
At the beginning of the program where all variables are
declared we assign the variable button to pin 34.
pinMode(button, INPUT);
In the setup() we make sure the button pin is set as an INPUT
pin.
else if (msg.text.equalsIgnoreCase("Button"))
{
Serial.print("The Button is: ");
Serial.println(digitalRead(button));
tosend = "The Button is : ";
tosend += digitalRead(button);
myBot.sendMessage(msg, tosend);
}
And the above code is attached to the loop().
First we
test wether the command "Button" is received.
If that is true then we
test the button and send the state of the button to our bot.
The LDR
For sending the LDR value to the Telegram Bot we only have to
make another entry in the loop() and that is similar to the routine for the
thermometer.
else if (msg.text.equalsIgnoreCase("LDR"))
{
Serial.print("The LDR's value is: ");
Serial.println(analogRead(32));
tosend = "The LDR's value is : ";
tosend +=
String(analogRead(32));
myBot.sendMessage(msg,
tosend);
}
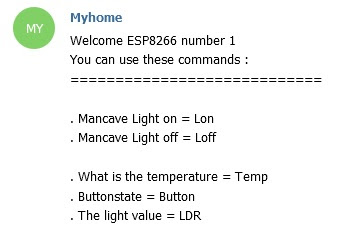
The menu
The only thing left to do is to alter the menu for it to
incorporate our new commands. It will look as follows.
{
// generate the message for
the sender
String reply;
reply = "Welcome ESP8266 number 1\n" ;
reply += "You can use these commands :\n" ;
reply += "============================\n\n" ;
reply += ". Mancave Light on = Lon\n";
reply += ". Mancave Light off = Loff\n\n";
reply += ". What is the temperature = Temp\n";
reply += ". Buttonstate = Button\n";
reply += ". The light value = LDR\n";
myBot.sendMessage(msg, reply);
}
As you can see the new commands are added to the user menu of
the bot. So when you type /start in the bot it will show the menu.
/*
Name:                     Telegram sensor readings
Library and demo Author:  Tolentino Cotesta <cotestatnt@yahoo.com>

Adapted by:               Luc Volders
                          http://lucstechblog.blogspot.com/
*/

#include <Arduino.h>
#include "AsyncTelegram.h"

#include <DallasTemperature.h>
#include <OneWire.h>

# define ONE_WIRE_BUS 23
OneWire oneWire(ONE_WIRE_BUS);

AsyncTelegram myBot;

DallasTemperature dallas(&oneWire);

float temp = 0;
int button = 34;
String tosend = "";


const char* ssid = "ROUTERS_NAME";
const char* pass = "PASSWORD";
const char* token = "TELEGRAM TOKEN";

int led = LED_BUILTIN;

void setup()
{
  // initialize the Serial
  Serial.begin(115200);
  Serial.println("Starting TelegramBot...");

  WiFi.setAutoConnect(true);
  WiFi.mode(WIFI_STA);

  WiFi.begin(ssid, pass);
  delay(500);
  while (WiFi.status() != WL_CONNECTED)
  {
  Serial.print('.');
  delay(500);
  }

  myBot.setUpdateTime(1000);
  myBot.setTelegramToken(token);

  Serial.print("\nTest Telegram connection... ");
  myBot.begin() ? Serial.println("OK") : Serial.println("Not OK");

  dallas.begin();

  pinMode(led, OUTPUT);
  digitalWrite(led, LOW); //<== high for esp8266

  pinMode(button, INPUT);
}

void loop()
{
TBMessage msg;

  if (myBot.getNewMessage(msg))
  {
    if (msg.text.equalsIgnoreCase("Lon"))
    {
      digitalWrite(led, HIGH); //<== low for esp8266
      myBot.sendMessage(msg, "Light is now ON");
    }

    else if (msg.text.equalsIgnoreCase("Loff"))
    {
      digitalWrite(led, LOW); //<== high for ESP8266
      myBot.sendMessage(msg, "Light is now OFF");
    }

    else if (msg.text.equalsIgnoreCase("Temp"))
    {
      dallas.requestTemperatures();
      Serial.print("Temperature is: ");
      temp=dallas.getTempCByIndex(0);
      Serial.println(String(temp));
      tosend = "The temperature is now : ";
      tosend += String(temp);
      myBot.sendMessage(msg, tosend);
    }

    else if (msg.text.equalsIgnoreCase("Button"))
    {
      Serial.print("The Button is: ");
      Serial.println(digitalRead(button));
      tosend = "The Button is : ";
      tosend += digitalRead(button);
      myBot.sendMessage(msg, tosend);
    }


    else if (msg.text.equalsIgnoreCase("LDR"))
    {
      Serial.print("The LDR's value is: ");
      Serial.println(analogRead(15));
      tosend = "The LDR's value is : ";
      tosend += String(analogRead(32));
      myBot.sendMessage(msg, tosend);
    }

    else
    {
      // generate the message for the sender
      String reply;
      reply = "Welcome ESP8266 number 1\n" ;
      reply += "You can use these commands :\n" ;
      reply += "============================\n\n" ;
      reply += ". Mancave Light on = Lon\n";
      reply += ". Mancave Light off = Loff\n\n";
      reply += ". What is the temperature = Temp\n";
      reply += ". Buttonstate = Button\n";
      reply += ". The light value = LDR\n";
      myBot.sendMessage(msg, reply);
    }
  }
}
For your convenience I hereby show the complete program.
As stated before this is the same program from the first story on Telegram but with the above modifications. For a complete explanation on the program read that previous story here: http://lucstechblog.blogspot.com/2023/01/telegram-messenger-for-iot.html
How does it work
In your Telegram's Bot screen type /start.

As you can see the menu we created in the ESP32 is displayed.

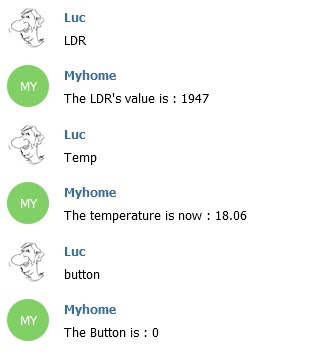
Type any of the commands an you will get the results from the ESP.
Adapting.
You can easily adapt the ESP's program to replace the button with a door contact, a pir sensor a tilt sensor, a vibration sensor, the door-bell sensor or whatever you want. As the ESP8266 and ESP32 have many IO ports you can attach a multitude of sensors to one ESP.
Alerts
There is much more you can do with Telegram. One important feature is that you can also send alerts to your Bot that is coming up in another story.
Till next time
have fun
Luc Volders

