
For an index to all my stories click this text

This is the fifth story in the series about building a device that aids with leveling your caravan or mobile-home. I am sure you will find other purposes for this tool to.
The previous stories in this series are important if you want to build this project yourself.
- The first story discussed building the hardware and a casing for the caravan/mobile-home leveling aid. You can find that story here: http://lucstechblog.blogspot.com/2024/04/caravanmotor-home-leveler-part-1.html
- The second story discussed the MicroPython program for the ESP8266 and how to test the setup. You can read that story here:
http://lucstechblog.blogspot.com/2024/05/caravanmotor-home-leveler-part-2.html
- The third story is about building an HTML file with Javascript that can be opened like a web-page on your mobile-phone and is the actual program that displays the data from the leveling aid. You can find that story here: http://lucstechblog.blogspot.com/2024/05/caravanmotor-home-leveler-part-3.html
- Story 4 showed how to run the software on your PC instead of on your phone. You can read that story here:
http://lucstechblog.blogspot.com/2024/05/caravanmotor-home-leveler-part-4-run-on.html
This story tells how to build a dedicated app from the HTML file. I already mentioned that you could do this in the third story. And I wrote a story some time ago about how to turn an HTML file into a dedicated app. You can read that story here if you missed it:
http://lucstechblog.blogspot.com/2024/04/turn-webpage-into-app.html
As I had some requests from readers that wanted a complete tutorial on how to turn the caravan/mobile-home leveling aid into an app I am happy to oblige. You can use this tutorial for any HTML page with Javascript that you want to turn into a dedicated app.
Description of the app
The app I am going to make is a simple app.
- It has it's own icon so you can find it between all the other icons on your phone's home screen.
- The app has a splash screen. That is a welcoming screen, shown when you start the app.
- After clicking the splash screen the app starts.
- The app gets the data from the ESP8266 and displays it graphically. This is just the Javascript program inside the HTML file.
- The app has an Exit button at the top-right side of the screen that, obviously, exitst the app.
This app is for Android Phones. The Webintoapp service we are going to use offers a possibility for building an app for Apple Phones. Due to the extreme price tags of Apple Phones I do not (want not) own an Apple Phone. Next to that the Webintoapp service charges a sum for building the Apple App while the Android app is free !!!
Download the Javascript file to your computer.
First step is to download the HTML file with the Javascript program to your computer. You can use the download link provided here.
https://app.mediafire.com/folder/jpswchudmlwu5
This link directs your browser to the directory on Mediafire where you can find all files for this project.
There are 2 files we need for building the app:
- caravan-ico.png
- caravan-level.html
The other files are of course necesary for the other stories in this series.
Make a zip file from the html file.
Webinto app needs the HTML file to have a special name. That name is index.html so start with renaming the caravan-level.html file into index.html.
There are loads of programs that run under Windows or Linux that can create a zip file from any files you throw at it.
If you do not have such a program at hand you can use a webservice. I used compress2go.com You can find it here: https://www.compress2go.com/create-zip-file
Just drag the HTML file from your disk to the orange field on the screen and then press the start button at the bottom. After a few moments a new screen opens on which you can download the zip file.
The icon
You can use the caravan-ico.jpg for which I just provided the download link.
You can of course design your own icon. I made mine in The Gimp and it has a resolution of 512 x 512 pixels. This is the maximum size for icons that Webintoapp accepts and gives the best results.
Webintoapp
Now we have gathered everything we need we can visit the service that makes the app.
https://www.webintoapp.com/
Copy this link and put it in your browser to visit the site.
Register or if you already have done so, log in.

As you can see I had already made some apps for previous stories on this weblog.
As we are going to make a new app choose App Maker at the top of the screen.

Standard Webintoapp is set for making a website into an app. We are going to make an HTML file into an app. So choose that option (where the red arrow points).

Then click on select zip file and upload your freshly made index.zip file that contains the index.html file and nothing else.

Fill the next fields in. So give your app a name (I chose Caravan-Leveler) and fill in your Company/Brand name. I just used my own name here.
When you are making updates to an app you can fill in the Major version and Minor version fields. Just leave them as they are at this moment.
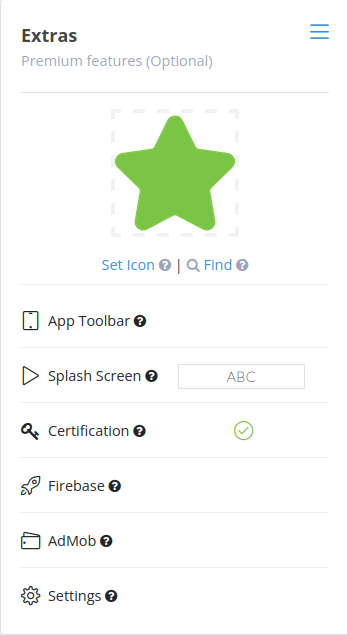
In the adjacent column first choose set icon and then upload the caravan-ico.png icon you previously downloaded.

Then chose the colors you want for the toolbar (the top of your screen). I did not make any alterations here. But you can chose another color setting if you want. Click OK when done.
There is a Splash-screen option. Unfortunately that is only usable by Premium developers. If you need a Spalsh screen with your company logo or whatever the consider becoming a Premium developer.
The other options like Certification, Firebase and Admob I left unchanged.
Then click on the last option: Settings.
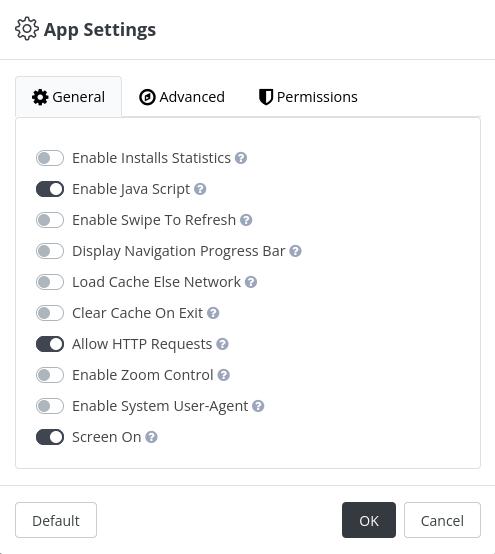
Make sure you enable JavaScript in the settings menu. Without Javascript our program will not run. Important is also that you Allow HTTP requests as our ESP8266 does not allow HTTPS requests.
And chose the Screen ON option so the app stays active.

Click on the Advanced tab and chose the apps orientation. Set this (for this app) to Portrait.

And in the last tab (Permissions) make sure that the Internet Permission is set on. Our app will not communicate over the internet but direct to the ESP8266. But this option is needed to make sure Wifi is enabled.
Then click on the OK button to save your choices.
Then go back to the right part of the screen and click on the Next button.

A screen opens with the complete overview of your settings. Check if everything is ok and then press Make App on the left-bottom side of the screen.

When the app has been made a new pop-up screen emerges. Here you can fill in some details about the app. As Category I chose Auto & Vehicles but there are many more categories to choose from.
You can also give a short description here about your app.
This information will be shown on a special home-page for this app.
You can find the URL of that homepage in the first field in this pop-up screen.
Click OK, and you're done !!!
The App's homepage.

And this is how the homepage looks.
Save it's URL so you can use it on your phone to download the app, or to send it to friends to share.
From this page you can also download the app to your computer and transfer it from the computer to your phone.

If you lost the URL to the App's homepage you can always go to the dashboard and click on the most right icon next to the App's name and Icon. There is a drop-down menu in which there is a link to the homepage.
Transfer the app from your PC to your Phone
There is an easy way to transfer the APK file from your PC to your phone. In fact there are several ways to do that.
- Drive
If you use Google Drive you can upload the App to that service and download it on your phone.
- Telegram
If you use Telegram on your Phone you can use the Telegram web-app and transfer the file from the web-app to your phone. I have demonstrated how to do that in this story on this web-log:
http://lucstechblog.blogspot.com/2023/03/file-transfer-with-telegram.html
Installing the App
If you downloaded the App on your phone with a web-browser from the app's home-page. The APK file will be in the download folder and called app-release. Just click on it and give permission to install it. And again: for lazy people that not build the app themselves can download it from my app's download page: https://www.webintoapp.com/store/313868
If you downloaded the app from Telegram you need to point your file manager to the Telegram folder/directory on your phone. There you will find the APK file with the name app-release. Click on it and give permission to install the App.
That's the complete story.
I hope this project helps you in any way.
Till next time
Have fun
Luc Volders