
For an index to all my stories click this text
Telegram keeps interesting me and the more I work with it the more possibilities I see.
The first story in this series showed how to install Telegram and make a bot to communicate with your ESP. You can re-read that story here. http://lucstechblog.blogspot.com/2023/01/telegram-messenger-for-iot.html
For testing purposes working on a big screen is more convenient. So the second story showed how to get Telegram working on your PC. Read that story here: http://lucstechblog.blogspot.com/2023/02/convenient-working-with-telegram.html
The third story showed how to send sensor data from your ESP to Telegram. Re-read that story here. http://lucstechblog.blogspot.com/2023/02/request-esp-sensor-data-with-telegram.html
The fourth story showed how to connect Octoprint to Telegram. That way you can get an alert with a picture if your 3D printer has finished. You can read that story here: http://lucstechblog.blogspot.com/2023/03/octoprint-notifications-to-telegram.html
The fifth story showed how your ESP could send alerts to Telegram. This way you can get an alert on your smart-phone or tablet whenever a temperature gets critical or a door is opened etc. Read that story here. http://lucstechblog.blogspot.com/2023/03/esp-sending-alert-to-telegram.html
There was just one thing I wanted and that is a connection between Telegram and my home automation system: Domoticz.
Domoticz to Telegram.
Actually Domoticz has a connection to Telegram.
In Domoticz you can set notifications.
Go to the last tab on your screen and choose settings (called Instellingen in Dutch).
In the settings menu choose Notifications. Here you can find the settings for all kind of notifiers. Just scroll all the way down.
There it is. Click on active (Actief) so it is checked and fill in your Telegram token which you got when you made your Telegram bot. If you not know how to get that token re-read the first story in this series. http://lucstechblog.blogspot.com/2023/01/telegram-messenger-for-iot.html
next to the token you also need the Chat ID. You can get that with the IDBot. You can read how to get the Chat ID in this story http://lucstechblog.blogspot.com/2023/03/esp-sending-alert-to-telegram.html
To copy these two codes it is more convenient to work with Telegram on your PC's screen. Read how to do that here. http://lucstechblog.blogspot.com/2023/02/convenient-working-with-telegram.html
Now press the TEST button to see if you filled in the right codes. If you filled in every thing right you would get a message on your phone in the Telegram app saying "Domoticz test message".
Now switch over to the Switches tab in Domoticz.
As you can see each switch has a Notifications button. Click on that button.
Here you can see that I activated a notification when the lamp is set ON and a notififaction when the lamp is put OFF. I also added my own text in the "Aangepast bericht" field so I would get a meaningfull text in Telegram.
In the list it shows that I only have a notification for Telegram.
That is all. Or isn't it..........
How about the other way round ???
I not only wanted to get a notification by Telegram when a lamp is switched on or off but I also wanted to set the lamp on or off with my Telegram bot. There is no solution from Domoticz for that.
We can send from Domoticz to Telegram but we can not send commands from Telegram to Domoticz.......
ESP to the rescue !!!
So I had this weird idea.
I could send commands from Telegram to my ESP, and I could send data from my ESP to Telegram. But I also can send commands from my ESP to Domoticz as these stories showed:
https://lucstechblog.blogspot.com/2020/02/esp8266-sending-data-to-domoticz.html
http://lucstechblog.blogspot.com/2020/01/sending-data-from-esp-to-domoticz-part.html
http://lucstechblog.blogspot.com/2020/01/sending-data-from-esp8266-to-domoticz.html
So why not combine these. The Idea is as folows:
Telegram sends to an ESP ==> The ESP sends to Domoticz.
Well this is a nasty solution, but as long as there is nothing else that can solve my problem this is the way it is done. I use the ESP as a bridge between Telegram and Domoticz.
ESP to Domoticz
A fast recap of the program that makes the ESP send commands to Domoticz.
First you need the ID of the switch you are going to set ON and OFF. Next you need to send a command do Domoticz that incorporates that ID.
http://192.168.1.2:8080//json.htm?type=command¶m=switchlight&idx=99&switchcmd=On
As how to do this is a story in itself I am not going to tell you here. Just re-read the story in the following link and all will be clear.
Breadboard
For completeness I show you the breadboard setup here. It is the same setup as from the previous story which you can re-read here.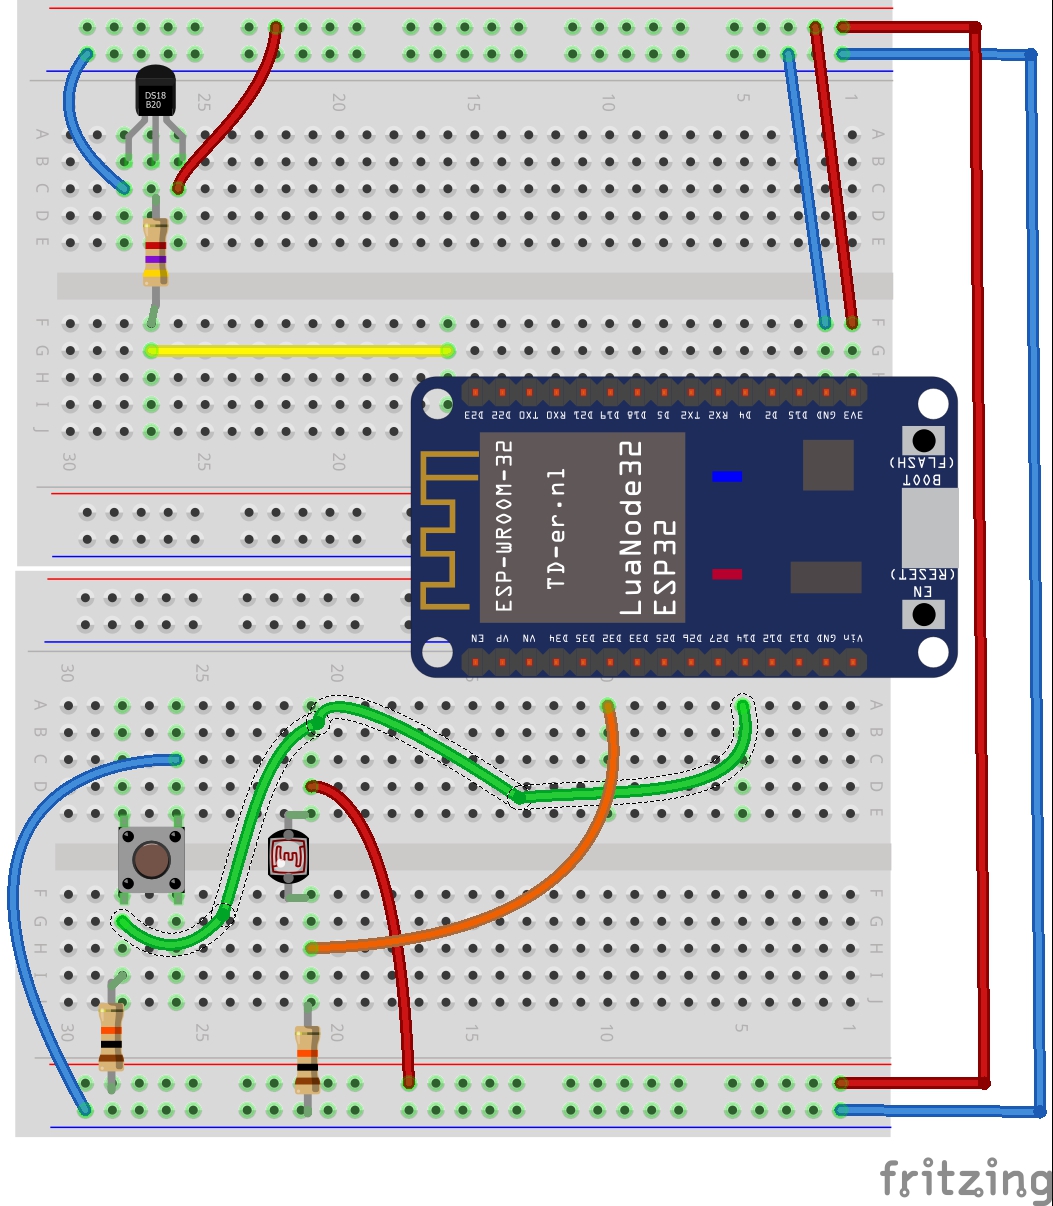
The button is attached with a 10K pull-up resistor to D14, The LDR with a 10K pull-doen resistor to pin D32 and the Dallas DS18b20with a 4.7 pull-up resistor to pin D23. Nothing we have not discussed before.
The ESP bridge program
What I am going to do is to combine the program from the Telegram to ESP stories with the ESP to Domoticz stories. All these are referenced above.
/* Adapted by: Luc Volders http://lucstechblog.blogspot.com/ */ #include <Arduino.h> #include "AsyncTelegram.h" //#include <WiFi.h> #include <HTTPClient.h> #include <DallasTemperature.h> #include <OneWire.h> # define ONE_WIRE_BUS 23 OneWire oneWire(ONE_WIRE_BUS); AsyncTelegram myBot; DallasTemperature dallas(&oneWire); float temp = 0; int button = 34; String tosend = ""; String text; const char* ssid = "ROUTERS NAME"; const char* pass = "PASSWORD"; const char* token = "TELEGRAM TOKEN"; const char* host = "192.168.1.66"; const int port = 8080; int led = LED_BUILTIN; void sendToDomoticz(String url) { HTTPClient http; Serial.print("Connecting to "); Serial.println(host); Serial.print("Requesting URL: "); Serial.println(url); http.begin(host,port,url); int httpCode = http.GET(); if (httpCode) { if (httpCode == 200) { String payload = http.getString(); Serial.println("Domoticz response "); Serial.println(payload); } } Serial.println("closing connection"); http.end(); } void setup() { // initialize the Serial Serial.begin(115200); Serial.println("Starting TelegramBot..."); WiFi.setAutoConnect(true); WiFi.mode(WIFI_STA); WiFi.begin(ssid, pass); delay(500); while (WiFi.status() != WL_CONNECTED) { Serial.print('.'); delay(500); } myBot.setUpdateTime(1000); myBot.setTelegramToken(token); Serial.print("\nTest Telegram connection... "); myBot.begin() ? Serial.println("OK") : Serial.println("Not OK"); dallas.begin(); pinMode(led, OUTPUT); digitalWrite(led, LOW); //<== high for esp8266 pinMode(14, INPUT); } void loop() { TBMessage msg; if (myBot.getNewMessage(msg)) { if (msg.text.equalsIgnoreCase("Lon")) { digitalWrite(led, HIGH); //<== low for esp8266 myBot.sendMessage(msg, "Mancave light is now ON"); String url = "/json.htm?type=command¶m=switchlight&idx="; url += String(3); url += "&switchcmd=On"; sendToDomoticz(url); } else if (msg.text.equalsIgnoreCase("Loff")) { digitalWrite(led, LOW); //<== high for ESP8266 myBot.sendMessage(msg, "Mancave light is now OFF"); String url = "/json.htm?type=command¶m=switchlight&idx="; url += String(3); url += "&switchcmd=Off"; sendToDomoticz(url); } else if (msg.text.equalsIgnoreCase("Temp")) { dallas.requestTemperatures(); Serial.print("Temperature is: "); temp=dallas.getTempCByIndex(0); Serial.println(String(temp)); tosend = "The temperature is now : "; tosend += String(temp); myBot.sendMessage(msg, tosend); } else if (msg.text.equalsIgnoreCase("LDR")) { Serial.print("The LDR's value is: "); Serial.println(analogRead(15)); tosend = "The LDR's value is : "; tosend += String(analogRead(32)); myBot.sendMessage(msg, tosend); } else { // generate the message for the sender String reply; reply = "Welcome ESP8266 number 1\n" ; reply += "You can use these commands :\n" ; reply += "============================\n\n" ; reply += ". Mancave Light on = Lon\n"; reply += ". Mancave Light off = Loff\n\n"; reply += ". What is the temperature = Temp\n"; reply += ". The light value = LDR\n"; myBot.sendMessage(msg, reply); } } if ((digitalRead(14))==0) { Serial.println("Button PRESSED"); HTTPClient http; text = "https://api.telegram.org"; text += "/bot"; text += "TELEGRAM TOKEN" text += "/sendMessage?chat_id=CHATID"; text += "&text=Button pressed"; http.begin(text); int httpCode = http.GET(); //Send the request if (httpCode > 0) { //Check the returning code String payload = http.getString(); //Get the request response payload Serial.println(payload); //Print the response payload } http.end(); //Close connection } }
As this really is a mix of previous stories I will not go into details here although there is one important thing I will show you. And beware that this is the ESP32 version. Adapting for the ESP8266 should be easy if you followed the previous stories in this series.
#include <Arduino.h>
#include "AsyncTelegram.h"
#include <HTTPClient.h>
The two libraries AsyncTelegram.h and HTTPClient.h are not exactly friends of eachother. So to make sure they do not byte eachother and crash the ESP32 we only call the HTTPClient.h library when it is needed.
void sendToDomoticz(String url)
{
HTTPClient http;
Serial.print("Connecting to ");
Serial.println(host);
Serial.print("Requesting URL: ");
Serial.println(url);
http.begin(host,port,url);
int httpCode = http.GET();
if (httpCode)
{
if (httpCode == 200)
{
String payload = http.getString();
Serial.println("Domoticz response ");
Serial.println(payload);
}
}
Serial.println("closing connection");
http.end();
}
This is the place where this happens. Here is the HTTPClient library activated and at the end de-activated with http.end(). The text this routine is sending is build in the loop.
In the loop() we had the Lon and Loff routines that in the original program activated the build-in led of the ESP. This is now changed into building the strings that are needed to set the lamp in Domoticz On or Off.
At the end of the loop there is another HTTPClient(0 routine that sends an alert to Telegram when the button is pressed.
Telegram Bot
And here you can see what will happen in the Telegram Bot screen.
Here is the start menu again. We discussed all the features in the previous entries in this series so let's concentrate on the Lon (Lamp ON) and Loff (Lamp Off) menu entries.
If you type the command Lon in the Telegram bot the build-in led of the ESP will go on, the command to set the lamp on will be send to Domoticz, Telegram will mention that the mancave light is set On and Domoticz confirms that by sending "De lamp gaat aan" to Telegram.
And the lamp in Domoticz goes On.

Typing the command Loff will do the reverse. The build-in lamp will go off, a command to set the lamp off is send to Domoticz, Telegram will mention that the mancave light has been set Off and Domoticz sends a confirmation saying "De lamp gaat uit"

Goal Achieved !!!
Now I can control my whole home automation from Telegram.
Til next time
Have fun
Luc Volders